To start, please review the Heroes & Generals [[Hardware Requirements|hardware requirements and drivers section]]. If you have any technical questions or require support, please review the [https://heroesandgenerals.com/support/ “Support” section of the forums here].
To start, please review the Heroes & Generals [[Hardware Requirements|hardware requirements and drivers section]]. If you have any technical questions or require support, please review the [https://heroesandgenerals.com/support/ “Support” section of the forums here].
For the full list of Frequently Asked Questions and other helpful information, please visit the official Heroes and Generals subforum linked [https://heroesandgenerals.com/forums/forum/45-questionsanswers/ here].
For the full list of Frequently Asked Questions and other helpful information, please visit the official Heroes and Generals subforum linked [https://heroesandgenerals.com/forums/forum/45-questionsanswers/ here].
+
==Heads-Up Display==
+
Here is a link to a [http://www.heroesandgenerals.com/community/14019/upcoming-hud-improvements news post detailing the GUI/HUD]
+
[[cs:Příručka pro nové hráče]]
+
[[de:Einsteiger Leitfaden]]
+
[[en:Getting_Started]]
+
[[es:Comenzando_a_jugar]]
+
[[fr:Guide pour bien débuter]]
+
[[pl:Getting Started/pl]]
+
[[ru:Getting Started/ru]]
+
[[pt:Getting Started/pt]]
+
[[hu:Kezdeti lépések]]
+
[[nl:Getting Started/nl]]
+
[[sh:Getting Started/sh]]
+
[[sk:Getting Started/sk]]
+
[[it:Getting Started/it]]
+
[[fi:Getting Started/fi]]|}{{tocright}}
+
'''Welcome to the Heroes & Generals (H&G) getting started guide!'''
+
Heroes & Generals consists of two major parts. One part is the ''Heroes'', a multiplayer first person shooter. The other part, ''Generals'', is a massive multiplayer real-time strategy game. This can be a lot to absorb, so this page exists to assist in the learning curve.
−
[[Category:Getting Started]]
+
The ''Generals'' part of the game requires high-ranked soldiers, so it's limited to the more experienced players. Therefore, in this tutorial, we will be focusing on the ''Heroes'' part of the game. Don’t worry though, if you follow this tutorial, you will be a General in no time!
+
+
==Getting Started==
+
<blockquote>
+
===Technical Requirements===
+
To start, please review the Heroes & Generals [[Hardware Requirements|hardware requirements and drivers section]]. If you have any technical questions or require support, please review the [https://heroesandgenerals.com/support/ “Support” section of the forums here].
Once you are sure your machine meets the necessary hardware/driver requirements, you need to register an account. Registering will give you the username and password needed to log into the game. You can [https://heroesandgenerals.com/ register by visiting this page].
+
+
</blockquote><blockquote>
+
===Downloading===
+
Now that you have registered, you need to download the game. You have two options: a stand-alone client, or Steam (a free to use digital game store).
+
* As the game runs, you will notice [[H&G Sync]], a small program that handles the files needed to play. The download size is currently around 1 Gigabyte. You will only need to download that once. After the initial download, [[H&G Sync]] will make sure that you have the right version of the game and download any future patches for you automatically.
+
<blockquote>
+
====Stand-Alone Client====
+
[http://game.heroesandgenerals.com/ Click here to download Heroes & Generals.]
+
* Once the installer is downloaded you need to run it and it will download your game and install it.
+
+
====Steam====
+
[http://store.steampowered.com/app/227940/ Click here to download Heroes & Generals] via Steam.
+
</blockquote>
+
+
===Login Screen===
+
After a successful download/patching, you will be prompted to login. Use the credentials rendered via the steps above to continue.
If you are logging in for the first time or if the war has recently ended, you will need to choose a war. At present, there is only one war. But when there are more players online, more wars will be available to join.
+
+
</blockquote>
+
+
==<big>Character Interface</big>==
+
+
Once you logged in the game and chose your first soldier, you will see main interface or "Heroes" tab which includes numerous options.
+
{| class="wikitable"
+
|-
+
|[[File:Soldier screen.jpg|400px]]
+
|}
+
Let us go through all the numbers and buttons.
+
+
# '''Bulletin'''. The most recent game news and articles are shown here.
+
# '''Notifications'''. Here you will receive important notifications: weapon repair costs, battle summary, and more.
+
# '''Messages'''. You are able to send and receive instant private messages with online players or send and receive mail that can be received even while offline. A small number on the icon will indicate any new messages received.
+
# '''Veteran membership''' status. Once you purchase [[Veteran_membership|Veteran Membership]], you will see its current status. By clicking on the line, you will receive full information about your veteran membership.
+
# '''"Heroes" and "Generals"''' tabs. As soon as you reach [[Player Level]] X (10), you will be able open the "Generals" tab which includes [[Campaign map|War map]]. More information about War - down below.
+
# '''[[Credits]]'''. Credits are the most common in-game currency earned through playing the FPS. With credits, you can purchase almost everything in the game - including new soldiers and veteran membership.
+
# '''[[Warfunds]]'''. Warfunds are the second type of in-game currency. It is earned and used in the War effort. You are able to earn Warfunds by playing War battles once you reach player level 10.
+
# '''[[Gold]]'''. This kind of currency can be purchased with real money and can be used everywhere. Also, you receive free 4 gold after finishing your first battle each day.
+
# '''[[Player Level]]'''. It displays your current [[Player Level|player level]]. The higher the level, the more game modes and soldier types available.
+
# '''Store'''. New equipment, vehicles and camouflages can be purchased in the Store.
+
# '''Options'''. Here you find all kinds of settings and helpful links.
+
# '''Faction icon'''. It displays a faction of soldier chosen. Once you unlock "factions" you will be able to scroll through soldiers of different factions by pressing the left and right arrow keys.
+
# '''[[Ranks|Rank]]'''. Current rank and progress of your soldier is shown here.
+
# '''The name of a soldier'''. You can always customize your soldier by changing his name for some [[Credits]].
+
# '''Experience'''. It displays amount of experience that your soldier needs to get new rank.
+
# '''Next rank''' shows you insignia of the next rank. You can also click on it to open "ranks" window for more information.
+
# You can switch between [[weapons]], [[vehicles]], [[camouflage]] and field gear which your soldier owns but have unequipped or can purchase.
+
# '''Equipment depot'''. Once you promote your soldier to [[General]], all his equipment will be placed here. You can spread equipment among other soldiers but they have to meet the requirements of particular equipment.
+
# By pressing these buttons you can see [[weapons]], [[badge|combat badges]], [[vehicles]], [[camouflage]] and [[Assault team|assault teams]] currently equipped on your character.
+
# '''List of soldiers''' of one faction. Here you can see all your soldiers and generals of one faction. You can enlist additional soldier by pressing on empty slot with "+" in it.
+
# '''Weapons list'''. Here you can see current set up of your soldier. You can change soldier's set up by using "drag and drop" function.
+
# '''List of equipment''' that is owned by your soldier or able to purchase.
+
# '''Ribbons'''. By playing the game, you will earn experience not only for your rank but also for your ribbons. Here, you can see the full list of ribbons you can get. You can click on the ribbons on this page to get a description of the rewards and how to level up that ribbon. Ribbons unlock a great deal of equipment for purchase.
+
# '''Next unlocks'''. By playing the game, you will unlock a lot of stuff. The closest unlocks are shown in here.
+
# '''Soldier filter'''. You can filter your soldier list to only display one type.
+
# '''Game chat'''. You can always chat with other players or create a specific chat room and use it with your friends.
+
# '''Friends'''. Every player you added to your friend list will be shown in here as well as his online status and war faction. You can also queue for a friend's battle from the friend list.
+
# '''Your squad'''. Here, you can adjust your squad and see portraits of soldiers who are currently in your squad. [[Getting Started#Squads|More information about squads]].
+
# '''Map filters'''. You can adjust map filters to join specific types of battles.
+
# '''COMBAT''' button. The main button which allows you to join battles.
+
+
==<big>Time to Squad Up and Go to Battle!</big>==
+
<big>Looking to join a battle? Click on the '''COMBAT!''' button in the bottom right corner to open the Map & Filter selection.</big>
+
{| class="wikitable"
+
|+'''<big>First Battle</big>'''
+
|
+
[[File:FirstCombat.png|none|500px|First Battle]]
+
|
+
'''1.''' There are different [[Getting Started#Game Modes|game modes]] to choose from. When you're first starting out, only the 'Encounter' game mode is available.
+
*You unlock more [[Getting Started#Game Modes|game modes]] as you level up your [[Player Level]].
+
*The first couple of battles on this map will be versus AI training bots. Once you reach [[Player Level]] 1, your opponents will be humans.
+
'''2.''' Once you press '''TO BATTLE!''' you will enter match-making.
+
|}
+
+
----
+
===Squads===
+
''More info on [[Squads]] and [[Squad Leader]].''
+
+
{| class="wikitable"
+
|+ '''<big>First Squad</big>'''
+
|
+
[[File:FirstSquad.png|none|500px|First Squad]]
+
|
+
'''1.''' Through the shield button you access the squad menu.
+
+
'''2.''' To invite friends to your squad, use the '+' symbol on the bottom or add them in the squad player list.
+
*You can only add players that are on your friend list.
+
'''3.''' Once you've gathered your friends, use the '''COMBAT!''' button to select a game mode.
+
*'''''<big>You will always be part of a squad. If you join a battle without being in one, you will be automatically matched into a random squad.</big>'''''
+
|}
+
+
====Squad Customisation====
+
A squad is the core of team work and can be customised before (but not during) a battle to fit your needs.
+
*Each of your soldiers has his own squad but can only customise it if he is '''rank 6 or higher'''.
+
*All customizations are saved and bound to the soldier with which you made them.
+
*As of now, you can only change your squad settings when having at least 1 person in it or while in match-making. This is bound to change, the date of that is unknown.
+
*For each squad member who has an active [[Veteran membership|veteran membership]], everyone in the squad gets a 5% bonus on all experience earned.
+
{| class="wikitable"
+
|
+
[[File:CustomiseSquad.png|500px|Customise Squad]]
+
|
+
'''1.''' In order to do most customisations, you need '''Squad Upgrade Points'''.
+
+
'''2.''' Inviting more than 2 friends will cost you squad upgrade points for each additional player.
+
+
'''3.''' Spending points on '''[[Getting Started#Auxiliary Seats|Auxiliary Seats]]''' allows you to use different types of soldiers during a battle.
+
+
'''4.''' For a fee, you can rename your squad. The name is saved to your soldier and is visible in the game.
+
+
'''5.''' A squad chat is automatically created to enable you to communicate with your squad members in the lobby as well as during a battle.
+
|-
+
|
+
[[File:SquadPoints.png|500px|Squad Member Ribbon]]
+
|
+
<big>'''Squad Upgrade Points'''</big>
+
+
By playing as a squad member or a squad leader you earn experience in the corresponding ribbon.
+
*A total of 12 squad upgrade points can be unlocked, 6 on each of the two ribbons.
+
*Like [[Equipment points]], squad upgrade points are not lost upon spending and can be reused.
+
|-
+
|
+
[[File:Briefing.png|500px|BattleBriefing]]
+
|
+
Upon joining a battle you have a preparation phase of 30 seconds ('''1.''') to look at the resources in battle ('''2.'''), hide the battle briefing window ('''3.''') and do last minute changes to your squad ('''4.''')(e.g. adjusting the [[Getting Started#Auxiliary Seats|auxiliary seats]]).
+
|}
+
+
====Auxiliary Seats====
+
Setting up auxiliary seats allows you to be more versatile while ingame. You can spawn a soldier of a different type than the squad type.
+
*To be able to spawn it in battle, you need to own that type of soldier as well as have the resources, or [[Assault Team|assault team]], available.
+
{| class="wikitable"
+
|
+
[[File:AuxSeat.gif|622px|Auxiliary Seats]]
+
|
+
*You can set up to 3 seats, but each seat needs 1 additional squad upgrade point.
+
*Each seat can only be taken by one person at a time. With e.g. 1 recon seat, only one of the squad members can spawn his recon soldier until he switches back to infantry.
+
*When running a special type of squad ([[Tank Crew|Armour]] squad, [[Recon soldier|Recon]] squad, [[Fighter Pilot|Fighter]] squad or [[Paratrooper soldier|Paratrooper]] squad), it is highly advised to '''always''' have an auxiliary seat to swap to infantry if necessary.
+
|}
+
+
====Squads in War====
+
In war, unlike in [[Getting Started#Staged Battles|staged battles]], you have the ability to queue up for specific battles.
+
<br />In order to do so, you have to open the [[Campaign map|war map]], look at the ongoing battles (burning cities or burning points in between cities) and discuss with your squad which one you would like to join.
+
<br />There are several criteria that have to be fulfilled to be able to join as well as a way to increase your chance of getting in. More information on that: [[Getting Started#Joining Specific War Battles|Joining Specific War Battles]]
+
+
==<big>Game Modes</big>==
+
As mentioned at the beginning of '''[[Getting_Started#Time_to_Squad_up_and_go_to_Battle.21|Time to Squad Up and Go to Battle]]''', you gradually unlock more game modes as you level up your [[Player Level]].
+
*You gain progress in the player levels by increasing your score which is done by playing the action game with any kind of soldier.
+
<br /><big>There are two categories of game modes: [[Getting Started#Staged Battles|Staged Battles]] and [[Getting Started#War Battles|War Battles]]. '''Both categories feature all game modes and all maps.'''</big>
+
*For a more detailed look at the game modes and mechanics of the Action game view the [[Action Rules]].
+
+
+
===Staged Battles===
+
{| class="wikitable"
+
|
+
[[File:StagedGM.png|500px|Staged Battles]]
+
|
+
In staged battles, every faction has exactly the same type and the same amount of resources, or [[Assault Teams|assault teams]], which resemble spawn tickets.
+
<br />Those battles are generated randomly and the resources are created and provided by the server.
+
*'''''It is highly recommended to play staged battles to get used to the game, the maps, [[weapons]], [[vehicles]], etc. before playing [[Getting Started#War Battles|war battles]].'''''
+
|}
+
+
----
+
====[[Encounter]]====
+
{| class="wikitable"
+
|
+
[[File:EncounterGM.png|500px|Encounter]]
+
|
+
Available from the very beginning ([[Player Level|player level 1]]), this fast-paced game mode is meant to introduce new players to the game.
+
*There is 1 spawn area for each team and 1 objective (Objective 01).
+
*Whichever team holds Objective A for the longest wins the battle (when the bar at the top is full).
+
*Only [[Infantryman|infantry]] may participate in this game mode.
+
*Battles last for around 10 minutes.
+
*Read more about this game mode: [[Encounter]]
+
+
Maps:
+
*[[Depot Encounter]]
+
|}
+
+
----
+
+
====[[Skirmish]]====
+
{| class="wikitable"
+
|
+
[[File:SkirmishGM.png|500px|Skirmish]]
+
|
+
Once you reach '''[[Player Level|player level 2]]''', the [[Skirmish]] game mode is permanently unlocked for your account.
+
*There is 1 spawn area for each team and 3 objectives.
+
*The goal is to hold more objectives than the other team until the bar at the top is full.
+
*The following [[Characters|soldier types]] may participate if the corresponding resources are available: [[Infantryman]], [[Tank Crew|Tank Crewman]], [[Recon soldier|Recon]] and [[Paratrooper soldier|Paratrooper]]
+
*Battles generally last for 7 - 20 minutes.
+
*Read more about this game mode: [[Skirmish]]
+
+
Maps:
+
*[[Forest Skirmish]]
+
*[[Hill Skirmish]]
+
*[[Village Skirmish]]
+
|}
+
+
----
+
====[[Assault]]====
+
{| class="wikitable"
+
|
+
[[File:AssaultGM.png|500px|Assault]]
+
|
+
Once you reach '''[[Player Level|player level 4]]''', the [[Assault]] game mode is permanently unlocked for your account.
+
<br />The goal for the attacking team is to capture all objectives (labeled with 'O').
+
<br />In order to do so, attackers have to advance from different lines. They start on an [[Access Point|access point]] and capture point after point until they are able to attack an objective. Defenders however have to hold the objective and push the attackers back.
+
<br />Usually there are 2 objectives, but the [[Airfield]] and the [[Forward Airfield]] maps have 3.
+
+
Maps:
+
*[[Airfield]]
+
*[[Factory]]
+
*[[Forward Airfield]]
+
*[[Mountain Town]]
+
*[[Town]]
+
|}
+
*The lines from which the attacking team assaults vary. In [[Getting Started#War Battles|war battles]], this depends on connections from adjoining cities to the current city (if any), and whether Assault Teams have been sent.
+
*Once a point is captured, the controlling team can spawn in a connected spawn area.
+
*Certain vehicles like tanks, [[Fighter planes|fighter planes]] and [[Infantry Support Vehicle|infantry support vehicles]] can only be spawned near an objective (e.g. 01) or an [[Access Point|access point]].
+
*If the time limit (30 minutes) runs out while one team is holding one of the objectives, the game will enter sudden death. Whichever team captures all objectives first, wins the game.
+
*Assaulting is generally harder than defending.
+
*Every [[Characters|soldier type]] may participate if the corresponding resource, or [[Assault Teams|assault team]], is available.
+
*Battles generally last for around 30 minutes.
+
*Read more about this game mode: [[Assault]]
+
+
+
----
+
+
===War Battles===
+
{| class="wikitable"
+
|
+
[[File:WarGM.png|500px|War Battles]]
+
|
+
Once you reach '''[[Player Level|player level 10]]''', the ability to join war battles is permanently unlocked for your account.
+
<br />All of the game modes and maps described above are available in war battles; However, some are more common than others (Assault on [[Town]] and [[Mountain Town]]).
+
*Because players themselves create war battles with [[Assault Team|assault teams]], every battle is different.
+
*Battles may be unfair in terms of the distribution of resources or the line of attack. Keep your chin up and make the best out of it, war is a challenge, not a vacation!
+
+
You earn +50% [[Ranks|rank experience]], +50% [[Combat Ribbons|ribbon experience]] as well as [[warfunds]] for participating in war battles.
+
<br />'''''However, it is highly recommended to play [[Getting Started#Staged Battles|staged battles]] to get used to the game, the maps, [[weapons]], [[vehicles]], etc. before playing [[Getting Started#War Battles|war battles]].''''' This way, you avoid wasting precious resources others paid for while you are acquainting yourself to the game, maps and/or weaponry.
+
|}
+
War battles are set up by players.
+
<br />Though not everyone can set up war battles, all players with a [[Player Level|player level]] of 10 or higher can join war battles.
+
*To set up a war battle, players have to send their own resources ([[Assault Team|assault teams]]) which is done on the [[Campaign map|war map]] as part of the Generals portion of Heroes & Generals.
+
*Only players with at least one soldier above level 12 can equip and deploy [[Assault Team|assault teams]].
+
*More about the Generals portion: [[Strategy Game]]
+
+
+
====Joining Specific War Battles====
+
Apart from letting the match-maker find you a battle, you are able to choose your own battles on the [[Campaign map|war map]].
+
<br />In order to do so you first have to choose a [[Factions|faction]] for which you want to fight for the duration of the current war.
+
<br />There are several conditions that have to be fulfilled to be able to queue for a specific battle:
+
{| class="wikitable"
+
|
+
[[File:QueueWarB.png|500px|Queue on War Battles]]
+
|
+
'''1.''' The available resources have to match you squad type and there have to be enough resources for the battle to be "fun" (Otherwise the battle won't start, more informations: [[Battle Director]]).
+
+
'''2.''' If you're not by yourself, you have to be the squad leader to be able to queue up.
+
+
'''3.''' If all conditions are met, you'll be able to join the battle. Otherwise a "Missing Condition"-warning will show above this button explaining you what is wrong.
+
<br />You can significantly increase your chances of getting into your desired battle if you or at least one of your squad members have at least 1 [[Assault Team]] in that battle. The bigger the total number of [[Assault Team|assault teams]] your squad has in that battle (which fit your squad type), the higher your chances of joining.
+
+
'''4.''' Check additional informations like time, weather and ping here. If ongoing battles have a high ping for you, it may impair your game experience negatively.
+
|}
+
+
=How to fight=
+
+
You shoot the enemy. You capture the objective. You coordinate with your teammates. Also, don't forget to whistle.
+
+
==Controls==
+
Here are some of the more useful controls. You might want to use these in your first battle.
+
<blockquote>
+
See also [[Action Game Controls]] - a full list of game controls.
+
+
'''Important Controls'''
+
* M = Map (right mouse click to zoom in/out). Use this to see where you are in relation to the objectives.
+
* F = Whistle (this can be used to signal teammates when on foot). You can use this to ask a teammate in a vehicle to wait for you to board.
+
* Mouse Wheel = Camera Angle / Position (used when in a vehicle)
+
* B = Binoculars (requires you to have [[binoculars]] equipped) Binoculars are used by soldiers to better survey the battlefield and help spotting enemy units.
+
</blockquote>
+
+
+
== Squad ==
+
{| class="wikitable"
+
|[[File:Heroes and Generals 08.11.2016 - 13.59.55.23.DVR.mp4 1470931938.gif|frameless|438x438px]]
+
|After joining a battle, you will be put into a [[squads|squad]]. Depending on your level and other factors, you will either be a [[Squad Leader]] or become a squad member. As a squad leader, you will be able to give orders out by pressing 'Q'. While holding 'Q', move your cursor to the desired location and press left mouse button to confirm your order. Available orders: 'Attack','Defend','Rally' or 'Clear Area'(only avilable to tankers and pilots)
+
If you would like to dismiss a squad member or leave the squad, you just need to go to the scoreboard (default 'Tab'), then either find yourself on the scoreboard then press left mouse button and select 'Leave Squad', or select the member of squad you like to dismiss, press left mouse button to dismiss the member from your squad.
+
* You can only give out orders with a soldier that is at least level 6.
+
* Additional experience are given to both squad leader and squad member(s) when orders have been executed.
+
* During the battle, you won't be able to get back into a squad after leaving a squad. For squad leader, the squad spot would be locked for the rest of the match after one of the member being dismissed. So think twice before you leave/dismiss someone from the squad.
+
|-
+
|
+
* You can also report players for any suspicious behaviour in game. 'Report' option also can be found through scoreboard.
+
|
+
|}
+
+
==Spawning==
+
You can spawn near any point your team has captured.
+
+
<br />If you like to spawn previously selected [[Getting Started|auxiliary seats]] and the desired ressource is available, you can select the auxillary seat soldier through your soldier list.
+
+
Assault Team Spawns:
+
::{| class="wikitable"
+
|
+
* [[Fighter Pilot|Pilots]] spawn in a plane.
+
* [[Paratrooper soldier|Paratroopers]] must choose a capture point as destination where their transport planes will fly to, then will spawn in the plane, and be able to jump out when it reaches the point, (or before, if needs be) unless the para planes have ran out. If the team resources have ran out of transport planes, then paratroopers will spawn the same way as regular infantry.
+
* [[Tank Crew|Tank Crewman]] can spawn in a tank near the main objective or access point, or as a passenger in a tank driven by a friendly tanker.
+
* [[Infantryman]] can spawn in an APC at any time. If you are assaulting, you can only spawn in an APC if you are on the same attacking line.
+
|[[File:Select aux.gif|frame]]Switching from infantry to tank Auxillary seat
+
|}
+
{| class="wikitable"
+
|[[File:Play under spawn protection.png|thumb|664x664px]]An infantry under spawn protection
+
|
+
*After spawning as an infantry, you will remain invulnerable inside the protecting zone until the moment you fire your weapon or leave the protecting zone.
+
+
*Also Tanks cannot spawn from every point, only the main objectives (e.g. O1, O2, O3) and access points (e.g. A1, B1, C1,)
+
*Planes can only spawn at main objective points and access points (e.g. A1, B1, C1) where they will spawn in the air behind the access point.
+
|}
+
+
==Capturing==
+
{| class="wikitable"
+
|In order to capture a point, you must be within the radius of the [[Capture Points|capture zone]] (normally within the fences,walls etc). When you get inside the capture zone, a circle with the capture point's letter and number appears on the UI, along with (a) red/blue number(s). The blue number represents the amount of friendly soldiers inside the capture point, and the red represents the amount of enemies. The higher the amount of allies you have inside the capture point (the blue number) the quicker you will capture the point. However, if there are an equal amount of allies and enemies inside the capture point, the counter will stop - it will remain at its current status. E.g. if you are attacking A3, an enemy point, and there is one enemy inside as well, the capture point status would get contested but it will remain the enemies' point. In order to capture the point, you must remain inside the point, kill any enemies inside the capture zone and defend until the circle at the top of the screen is fully surrounded by blue.
+
|[[File:Cap point.png|frame]]Capture Counter
+
* Note there's 'Attack' order above the counter, indicating the squad leader's order.
+
|-
+
|
+
*Points are needed to be captured in certain order.
+
*Team needs to follow the number order, step by step connecting all objectives towards main objectives. (O1 or O2)
+
|
+
|}
+
+
==Defending==
+
{| class="wikitable"
+
|The primary way to defend a capture point is to prevent enemies from getting into the capture zone. However, if enemies got inside the capture zone, they will start capturing the point. You need to either eliminate all enemies inside, or, get inside the capture zone to slow down enemies' capture timer and wait for reinforcements. To reward players for defending capture zones, you will receive extra 10 Exp bonus point for each opponent you eliminate inside a CONTESTED capture zone. Use cover to your advantage, setting up Anti-Personel mines or cover the entrances. Use whatever way to help you defend the capture point.
+
It is adviced to use machine guns or sub-machine guns if you are planning to defend the objectives from inside. These weapons are ideal for close quarter combat. [[Mines|Anti-personnel mines]] can be placed inside or near the entrances, but can also be placed in the direction where you expect your opponents to come from. However anti-personel mines are rather expensive to maintain. Plus you teamates can triger it as well, so use them wisely.
+
+
Also be advised that anti-tank mines will NOT be triggered by players on foot, so do not place them in buildings unless you are planning to trigger them manually by shooting at them as enemies walk by.
+
|[[File:Contested Cap.png|frame]]A capture point that is being contested
+
* Note the progression circle stays where it is due to the same amount of enemy and friendly soldiers inside the capture zone.
+
|}
+
+
==Attacking==
+
{| class="wikitable"
+
|It is important to get to know the layout of the map when attacking. There are many medical/ammo/anti-tank supply crates scattered on the battlefield (they are usually close to capture points). You're also able to equip vehicles with crates. Use them as you can. You can find out if you have any of these items nearby by pressing 'M' button to display your battlefield map. Then press zoom in (default is right mouse button) to see if there's any crates around you.
+
<br />Rushing straight towards the next objective is the quickest way to capture. However if you encounter heavy enemy fire on the way, it might be good idea to think about a flanking maneuver. Many of the maps in game allow you to flank the enemies: swimming, use other bridges or access points. Because players tend to put more attentions on direct access roads/bridges towards the objective, you may achieve unexpected result from flanking.
+
<br />When you reach the objective, you will be rewarded for each enemy you eliminate inside the contested capture zone by 10 additional exp. You will receive great amount of bonuses when you neutralize/capture objectives. You should also be advised about enemy counter attacks on your current objective. You can not capture the next objective without your current one, so always keep eyes on it and always have 2-3 players defend it.
+
<br />Close quarter weapons and grenades are very helpful for clearing an objective. Due to the enemies defending capture zones, they will have better cover advantages over you, so grenades are good ways to flush the enemy out from covers. However, grenades can damage/kill friendly troopers too. So it is not wise to throw them into an objective while it is being contested by friendly soldiers.
+
+
In short, having map awareness and a capture-oriented load-out allows you to advance along capture lines much more efficiently, hopefully leading to a victory.
+
+
For more information about maps look [[Action Game #Mission Types and Maps|here]].
+
|[[File:Map new.png|thumb|619x619px]]
+
* Little symbols on map indicate medic crates, ammo crates and anti-tank crates.
+
* The symbols are also explained in the top part of the map.
+
|}
+
+
==General strategy for infantryman==
+
+
There are different ways to play this game as infantry. As we know, infantry is the main core of an army and without it it's impossible to win whether you attack or defend.
+
<br />Condition - Capture: You can help your team by pushing with them or defending the last conquered point. Both actions are equally important because you can't capture the next point if you lose the previous one!
+
<br />If your teammates are moving forward and you stay behind camping, trying to find someone to kill, "You are not helping your team", "You are not going to get much experience, credits or points to unlock ribbons". Sometimes killing enemy soldiers is a little useful towards victory as it drains the enemy spawn tickets/lives (lives from the assault team). You do not get a lot of experience for killing soldiers (outside of a capture zone) but it does help you leveling up your gun and unlocking new guns.
+
+
Situation and Instruction: You spawn at C1 with your teammates and you have C2, C3 and C4 ahead. One guy to capture C2, the others move straight to C3. Half will guard it and the other half will fight their way to C4. This can be changed by planes and tanks, maybe easy or maybe harder.
+
<br />It's hard to see good team play. If you spot good players or squads, try to work with them.
+
+
You spawned at random spawn point and you see the road to the next capture point is blocked by heavy defense. Use any mean of transport to go around that defense to either get to the next capture point from behind or weaken their defense by taking out soldiers and vehicles (tanks, etc.).
+
+
+
+
=Tanks, Mines and Planes=
+
+
===How to deal with Tanks===
+
+
{{QNA
+
|QUESTION = What do tanks do?
+
|ANSWER = Tanks provides very safe protection to crews from gun fires. They often have very powerful cannons, which can be loaded with high-explosive shells, along with machine guns too. They can suppress infantry from distance, defend bridges, access points and eliminate vehicles but also combat enemy armors. However, a tanker's view is extremely limited due to the crew only being able to observe the surrounding environment through its scope and view port. So it is extremely easy to get flanked up close by infantry. That is why it is often advised to cover your teammate's tanks, to avoid enemies from using [[Anti-Tank Equipment|anti-tank equipment]] to destroy them.
+
}}
+
+
{{QNA
+
|QUESTION = How do I destroy a tank?
+
|ANSWER = You need [[Anti-Tank Equipment|anti-tank weaponry]] to destroy weapons. There are hand held anti-tank rocket launchers ([[Panzerfaust 60]]) scattered across all maps. There are also rocket launchers, anti-tank mines and anti-tank grenades which you can unlock and purchase to use on your soldiers. The hand greanades do NOT deal any damage to tanks and armored vehicles, including [[Infantry Support Vehicle|Armored Personel Carriers (APC)]]. So if there's an enemy tank in sight and you don't have any anti-tank weaponry at the time, do not waste your time and credits throwing hand grenades at them. Just simply mark its location by aiming at it for few seconds and let your other teamates know and deal with him or try to find anti-tank crates on the map (note: it takes around 3 shots from picked up anti-tank rocket launcher ([[Panzerfaust 60]]) to destroy a tank).
+
+
+
[[Mines|Anti-tank mines]] are best being used for defensive purpose. It only takes one single mine to kill any type of vehicle (from [[Cars]] to [[Heavy Armor Category|Heavy Tanks]]), as long as they drive right over it.
+
Note: if an Anti-tank mine explodes next to a vehicle instead of below, it only deals about a third of its damage.
+
}}
+
* Tanks rear and side armor tend to be weaker than the front armor. Weapons like Anti-Tank rocket launchers and certain Anti-Tank grenades can only penetrate certain milimeters thick armor. So it is always a good idea to approach a tank from the side or rear.
+
* Each tank has its own weakspots, try to get to know them and shot at their weakspots. It will guarantee a higher chance of penetration and let you destroy enemy armor more efficently.
+
{| class="wikitable"
+
|Tank View Port
+
|Tank Sight
+
|-
+
|[[File:M10 View port.png|frameless|391x391px]]
+
|[[File:M10 Sight.png|frameless|428x428px]]
+
|-
+
|
+
* Note how limited the vision is from inside a tank.
+
|
+
|}
+
+
=== How to place Anti-tank Mines ===
+
{| class="wikitable"
+
|It is always a good idea to place some AT mines to prevent enemies from using vehicles to transport troops to the capture points. Especially between Number 3 and Number 4 points, where distances tend to be long. AT mines can be set up at flanking points to prevent enemies from showing up at your side or rear. For example, it is always a good idea to lay down some mines at the water crossing of B line when the enemies are attacking on C line (on the [[Town]] map).
+
+
+
Place your mines in the water, under shades or on terrian that has the similar texture as your AT mines texture will prevent enemies from discovering your AT mines.
+
|[[File:AT mines being layed on Bridge.png|frameless|559x559px]]
+
|-
+
|
+
* AT mines have around 4-5 metres of explosive radius, so it is a wise idea to have at least a 4 meter gap between two mines to avoide a chain reaction which also leads to a higher cost.
+
* To cover maximum area while giving your allies chances to drove by them, lay down mines in triangle shape or 'S' shape is always a good idea.
+
|Anti-Tank Mines Being Placed on Bridge
+
* Note AT mines are being layed in the shape of 'S' and under the shade but also having some gaps between one and another.
+
|}
+
+
===How to deal with Anti-tank Mines===
+
{| class="wikitable"
+
|If you're within a 25 m radius to a friendly mine, you will see it marked as such with a red skull (see image). So do not destroy them unless they leave you no other possible way to advance (You can destroy them by shooting them). When you see friendly mines, be careful not to walk/drive over them because they will detonate and kill you. Usually, most people will lay mines in a pattern so that you can navigate around them safely.
+
<br />If you happen to spot enemy mines, disable them by shooting at them. If they are placed in shallow water, bullets may not be able to scratch them. In that case, use any kind of grenade to detonate them.
+
|}
+
+
=== How to deal with anti-personel mines ===
+
{| class="wikitable"
+
|Noob
+
[[File:AP mines.gif|frameless|452x452px]]
+
|Anti-personel (AP) mines have much smaller explosive radius and only deal damage to soldiers. The trigger distance of AP mines are 2 metres, so if you like to squeeze by an AP mine, bare in mind to keep at least 3 metres distance between your soldier and the mine. TRY NOT TO DESTROY FRIENDLY MINES!! AP mines are very expensive to use, so do not shoot them unless you have been trapped and have no choices at all.
+
AP mines are small and can be difficult to discover, but it is still possible to look out for them. Placing down AP mines next to the door, down at corner of stairs or other more hidden spaces will minimise the chance of them being spotted by the enemies.
+
<br />AP Mines are extremly expensive at around 1k credits for each mine you place!
+
|-
+
|Setting up AP mines inside the Capture point
+
* Note the AP mine is being set up by the door step instead of right at the entrance.
+
|
+
|}
+
+
===How to deal with Planes===
+
+
{{QNA
+
|QUESTION = Why am I blown to smithereens by planes all the time?
+
|ANSWER = Planes often have the altitude advantage, so they tend to have a great overview of the battlefield. They can easily pick out the targets to destroy. However, they do have their own limitation too - weather, trees, houses and also very loud engine noises. So, it is not difficult guess a plane's action.
+
<br/>Use [[Anti-Air Guns]] on map to counter planes. You may not be able to take down planes all the time but by using AA guns (which can be found near most of the main objectives and some capture points) you can put more pressures on enemy pilots, force them to change there tactics and also make them be more cautious about their strikes. Forcing them to repair can be better than destroying an aircraft as it takes more time before they can get back up in the air.
+
}}
+
* Use trees to cover your advances. Roads are easier for vehicles but good pilots will always spot you on a road
+
* Get into cover when you hear the plane's engine sound getting closer
+
* Use flanking manuvour to avoid being seen
+
+
=A successful career=
+
<big>Different Soldiers</big>
+
+
The game has a variety of classes, which you can see in the picture below. This section covers the main roles of each class and some player-made variations that are common.
+
+
{| class="wikitable"
+
|-
+
| [[File:CN7HQtt (1).png|400px]] ||
+
In Heroes and Generals it is better to have many different soldiers with diverse equipment sets rather than one soldier with everything, as you progress through the game you build your characters for suitable roles or your particular play-style.
+
+
*Infantry is a flexible class and it is possible to have many different loadouts focused around close quarters combat, long range and anti-tank roles.
+
*You probably won't need more than one tanker per faction.
+
*Recon is a fairly basic class focused around bolt-action rifles, you won't need to make multiple of them for now.
+
*Paratroopers can be given diverse loadouts (including anti-tank), though they are limited by fewer equipment points.
+
*As a pilot you could have one plane fitted with high explosive shells and another crew with armour piercing.
+
*Different classes have different rank insignia as seen next to the character icon.
+
|}
+
+
<big>Player level</big>
+
+
{| class="wikitable"
+
|-
+
| [[File:PlayerLevel.png]]
+
With the new Player level system you can earn quite a bit of [[Gold]], [[Credits]] and [[Warfunds]]. For more Information: [[Player Level]]
+
+
+
+
<big>Money Making</big>
+
+
[[File:money making.PNG|400px]]
+
+
There are a lot of ways to earn [[credits]] in the game but the best class is usually infantry due to their flexible approach to capturing objectives and destroying vehicles.
+
+
<big>Credits</big>
+
+
*If you are trying to earn credits make sure to use as few modifications as possible on your guns to make the most credits.
+
*Anti-tank roles are a good way to make credits, but be careful as using anti-tank weapons ineffectively can cost you!
+
*The higher rank you are the more credits you will earn, so using more experienced soldiers can help you buy equipment for your newer characters.
+
*As a beginner, you primary income most likely will be from your rank salary. Rank salary is measured by the hour and earned by total time spent alive in each game.
+
*Capturing objectives and getting kills will earn you more money as well.
+
*Getting more credits is also based on your [[Score]] ingame ex. you can get alot of score by capturing.
+
+
'''If you decide to equip scopes on any of your guns keep in mind they are fairly expensive to maintain, so make each shot count'''
+
+
<big>Warfunds</big>
+
+
*[[Warfunds]] can be earned by commanding your troops in combat on the war map (General's tab in the menu).
+
*You can earn them by playing war battles and destroying high value targets such as tanks, planes and other vehicles.
+
+
+
<big>Gold</big>
+
+
*[[Gold]] is the premium currency in Heroes and Generals and can be bought through the store.
+
*Once per day, you can earn 4 gold for simply participating in a battle.
+
*Sometimes gold is given during giveaways or during special events, so check you inbox!
+
+
[[Ranks | You can read more information about ranks and salary here.]]
+
+
=Infantry=
+
+
Infantry is the backbone of any army and is always used in larger quantities than any other class in the game.
+
Infantry has access to a very big variety of weapons and vehicles, so you always have different choices in terms of how you want to make that particular infantry character as you should make many of them for different roles (anti-tank, infantry sniper). You have a lot of possibilities with loadouts as well. Essentially, infantry does pretty much everything from defending objectives to attacking them, though always infantry will win the matches not any other class.
+
+
{| class="wikitable"
+
|-
+
| [[File:infantry wiki.PNG|600px]] ||
+
*Buy and use the different infantry soldiers for different purposes because when you are in the game you can switch between those characters for what situation you need.
+
*Always make sure to have at least one infantry soldier available to you. (If you branch out to other classes).
+
*Even though infantry only starts with a simple Semi-Auto rifle, do not be discouraged by this as it is a powerful weapon when modified with proper ammo or the scout 2 barrel - increasing the damage enough for the gun to be able to 2 hit kill anyone!
+
*As you can see from the picture, infantry and any class in the game can be bought as Lieutenant (Level 12) or as Major (Level 15).
+
+
|}
+
+
==Tank crewman==
+
+
Tank crewman's task is to support the infantry's advance, but a tanker's main objective always is to destroy other tanks in the battlefield and then support his team's infantry. As a tank crewman, you should always consider having a wrench with you to repair your tank and a pistol, later, on, to defend yourself from those people who want to destroy your tanks. Try to learn different tanks exports while you are in battles.
+
+
{| class="wikitable"
+
|-
+
| [[File:tanker wiki.PNG|600px]] ||
+
*Tank crewman should always carry a wrench if possible to repair the tank.
+
*Tank crewman's primary objective is to destroy other tank's
+
*Binocular's can be helpful to a tanker to locate very long range target's
+
*Carrying a pistol might be helpful if someone tries to destroy your tank or if you need to defend yourself.
+
*You can press the space bar once while aiming at target's to auto adjust your range.
+
*Also note that different type's of tanks are good in different thing's, such as a tank destroyer is good at destroying tanks but it has a harder time helping infantry.
+
|}
+
+
==Fighter Pilot==
+
+
+
Fighter pilots essentially have the same job as a tank crewman would have. Their main objective is to destroy enemy planes first, then provide air support for the advancing infantry. It is recommended as well to carry a wrench on your pilot. Do not be discouraged by how hard it is to learn to fly at first you really have to give it time.
+
+
+
+
Your plane has a choice of using High Explosive rounds or the Armour-piercing, composite rigid ammunition. Now, the high explosive rounds are best used for ground targets and supporting infantry, but the armour piercing are more effective against the planes and the tanks on the ground. But, don't worry, you will always have your normal Machine gun on your plane with 1000 rounds to shoot down other planes.
+
+
{| class="wikitable"
+
|-
+
| [[File:fighter pilot wiki.PNG|600px]] ||
+
+
*It is useful to carry a wrench as pilot to land and repair your plane after taking damage make sure to find a nice open spot for getting back into the air.
+
*By pressing (Shift) in-game you can use the debug controls to fly more smoothly!
+
*Having a sidearm sometimes can prove very useful to you if you happen to jump out of your plane to the ground.
+
*You have a choice between Armour-piercing, composite rigid or the High explosive ammunition on your plane.
+
+
|}
+
+
<big>Controls and Throttle More in depth</big>
+
+
{| class="wikitable"
+
|-
+
| [[File:plane modes.PNG|400px]] ||
+
*As a fighter pilot you have three options for controls.
+
*First control mode is controlling the plane by the camera itself
+
*Second is controlling the plane by the crosshair (Note that both of these modes use the mouse to control the planes direction)
+
*The third is the classic mode which is used by pressing shift to use debug controls to move smoothly when turning, allowing very much precisely to do what you want.
+
|}
+
+
{| class="wikitable"
+
|-
+
| [[File:throttle modes planes.PNG|400px]] ||
+
*Fighter pilots also have three different options for throttle.
+
*First option for throttle is automatic which automaticly always goes back to the optimal speed for the plane.
+
*Second option is the step mode which simply allows you to press W and S to go lower or faster in speed but in certain steps.
+
*Third option is the smooth option which allows you to just press W and S to smoothly go up and down in the throttle allowing you to completely choose your speed how you want it.
+
|}
+
+
==Paratrooper==
+
+
Paratroopers are light infantry that jumps from the transport planes to objectives to capture them and then essentially defend and move to the next objectives. Paratroopers have some special equipment depending on what faction you're playing in the game.
+
+
{| class="wikitable"
+
|-
+
| [[File:Paratrooper wiki.PNG|600px]] ||
+
*You can make multiple paratroopers to give them different loadouts depending if you need something like anti-tank.
+
*Paratroopers can use a badge called free fall to choose freely when they want to deploy their chute.
+
*Paratroopers have special weapons such as [[FG42 Ausf. E|Fallschimjägergewehr 42]] and [[M1_Carbine|M1 Carbine]] , [[M1A1_Carbine|M1A1 Carbine]].
+
*Paratroopers can be either grounded paratroopers or in the air using their transport planes.
+
|}
+
+
==Recon==
+
+
Recon's job in the game is to try and spot enemies for his team and hold down areas if possible with his sniper rifle and the [[Unertl|8x Unertl scope]]. As recon, remember to relocate often after killing enemies because they will try to hunt you down.
+
+
{| class="wikitable"
+
|-
+
| [[File:recon wiki.PNG|600px]] ||
+
Keep in mind if you buy an academy trained recon, it only comes with the lower zoom scope to start. Ranking up the Bolt action rifle specialist ribbons will get you to the one hit kill modding capabilities and the better scopes.
+
+
*Carrying sidearm is useful as recon too.
+
*Switch positions often if you kill a lot of enemies they will try to hunt you down
+
*The 8x scopes are expensive to repair. Keep that in mind when shooting!
+
*Don't forget to spot enemies for your team if you can!
+
*Use your camoflage to your advantage when hiding from people it is effective.
+
*Recon has access to special infantry fighting vehicles such as [[Sonderkraftfahrzeug_222|Sonderkraftfahrzeug 222]] , [[M8_Greyhound|M8 Greyhound]] , [[GAZ_BA-64|GAZ BA-64]] and [[BA-6|BA-6]]
+
+
|}
+
+
=Tips=
+
+
===Overall Tips===
+
*Simply Enter Battle and let the fun begin! From the get-go, your Infantryman will be equipped with your chosen faction's unique semi-automatic rifle. It can be a very powerful weapon and here are [https://heroesandgenerals.com/2016/10/five-tips-to-improve-your-starter-weapon/ 5 Tips on how to get the most out of your Semi-Auto Weapon] from Reto.Circinus.
+
*Each Hero can be a different adventure. On your way, you will unlock exciting new modifications, weapons, and vehicles - each with their own unique advantages and disadvantages. You can even develop special abilities with badges to enhance your Heroes. The choice is yours!
+
*The in-game Economy in Heroes and Generals is an important and valuable aspect of the game. Everything (except Warbonds) has been made purchasable with in-game credits so nothing is locked behind a pay-wall beyond your reach. Keep in mind that higher ranked soldiers earn a greater base salary and that your actions in-game influence the credits you will earn as well as the credits you will use to repair your equipment. For example, capturing objectives will earn you more credits while over-usage of explosives and modified equipment can cost you in repairs.
+
*The base salary only applies when you are active in a battle. So, being AFK or unhelpful in a game is not only hurting your team, you'll be missing out on credits you could have been earning by being active and helpful to your team.
+
*Pricier items are not necessarily upgrades over more affordable items. Each different item you acquire on your journey adds diversity and adaptability to your game play.
+
*For more information on how to make credits, take a look at [https://heroesandgenerals.com/2016/10/five-tips-to-gain-credits/ these 5 helpful tips] from Reto.Circinus!
+
*Just because Specialist Classes are unlocked at a higher Player Level, it does not necessarily mean they are more powerful than Infantry in every way. You will need to learn what classes are best used in what situations, how to use each class, and adjust accordingly.
+
*Once you enter battle, you will only have access to the weapons currently equipped on each of the characters you entered the battle with. Therefore, it can also be beneficial in the long run to create multiple characters of the same class with different loadouts so that you are able to adjust on the fly depending on the situation.
+
*Here are [https://heroesandgenerals.com/2016/10/five-tips-on-getting-started-in-heroes-generals/ a few more helpful tips for Getting Started] from the great Reto.Circinus.
+
+
===Gameplay Tips===
+
*When moving from one objective to the other, it could be beneficial to avoid high-traffic areas that may have anti-[[Vehicles|vehicle]] mines, or may be in the sights of a [[Tank|tank]] or [[Recon]].
+
*Do not wait too long for people to get onto a single jeep. [[Airplanes]] will target [[Vehicles]] with large amounts of people!
+
*The best way to get onto vehicles (even while moving at high speeds) is to Jump and spam E(or your 'Use' key) as they're passing by. With some practice, you can get into fast moving vehicles very effectively.
+
*Make friends and use them. A team of six uncoordinated people with every resource can easily be beaten by a team of six coordinated people with nothing.
+
*After capturing a point, avoid simply moving on to the next one. Enemies may contest your point, which can ruin your progress.
+
*Become familiarized with the weapons that work well in certain situations.
+
*Use [[Combat Badge|combat badges]] that compliment your play style - don't equip a [[Nimble]] badge if you aren't sneaking up on anyone!
+
*Do not throw anti-personnel grenades at tanks - it doesn't damage them, but they will be alerted to your position.
+
*Swimming is a time-heavy endeavor, and can put you in risky situations. Only swim if you have to, or find another way to cross water. You can also use an amphibious vehicle to get several teammates across for a coordinated flanking effort.
+
*Don't stand on top of or next to enemy tanks being targeted by friendly [[Airplanes]] or friendly [[Tank|Tanks]], or you may be [[teamkilling|teamkilled]]!
+
*Use transport vehicles to speed up movement of the team.
+
*When using a [[Vehicles|Vehicle]], add [[Supply Crates]] to help your team deal with [[Tank|Tanks]] or infantry!
+
*Utilize the [[Bicycle]], a free and common transport method. If you are deep in enemy territory, you can't spawn in a vehicle. So, take one and ride away!
+
*When in any vehicle, press CTRL (or whatever key is bound for Crouching) to duck from enemy fire. Keep in mind, however, if you are in a turret you cannot fire, nor can you enter third person.
+
+
: More tips can be found '''[[Tips|Here]]'''
+
+
==Frequently Asked Questions and Other Helpful Information==
+
+
For the full list of Frequently Asked Questions and other helpful information, please visit the official Heroes and Generals subforum linked [https://heroesandgenerals.com/forums/forum/45-questionsanswers/ here].
==Heads-Up Display==
==Heads-Up Display==
Here is a link to a [http://www.heroesandgenerals.com/community/14019/upcoming-hud-improvements news post detailing the GUI/HUD]
Here is a link to a [http://www.heroesandgenerals.com/community/14019/upcoming-hud-improvements news post detailing the GUI/HUD]
Welcome to the Heroes & Generals (H&G) getting started guide!
Heroes & Generals consists of two major parts. One part is the Heroes, a multiplayer first person shooter. The other part, Generals, is a massive multiplayer real-time strategy game. This can be a lot to absorb, so this page exists to assist in the learning curve.
The Generals part of the game requires high-ranked soldiers, so it's limited to the more experienced players. Therefore, in this tutorial, we will be focusing on the Heroes part of the game. Don’t worry though, if you follow this tutorial, you will be a General in no time!
Once you are sure your machine meets the necessary hardware/driver requirements, you need to register an account. Registering will give you the username and password needed to log into the game. You can register by visiting this page.
Downloading
Now that you have registered, you need to download the game. You have two options: a stand-alone client, or Steam (a free to use digital game store).
As the game runs, you will notice H&G Sync, a small program that handles the files needed to play. The download size is currently around 1 Gigabyte. You will only need to download that once. After the initial download, H&G Sync will make sure that you have the right version of the game and download any future patches for you automatically.
After a successful download/patching, you will be prompted to login. Use the credentials rendered via the steps above to continue.
War Selection
If you are logging in for the first time or if the war has recently ended, you will need to choose a war. At present, there is only one war. But when there are more players online, more wars will be available to join.
Character Interface
Once you logged in the game and chose your first soldier, you will see main interface or "Heroes" tab which includes numerous options.
Let us go through all the numbers and buttons.
Bulletin. The most recent game news and articles are shown here.
Notifications. Here you will receive important notifications: weapon repair costs, battle summary, and more.
Messages. You are able to send and receive instant private messages with online players or send and receive mail that can be received even while offline. A small number on the icon will indicate any new messages received.
Veteran membership status. Once you purchase Veteran Membership, you will see its current status. By clicking on the line, you will receive full information about your veteran membership.
"Heroes" and "Generals" tabs. As soon as you reach Player Level X (10), you will be able open the "Generals" tab which includes War map. More information about War - down below.
Credits. Credits are the most common in-game currency earned through playing the FPS. With credits, you can purchase almost everything in the game - including new soldiers and veteran membership.
Warfunds. Warfunds are the second type of in-game currency. It is earned and used in the War effort. You are able to earn Warfunds by playing War battles once you reach player level 10.
Gold. This kind of currency can be purchased with real money and can be used everywhere. Also, you receive free 4 gold after finishing your first battle each day.
Player Level. It displays your current player level. The higher the level, the more game modes and soldier types available.
Store. New equipment, vehicles and camouflages can be purchased in the Store.
Options. Here you find all kinds of settings and helpful links.
Faction icon. It displays a faction of soldier chosen. Once you unlock "factions" you will be able to scroll through soldiers of different factions by pressing the left and right arrow keys.
Rank. Current rank and progress of your soldier is shown here.
The name of a soldier. You can always customize your soldier by changing his name for some Credits.
Experience. It displays amount of experience that your soldier needs to get new rank.
Next rank shows you insignia of the next rank. You can also click on it to open "ranks" window for more information.
You can switch between weapons, vehicles, camouflage and field gear which your soldier owns but have unequipped or can purchase.
Equipment depot. Once you promote your soldier to General, all his equipment will be placed here. You can spread equipment among other soldiers but they have to meet the requirements of particular equipment.
List of soldiers of one faction. Here you can see all your soldiers and generals of one faction. You can enlist additional soldier by pressing on empty slot with "+" in it.
Weapons list. Here you can see current set up of your soldier. You can change soldier's set up by using "drag and drop" function.
List of equipment that is owned by your soldier or able to purchase.
Ribbons. By playing the game, you will earn experience not only for your rank but also for your ribbons. Here, you can see the full list of ribbons you can get. You can click on the ribbons on this page to get a description of the rewards and how to level up that ribbon. Ribbons unlock a great deal of equipment for purchase.
Next unlocks. By playing the game, you will unlock a lot of stuff. The closest unlocks are shown in here.
Soldier filter. You can filter your soldier list to only display one type.
Game chat. You can always chat with other players or create a specific chat room and use it with your friends.
Friends. Every player you added to your friend list will be shown in here as well as his online status and war faction. You can also queue for a friend's battle from the friend list.
Your squad. Here, you can adjust your squad and see portraits of soldiers who are currently in your squad. More information about squads.
Map filters. You can adjust map filters to join specific types of battles.
COMBAT button. The main button which allows you to join battles.
Time to Squad Up and Go to Battle!
Looking to join a battle? Click on the COMBAT! button in the bottom right corner to open the Map & Filter selection.
First Battle
1. There are different game modes to choose from. When you're first starting out, only the 'Encounter' game mode is available.
1. Through the shield button you access the squad menu.
2. To invite friends to your squad, use the '+' symbol on the bottom or add them in the squad player list.
You can only add players that are on your friend list.
3. Once you've gathered your friends, use the COMBAT! button to select a game mode.
You will always be part of a squad. If you join a battle without being in one, you will be automatically matched into a random squad.
Squad Customisation
A squad is the core of team work and can be customised before (but not during) a battle to fit your needs.
Each of your soldiers has his own squad but can only customise it if he is rank 6 or higher.
All customizations are saved and bound to the soldier with which you made them.
As of now, you can only change your squad settings when having at least 1 person in it or while in match-making. This is bound to change, the date of that is unknown.
For each squad member who has an active veteran membership, everyone in the squad gets a 5% bonus on all experience earned.
1. In order to do most customisations, you need Squad Upgrade Points.
2. Inviting more than 2 friends will cost you squad upgrade points for each additional player.
3. Spending points on Auxiliary Seats allows you to use different types of soldiers during a battle.
4. For a fee, you can rename your squad. The name is saved to your soldier and is visible in the game.
5. A squad chat is automatically created to enable you to communicate with your squad members in the lobby as well as during a battle.
Squad Upgrade Points
By playing as a squad member or a squad leader you earn experience in the corresponding ribbon.
A total of 12 squad upgrade points can be unlocked, 6 on each of the two ribbons.
Like Equipment points, squad upgrade points are not lost upon spending and can be reused.
Upon joining a battle you have a preparation phase of 30 seconds (1.) to look at the resources in battle (2.), hide the battle briefing window (3.) and do last minute changes to your squad (4.)(e.g. adjusting the auxiliary seats).
Auxiliary Seats
Setting up auxiliary seats allows you to be more versatile while ingame. You can spawn a soldier of a different type than the squad type.
To be able to spawn it in battle, you need to own that type of soldier as well as have the resources, or assault team, available.
You can set up to 3 seats, but each seat needs 1 additional squad upgrade point.
Each seat can only be taken by one person at a time. With e.g. 1 recon seat, only one of the squad members can spawn his recon soldier until he switches back to infantry.
When running a special type of squad (Armour squad, Recon squad, Fighter squad or Paratrooper squad), it is highly advised to always have an auxiliary seat to swap to infantry if necessary.
Squads in War
In war, unlike in staged battles, you have the ability to queue up for specific battles.
In order to do so, you have to open the war map, look at the ongoing battles (burning cities or burning points in between cities) and discuss with your squad which one you would like to join.
There are several criteria that have to be fulfilled to be able to join as well as a way to increase your chance of getting in. More information on that: Joining Specific War Battles
You gain progress in the player levels by increasing your score which is done by playing the action game with any kind of soldier.
There are two categories of game modes: Staged Battles and War Battles. Both categories feature all game modes and all maps.
For a more detailed look at the game modes and mechanics of the Action game view the Action Rules.
Staged Battles
In staged battles, every faction has exactly the same type and the same amount of resources, or assault teams, which resemble spawn tickets.
Those battles are generated randomly and the resources are created and provided by the server.
It is highly recommended to play staged battles to get used to the game, the maps, weapons, vehicles, etc. before playing war battles.
Encounter
Available from the very beginning (player level 1), this fast-paced game mode is meant to introduce new players to the game.
There is 1 spawn area for each team and 1 objective (Objective 01).
Whichever team holds Objective A for the longest wins the battle (when the bar at the top is full).
Once you reach player level 4, the Assault game mode is permanently unlocked for your account.
The goal for the attacking team is to capture all objectives (labeled with 'O').
In order to do so, attackers have to advance from different lines. They start on an access point and capture point after point until they are able to attack an objective. Defenders however have to hold the objective and push the attackers back.
Usually there are 2 objectives, but the Airfield and the Forward Airfield maps have 3.
The lines from which the attacking team assaults vary. In war battles, this depends on connections from adjoining cities to the current city (if any), and whether Assault Teams have been sent.
Once a point is captured, the controlling team can spawn in a connected spawn area.
If the time limit (30 minutes) runs out while one team is holding one of the objectives, the game will enter sudden death. Whichever team captures all objectives first, wins the game.
Assaulting is generally harder than defending.
Every soldier type may participate if the corresponding resource, or assault team, is available.
Once you reach player level 10, the ability to join war battles is permanently unlocked for your account.
All of the game modes and maps described above are available in war battles; However, some are more common than others (Assault on Town and Mountain Town).
Because players themselves create war battles with assault teams, every battle is different.
Battles may be unfair in terms of the distribution of resources or the line of attack. Keep your chin up and make the best out of it, war is a challenge, not a vacation!
You earn +50% rank experience, +50% ribbon experience as well as warfunds for participating in war battles.
However, it is highly recommended to play staged battles to get used to the game, the maps, weapons, vehicles, etc. before playing war battles. This way, you avoid wasting precious resources others paid for while you are acquainting yourself to the game, maps and/or weaponry.
War battles are set up by players.
Though not everyone can set up war battles, all players with a player level of 10 or higher can join war battles.
To set up a war battle, players have to send their own resources (assault teams) which is done on the war map as part of the Generals portion of Heroes & Generals.
Only players with at least one soldier above level 12 can equip and deploy assault teams.
Apart from letting the match-maker find you a battle, you are able to choose your own battles on the war map.
In order to do so you first have to choose a faction for which you want to fight for the duration of the current war.
There are several conditions that have to be fulfilled to be able to queue for a specific battle:
1. The available resources have to match you squad type and there have to be enough resources for the battle to be "fun" (Otherwise the battle won't start, more informations: Battle Director).
2. If you're not by yourself, you have to be the squad leader to be able to queue up.
3. If all conditions are met, you'll be able to join the battle. Otherwise a "Missing Condition"-warning will show above this button explaining you what is wrong.
You can significantly increase your chances of getting into your desired battle if you or at least one of your squad members have at least 1 Assault Team in that battle. The bigger the total number of assault teams your squad has in that battle (which fit your squad type), the higher your chances of joining.
4. Check additional informations like time, weather and ping here. If ongoing battles have a high ping for you, it may impair your game experience negatively.
How to fight
You shoot the enemy. You capture the objective. You coordinate with your teammates. Also, don't forget to whistle.
Controls
Here are some of the more useful controls. You might want to use these in your first battle.
M = Map (right mouse click to zoom in/out). Use this to see where you are in relation to the objectives.
F = Whistle (this can be used to signal teammates when on foot). You can use this to ask a teammate in a vehicle to wait for you to board.
Mouse Wheel = Camera Angle / Position (used when in a vehicle)
B = Binoculars (requires you to have binoculars equipped) Binoculars are used by soldiers to better survey the battlefield and help spotting enemy units.
Squad
After joining a battle, you will be put into a squad. Depending on your level and other factors, you will either be a Squad Leader or become a squad member. As a squad leader, you will be able to give orders out by pressing 'Q'. While holding 'Q', move your cursor to the desired location and press left mouse button to confirm your order. Available orders: 'Attack','Defend','Rally' or 'Clear Area'(only avilable to tankers and pilots)
If you would like to dismiss a squad member or leave the squad, you just need to go to the scoreboard (default 'Tab'), then either find yourself on the scoreboard then press left mouse button and select 'Leave Squad', or select the member of squad you like to dismiss, press left mouse button to dismiss the member from your squad.
You can only give out orders with a soldier that is at least level 6.
Additional experience are given to both squad leader and squad member(s) when orders have been executed.
During the battle, you won't be able to get back into a squad after leaving a squad. For squad leader, the squad spot would be locked for the rest of the match after one of the member being dismissed. So think twice before you leave/dismiss someone from the squad.
You can also report players for any suspicious behaviour in game. 'Report' option also can be found through scoreboard.
Spawning
You can spawn near any point your team has captured.
If you like to spawn previously selected auxiliary seats and the desired ressource is available, you can select the auxillary seat soldier through your soldier list.
Paratroopers must choose a capture point as destination where their transport planes will fly to, then will spawn in the plane, and be able to jump out when it reaches the point, (or before, if needs be) unless the para planes have ran out. If the team resources have ran out of transport planes, then paratroopers will spawn the same way as regular infantry.
Tank Crewman can spawn in a tank near the main objective or access point, or as a passenger in a tank driven by a friendly tanker.
Infantryman can spawn in an APC at any time. If you are assaulting, you can only spawn in an APC if you are on the same attacking line.
Switching from infantry to tank Auxillary seat
An infantry under spawn protection
After spawning as an infantry, you will remain invulnerable inside the protecting zone until the moment you fire your weapon or leave the protecting zone.
Also Tanks cannot spawn from every point, only the main objectives (e.g. O1, O2, O3) and access points (e.g. A1, B1, C1,)
Planes can only spawn at main objective points and access points (e.g. A1, B1, C1) where they will spawn in the air behind the access point.
Capturing
In order to capture a point, you must be within the radius of the capture zone (normally within the fences,walls etc). When you get inside the capture zone, a circle with the capture point's letter and number appears on the UI, along with (a) red/blue number(s). The blue number represents the amount of friendly soldiers inside the capture point, and the red represents the amount of enemies. The higher the amount of allies you have inside the capture point (the blue number) the quicker you will capture the point. However, if there are an equal amount of allies and enemies inside the capture point, the counter will stop - it will remain at its current status. E.g. if you are attacking A3, an enemy point, and there is one enemy inside as well, the capture point status would get contested but it will remain the enemies' point. In order to capture the point, you must remain inside the point, kill any enemies inside the capture zone and defend until the circle at the top of the screen is fully surrounded by blue.
Capture Counter
Note there's 'Attack' order above the counter, indicating the squad leader's order.
Points are needed to be captured in certain order.
Team needs to follow the number order, step by step connecting all objectives towards main objectives. (O1 or O2)
Defending
The primary way to defend a capture point is to prevent enemies from getting into the capture zone. However, if enemies got inside the capture zone, they will start capturing the point. You need to either eliminate all enemies inside, or, get inside the capture zone to slow down enemies' capture timer and wait for reinforcements. To reward players for defending capture zones, you will receive extra 10 Exp bonus point for each opponent you eliminate inside a CONTESTED capture zone. Use cover to your advantage, setting up Anti-Personel mines or cover the entrances. Use whatever way to help you defend the capture point.
It is adviced to use machine guns or sub-machine guns if you are planning to defend the objectives from inside. These weapons are ideal for close quarter combat. Anti-personnel mines can be placed inside or near the entrances, but can also be placed in the direction where you expect your opponents to come from. However anti-personel mines are rather expensive to maintain. Plus you teamates can triger it as well, so use them wisely.
Also be advised that anti-tank mines will NOT be triggered by players on foot, so do not place them in buildings unless you are planning to trigger them manually by shooting at them as enemies walk by.
A capture point that is being contested
Note the progression circle stays where it is due to the same amount of enemy and friendly soldiers inside the capture zone.
Attacking
It is important to get to know the layout of the map when attacking. There are many medical/ammo/anti-tank supply crates scattered on the battlefield (they are usually close to capture points). You're also able to equip vehicles with crates. Use them as you can. You can find out if you have any of these items nearby by pressing 'M' button to display your battlefield map. Then press zoom in (default is right mouse button) to see if there's any crates around you.
Rushing straight towards the next objective is the quickest way to capture. However if you encounter heavy enemy fire on the way, it might be good idea to think about a flanking maneuver. Many of the maps in game allow you to flank the enemies: swimming, use other bridges or access points. Because players tend to put more attentions on direct access roads/bridges towards the objective, you may achieve unexpected result from flanking.
When you reach the objective, you will be rewarded for each enemy you eliminate inside the contested capture zone by 10 additional exp. You will receive great amount of bonuses when you neutralize/capture objectives. You should also be advised about enemy counter attacks on your current objective. You can not capture the next objective without your current one, so always keep eyes on it and always have 2-3 players defend it.
Close quarter weapons and grenades are very helpful for clearing an objective. Due to the enemies defending capture zones, they will have better cover advantages over you, so grenades are good ways to flush the enemy out from covers. However, grenades can damage/kill friendly troopers too. So it is not wise to throw them into an objective while it is being contested by friendly soldiers.
In short, having map awareness and a capture-oriented load-out allows you to advance along capture lines much more efficiently, hopefully leading to a victory.
Little symbols on map indicate medic crates, ammo crates and anti-tank crates.
The symbols are also explained in the top part of the map.
General strategy for infantryman
There are different ways to play this game as infantry. As we know, infantry is the main core of an army and without it it's impossible to win whether you attack or defend.
Condition - Capture: You can help your team by pushing with them or defending the last conquered point. Both actions are equally important because you can't capture the next point if you lose the previous one!
If your teammates are moving forward and you stay behind camping, trying to find someone to kill, "You are not helping your team", "You are not going to get much experience, credits or points to unlock ribbons". Sometimes killing enemy soldiers is a little useful towards victory as it drains the enemy spawn tickets/lives (lives from the assault team). You do not get a lot of experience for killing soldiers (outside of a capture zone) but it does help you leveling up your gun and unlocking new guns.
Situation and Instruction: You spawn at C1 with your teammates and you have C2, C3 and C4 ahead. One guy to capture C2, the others move straight to C3. Half will guard it and the other half will fight their way to C4. This can be changed by planes and tanks, maybe easy or maybe harder.
It's hard to see good team play. If you spot good players or squads, try to work with them.
You spawned at random spawn point and you see the road to the next capture point is blocked by heavy defense. Use any mean of transport to go around that defense to either get to the next capture point from behind or weaken their defense by taking out soldiers and vehicles (tanks, etc.).
Tanks, Mines and Planes
How to deal with Tanks
What do tanks do?
Tanks provides very safe protection to crews from gun fires. They often have very powerful cannons, which can be loaded with high-explosive shells, along with machine guns too. They can suppress infantry from distance, defend bridges, access points and eliminate vehicles but also combat enemy armors. However, a tanker's view is extremely limited due to the crew only being able to observe the surrounding environment through its scope and view port. So it is extremely easy to get flanked up close by infantry. That is why it is often advised to cover your teammate's tanks, to avoid enemies from using anti-tank equipment to destroy them.
How do I destroy a tank?
You need anti-tank weaponry to destroy weapons. There are hand held anti-tank rocket launchers (Panzerfaust 60) scattered across all maps. There are also rocket launchers, anti-tank mines and anti-tank grenades which you can unlock and purchase to use on your soldiers. The hand greanades do NOT deal any damage to tanks and armored vehicles, including Armored Personel Carriers (APC). So if there's an enemy tank in sight and you don't have any anti-tank weaponry at the time, do not waste your time and credits throwing hand grenades at them. Just simply mark its location by aiming at it for few seconds and let your other teamates know and deal with him or try to find anti-tank crates on the map (note: it takes around 3 shots from picked up anti-tank rocket launcher (Panzerfaust 60) to destroy a tank).
Anti-tank mines are best being used for defensive purpose. It only takes one single mine to kill any type of vehicle (from Cars to Heavy Tanks), as long as they drive right over it.
Note: if an Anti-tank mine explodes next to a vehicle instead of below, it only deals about a third of its damage.
Tanks rear and side armor tend to be weaker than the front armor. Weapons like Anti-Tank rocket launchers and certain Anti-Tank grenades can only penetrate certain milimeters thick armor. So it is always a good idea to approach a tank from the side or rear.
Each tank has its own weakspots, try to get to know them and shot at their weakspots. It will guarantee a higher chance of penetration and let you destroy enemy armor more efficently.
Tank View Port
Tank Sight
Note how limited the vision is from inside a tank.
How to place Anti-tank Mines
It is always a good idea to place some AT mines to prevent enemies from using vehicles to transport troops to the capture points. Especially between Number 3 and Number 4 points, where distances tend to be long. AT mines can be set up at flanking points to prevent enemies from showing up at your side or rear. For example, it is always a good idea to lay down some mines at the water crossing of B line when the enemies are attacking on C line (on the Town map).
Place your mines in the water, under shades or on terrian that has the similar texture as your AT mines texture will prevent enemies from discovering your AT mines.
AT mines have around 4-5 metres of explosive radius, so it is a wise idea to have at least a 4 meter gap between two mines to avoide a chain reaction which also leads to a higher cost.
To cover maximum area while giving your allies chances to drove by them, lay down mines in triangle shape or 'S' shape is always a good idea.
Anti-Tank Mines Being Placed on Bridge
Note AT mines are being layed in the shape of 'S' and under the shade but also having some gaps between one and another.
How to deal with Anti-tank Mines
If you're within a 25 m radius to a friendly mine, you will see it marked as such with a red skull (see image). So do not destroy them unless they leave you no other possible way to advance (You can destroy them by shooting them). When you see friendly mines, be careful not to walk/drive over them because they will detonate and kill you. Usually, most people will lay mines in a pattern so that you can navigate around them safely.
If you happen to spot enemy mines, disable them by shooting at them. If they are placed in shallow water, bullets may not be able to scratch them. In that case, use any kind of grenade to detonate them.
How to deal with anti-personel mines
Anti-personel (AP) mines have much smaller explosive radius and only deal damage to soldiers. The trigger distance of AP mines are 2 metres, so if you like to squeeze by an AP mine, bare in mind to keep at least 3 metres distance between your soldier and the mine. TRY NOT TO DESTROY FRIENDLY MINES!! AP mines are very expensive to use, so do not shoot them unless you have been trapped and have no choices at all.
AP mines are small and can be difficult to discover, but it is still possible to look out for them. Placing down AP mines next to the door, down at corner of stairs or other more hidden spaces will minimise the chance of them being spotted by the enemies.
AP Mines are extremly expensive at around 1k credits for each mine you place!
Setting up AP mines inside the Capture point
Note the AP mine is being set up by the door step instead of right at the entrance.
How to deal with Planes
Why am I blown to smithereens by planes all the time?
Planes often have the altitude advantage, so they tend to have a great overview of the battlefield. They can easily pick out the targets to destroy. However, they do have their own limitation too - weather, trees, houses and also very loud engine noises. So, it is not difficult guess a plane's action.
Use Anti-Air Guns on map to counter planes. You may not be able to take down planes all the time but by using AA guns (which can be found near most of the main objectives and some capture points) you can put more pressures on enemy pilots, force them to change there tactics and also make them be more cautious about their strikes. Forcing them to repair can be better than destroying an aircraft as it takes more time before they can get back up in the air.
Use trees to cover your advances. Roads are easier for vehicles but good pilots will always spot you on a road
Get into cover when you hear the plane's engine sound getting closer
Use flanking manuvour to avoid being seen
A successful career
Different Soldiers
The game has a variety of classes, which you can see in the picture below. This section covers the main roles of each class and some player-made variations that are common.
In Heroes and Generals it is better to have many different soldiers with diverse equipment sets rather than one soldier with everything, as you progress through the game you build your characters for suitable roles or your particular play-style.
Infantry is a flexible class and it is possible to have many different loadouts focused around close quarters combat, long range and anti-tank roles.
You probably won't need more than one tanker per faction.
Recon is a fairly basic class focused around bolt-action rifles, you won't need to make multiple of them for now.
Paratroopers can be given diverse loadouts (including anti-tank), though they are limited by fewer equipment points.
As a pilot you could have one plane fitted with high explosive shells and another crew with armour piercing.
Different classes have different rank insignia as seen next to the character icon.
There are a lot of ways to earn credits in the game but the best class is usually infantry due to their flexible approach to capturing objectives and destroying vehicles.
Credits
If you are trying to earn credits make sure to use as few modifications as possible on your guns to make the most credits.
Anti-tank roles are a good way to make credits, but be careful as using anti-tank weapons ineffectively can cost you!
The higher rank you are the more credits you will earn, so using more experienced soldiers can help you buy equipment for your newer characters.
As a beginner, you primary income most likely will be from your rank salary. Rank salary is measured by the hour and earned by total time spent alive in each game.
Capturing objectives and getting kills will earn you more money as well.
Getting more credits is also based on your Score ingame ex. you can get alot of score by capturing.
If you decide to equip scopes on any of your guns keep in mind they are fairly expensive to maintain, so make each shot count
Warfunds
Warfunds can be earned by commanding your troops in combat on the war map (General's tab in the menu).
You can earn them by playing war battles and destroying high value targets such as tanks, planes and other vehicles.
Gold
Gold is the premium currency in Heroes and Generals and can be bought through the store.
Once per day, you can earn 4 gold for simply participating in a battle.
Sometimes gold is given during giveaways or during special events, so check you inbox!
Infantry is the backbone of any army and is always used in larger quantities than any other class in the game.
Infantry has access to a very big variety of weapons and vehicles, so you always have different choices in terms of how you want to make that particular infantry character as you should make many of them for different roles (anti-tank, infantry sniper). You have a lot of possibilities with loadouts as well. Essentially, infantry does pretty much everything from defending objectives to attacking them, though always infantry will win the matches not any other class.
Buy and use the different infantry soldiers for different purposes because when you are in the game you can switch between those characters for what situation you need.
Always make sure to have at least one infantry soldier available to you. (If you branch out to other classes).
Even though infantry only starts with a simple Semi-Auto rifle, do not be discouraged by this as it is a powerful weapon when modified with proper ammo or the scout 2 barrel - increasing the damage enough for the gun to be able to 2 hit kill anyone!
As you can see from the picture, infantry and any class in the game can be bought as Lieutenant (Level 12) or as Major (Level 15).
Tank crewman
Tank crewman's task is to support the infantry's advance, but a tanker's main objective always is to destroy other tanks in the battlefield and then support his team's infantry. As a tank crewman, you should always consider having a wrench with you to repair your tank and a pistol, later, on, to defend yourself from those people who want to destroy your tanks. Try to learn different tanks exports while you are in battles.
Tank crewman should always carry a wrench if possible to repair the tank.
Tank crewman's primary objective is to destroy other tank's
Binocular's can be helpful to a tanker to locate very long range target's
Carrying a pistol might be helpful if someone tries to destroy your tank or if you need to defend yourself.
You can press the space bar once while aiming at target's to auto adjust your range.
Also note that different type's of tanks are good in different thing's, such as a tank destroyer is good at destroying tanks but it has a harder time helping infantry.
Fighter Pilot
Fighter pilots essentially have the same job as a tank crewman would have. Their main objective is to destroy enemy planes first, then provide air support for the advancing infantry. It is recommended as well to carry a wrench on your pilot. Do not be discouraged by how hard it is to learn to fly at first you really have to give it time.
Your plane has a choice of using High Explosive rounds or the Armour-piercing, composite rigid ammunition. Now, the high explosive rounds are best used for ground targets and supporting infantry, but the armour piercing are more effective against the planes and the tanks on the ground. But, don't worry, you will always have your normal Machine gun on your plane with 1000 rounds to shoot down other planes.
It is useful to carry a wrench as pilot to land and repair your plane after taking damage make sure to find a nice open spot for getting back into the air.
By pressing (Shift) in-game you can use the debug controls to fly more smoothly!
Having a sidearm sometimes can prove very useful to you if you happen to jump out of your plane to the ground.
You have a choice between Armour-piercing, composite rigid or the High explosive ammunition on your plane.
Controls and Throttle More in depth
As a fighter pilot you have three options for controls.
First control mode is controlling the plane by the camera itself
Second is controlling the plane by the crosshair (Note that both of these modes use the mouse to control the planes direction)
The third is the classic mode which is used by pressing shift to use debug controls to move smoothly when turning, allowing very much precisely to do what you want.
Fighter pilots also have three different options for throttle.
First option for throttle is automatic which automaticly always goes back to the optimal speed for the plane.
Second option is the step mode which simply allows you to press W and S to go lower or faster in speed but in certain steps.
Third option is the smooth option which allows you to just press W and S to smoothly go up and down in the throttle allowing you to completely choose your speed how you want it.
Paratrooper
Paratroopers are light infantry that jumps from the transport planes to objectives to capture them and then essentially defend and move to the next objectives. Paratroopers have some special equipment depending on what faction you're playing in the game.
You can make multiple paratroopers to give them different loadouts depending if you need something like anti-tank.
Paratroopers can use a badge called free fall to choose freely when they want to deploy their chute.
Paratroopers can be either grounded paratroopers or in the air using their transport planes.
Recon
Recon's job in the game is to try and spot enemies for his team and hold down areas if possible with his sniper rifle and the 8x Unertl scope. As recon, remember to relocate often after killing enemies because they will try to hunt you down.
Keep in mind if you buy an academy trained recon, it only comes with the lower zoom scope to start. Ranking up the Bolt action rifle specialist ribbons will get you to the one hit kill modding capabilities and the better scopes.
Carrying sidearm is useful as recon too.
Switch positions often if you kill a lot of enemies they will try to hunt you down
The 8x scopes are expensive to repair. Keep that in mind when shooting!
Don't forget to spot enemies for your team if you can!
Use your camoflage to your advantage when hiding from people it is effective.
Simply Enter Battle and let the fun begin! From the get-go, your Infantryman will be equipped with your chosen faction's unique semi-automatic rifle. It can be a very powerful weapon and here are 5 Tips on how to get the most out of your Semi-Auto Weapon from Reto.Circinus.
Each Hero can be a different adventure. On your way, you will unlock exciting new modifications, weapons, and vehicles - each with their own unique advantages and disadvantages. You can even develop special abilities with badges to enhance your Heroes. The choice is yours!
The in-game Economy in Heroes and Generals is an important and valuable aspect of the game. Everything (except Warbonds) has been made purchasable with in-game credits so nothing is locked behind a pay-wall beyond your reach. Keep in mind that higher ranked soldiers earn a greater base salary and that your actions in-game influence the credits you will earn as well as the credits you will use to repair your equipment. For example, capturing objectives will earn you more credits while over-usage of explosives and modified equipment can cost you in repairs.
The base salary only applies when you are active in a battle. So, being AFK or unhelpful in a game is not only hurting your team, you'll be missing out on credits you could have been earning by being active and helpful to your team.
Pricier items are not necessarily upgrades over more affordable items. Each different item you acquire on your journey adds diversity and adaptability to your game play.
For more information on how to make credits, take a look at these 5 helpful tips from Reto.Circinus!
Just because Specialist Classes are unlocked at a higher Player Level, it does not necessarily mean they are more powerful than Infantry in every way. You will need to learn what classes are best used in what situations, how to use each class, and adjust accordingly.
Once you enter battle, you will only have access to the weapons currently equipped on each of the characters you entered the battle with. Therefore, it can also be beneficial in the long run to create multiple characters of the same class with different loadouts so that you are able to adjust on the fly depending on the situation.
When moving from one objective to the other, it could be beneficial to avoid high-traffic areas that may have anti-vehicle mines, or may be in the sights of a tank or Recon.
Do not wait too long for people to get onto a single jeep. Airplanes will target Vehicles with large amounts of people!
The best way to get onto vehicles (even while moving at high speeds) is to Jump and spam E(or your 'Use' key) as they're passing by. With some practice, you can get into fast moving vehicles very effectively.
Make friends and use them. A team of six uncoordinated people with every resource can easily be beaten by a team of six coordinated people with nothing.
After capturing a point, avoid simply moving on to the next one. Enemies may contest your point, which can ruin your progress.
Become familiarized with the weapons that work well in certain situations.
Use combat badges that compliment your play style - don't equip a Nimble badge if you aren't sneaking up on anyone!
Do not throw anti-personnel grenades at tanks - it doesn't damage them, but they will be alerted to your position.
Swimming is a time-heavy endeavor, and can put you in risky situations. Only swim if you have to, or find another way to cross water. You can also use an amphibious vehicle to get several teammates across for a coordinated flanking effort.
Don't stand on top of or next to enemy tanks being targeted by friendly Airplanes or friendly Tanks, or you may be teamkilled!
Use transport vehicles to speed up movement of the team.
Utilize the Bicycle, a free and common transport method. If you are deep in enemy territory, you can't spawn in a vehicle. So, take one and ride away!
When in any vehicle, press CTRL (or whatever key is bound for Crouching) to duck from enemy fire. Keep in mind, however, if you are in a turret you cannot fire, nor can you enter third person.
Welcome to the Heroes & Generals (H&G) getting started guide!
Heroes & Generals consists of two major parts. One part is the Heroes, a multiplayer first person shooter. The other part, Generals, is a massive multiplayer real-time strategy game. This can be a lot to absorb, so this page exists to assist in the learning curve.
The Generals part of the game requires high-ranked soldiers, so it's limited to the more experienced players. Therefore, in this tutorial, we will be focusing on the Heroes part of the game. Don’t worry though, if you follow this tutorial, you will be a General in no time!
Once you are sure your machine meets the necessary hardware/driver requirements, you need to register an account. Registering will give you the username and password needed to log into the game. You can register by visiting this page.
Downloading
Now that you have registered, you need to download the game. You have two options: a stand-alone client, or Steam (a free to use digital game store).
As the game runs, you will notice H&G Sync, a small program that handles the files needed to play. The download size is currently around 1 Gigabyte. You will only need to download that once. After the initial download, H&G Sync will make sure that you have the right version of the game and download any future patches for you automatically.
After a successful download/patching, you will be prompted to login. Use the credentials rendered via the steps above to continue.
War Selection
If you are logging in for the first time or if the war has recently ended, you will need to choose a war. At present, there is only one war. But when there are more players online, more wars will be available to join.
Character Interface
Once you logged in the game and chose your first soldier, you will see main interface or "Heroes" tab which includes numerous options.
Let us go through all the numbers and buttons.
Bulletin. The most recent game news and articles are shown here.
Notifications. Here you will receive important notifications: weapon repair costs, battle summary, and more.
Messages. You are able to send and receive instant private messages with online players or send and receive mail that can be received even while offline. A small number on the icon will indicate any new messages received.
Veteran membership status. Once you purchase Veteran Membership, you will see its current status. By clicking on the line, you will receive full information about your veteran membership.
"Heroes" and "Generals" tabs. As soon as you reach Player Level X (10), you will be able open the "Generals" tab which includes War map. More information about War - down below.
Credits. Credits are the most common in-game currency earned through playing the FPS. With credits, you can purchase almost everything in the game - including new soldiers and veteran membership.
Warfunds. Warfunds are the second type of in-game currency. It is earned and used in the War effort. You are able to earn Warfunds by playing War battles once you reach player level 10.
Gold. This kind of currency can be purchased with real money and can be used everywhere. Also, you receive free 4 gold after finishing your first battle each day.
Player Level. It displays your current player level. The higher the level, the more game modes and soldier types available.
Store. New equipment, vehicles and camouflages can be purchased in the Store.
Options. Here you find all kinds of settings and helpful links.
Faction icon. It displays a faction of soldier chosen. Once you unlock "factions" you will be able to scroll through soldiers of different factions by pressing the left and right arrow keys.
Rank. Current rank and progress of your soldier is shown here.
The name of a soldier. You can always customize your soldier by changing his name for some Credits.
Experience. It displays amount of experience that your soldier needs to get new rank.
Next rank shows you insignia of the next rank. You can also click on it to open "ranks" window for more information.
You can switch between weapons, vehicles, camouflage and field gear which your soldier owns but have unequipped or can purchase.
Equipment depot. Once you promote your soldier to General, all his equipment will be placed here. You can spread equipment among other soldiers but they have to meet the requirements of particular equipment.
List of soldiers of one faction. Here you can see all your soldiers and generals of one faction. You can enlist additional soldier by pressing on empty slot with "+" in it.
Weapons list. Here you can see current set up of your soldier. You can change soldier's set up by using "drag and drop" function.
List of equipment that is owned by your soldier or able to purchase.
Ribbons. By playing the game, you will earn experience not only for your rank but also for your ribbons. Here, you can see the full list of ribbons you can get. You can click on the ribbons on this page to get a description of the rewards and how to level up that ribbon. Ribbons unlock a great deal of equipment for purchase.
Next unlocks. By playing the game, you will unlock a lot of stuff. The closest unlocks are shown in here.
Soldier filter. You can filter your soldier list to only display one type.
Game chat. You can always chat with other players or create a specific chat room and use it with your friends.
Friends. Every player you added to your friend list will be shown in here as well as his online status and war faction. You can also queue for a friend's battle from the friend list.
Your squad. Here, you can adjust your squad and see portraits of soldiers who are currently in your squad. More information about squads.
Map filters. You can adjust map filters to join specific types of battles.
COMBAT button. The main button which allows you to join battles.
Time to Squad Up and Go to Battle!
Looking to join a battle? Click on the COMBAT! button in the bottom right corner to open the Map & Filter selection.
First Battle
1. There are different game modes to choose from. When you're first starting out, only the 'Encounter' game mode is available.
1. Through the shield button you access the squad menu.
2. To invite friends to your squad, use the '+' symbol on the bottom or add them in the squad player list.
You can only add players that are on your friend list.
3. Once you've gathered your friends, use the COMBAT! button to select a game mode.
You will always be part of a squad. If you join a battle without being in one, you will be automatically matched into a random squad.
Squad Customisation
A squad is the core of team work and can be customised before (but not during) a battle to fit your needs.
Each of your soldiers has his own squad but can only customise it if he is rank 6 or higher.
All customizations are saved and bound to the soldier with which you made them.
As of now, you can only change your squad settings when having at least 1 person in it or while in match-making. This is bound to change, the date of that is unknown.
For each squad member who has an active veteran membership, everyone in the squad gets a 5% bonus on all experience earned.
1. In order to do most customisations, you need Squad Upgrade Points.
2. Inviting more than 2 friends will cost you squad upgrade points for each additional player.
3. Spending points on Auxiliary Seats allows you to use different types of soldiers during a battle.
4. For a fee, you can rename your squad. The name is saved to your soldier and is visible in the game.
5. A squad chat is automatically created to enable you to communicate with your squad members in the lobby as well as during a battle.
Squad Upgrade Points
By playing as a squad member or a squad leader you earn experience in the corresponding ribbon.
A total of 12 squad upgrade points can be unlocked, 6 on each of the two ribbons.
Like Equipment points, squad upgrade points are not lost upon spending and can be reused.
Upon joining a battle you have a preparation phase of 30 seconds (1.) to look at the resources in battle (2.), hide the battle briefing window (3.) and do last minute changes to your squad (4.)(e.g. adjusting the auxiliary seats).
Auxiliary Seats
Setting up auxiliary seats allows you to be more versatile while ingame. You can spawn a soldier of a different type than the squad type.
To be able to spawn it in battle, you need to own that type of soldier as well as have the resources, or assault team, available.
You can set up to 3 seats, but each seat needs 1 additional squad upgrade point.
Each seat can only be taken by one person at a time. With e.g. 1 recon seat, only one of the squad members can spawn his recon soldier until he switches back to infantry.
When running a special type of squad (Armour squad, Recon squad, Fighter squad or Paratrooper squad), it is highly advised to always have an auxiliary seat to swap to infantry if necessary.
Squads in War
In war, unlike in staged battles, you have the ability to queue up for specific battles.
In order to do so, you have to open the war map, look at the ongoing battles (burning cities or burning points in between cities) and discuss with your squad which one you would like to join.
There are several criteria that have to be fulfilled to be able to join as well as a way to increase your chance of getting in. More information on that: Joining Specific War Battles
You gain progress in the player levels by increasing your score which is done by playing the action game with any kind of soldier.
There are two categories of game modes: Staged Battles and War Battles. Both categories feature all game modes and all maps.
For a more detailed look at the game modes and mechanics of the Action game view the Action Rules.
Staged Battles
In staged battles, every faction has exactly the same type and the same amount of resources, or assault teams, which resemble spawn tickets.
Those battles are generated randomly and the resources are created and provided by the server.
It is highly recommended to play staged battles to get used to the game, the maps, weapons, vehicles, etc. before playing war battles.
Encounter
Available from the very beginning (player level 1), this fast-paced game mode is meant to introduce new players to the game.
There is 1 spawn area for each team and 1 objective (Objective 01).
Whichever team holds Objective A for the longest wins the battle (when the bar at the top is full).
Once you reach player level 4, the Assault game mode is permanently unlocked for your account.
The goal for the attacking team is to capture all objectives (labeled with 'O').
In order to do so, attackers have to advance from different lines. They start on an access point and capture point after point until they are able to attack an objective. Defenders however have to hold the objective and push the attackers back.
Usually there are 2 objectives, but the Airfield and the Forward Airfield maps have 3.
The lines from which the attacking team assaults vary. In war battles, this depends on connections from adjoining cities to the current city (if any), and whether Assault Teams have been sent.
Once a point is captured, the controlling team can spawn in a connected spawn area.
If the time limit (30 minutes) runs out while one team is holding one of the objectives, the game will enter sudden death. Whichever team captures all objectives first, wins the game.
Assaulting is generally harder than defending.
Every soldier type may participate if the corresponding resource, or assault team, is available.
Once you reach player level 10, the ability to join war battles is permanently unlocked for your account.
All of the game modes and maps described above are available in war battles; However, some are more common than others (Assault on Town and Mountain Town).
Because players themselves create war battles with assault teams, every battle is different.
Battles may be unfair in terms of the distribution of resources or the line of attack. Keep your chin up and make the best out of it, war is a challenge, not a vacation!
You earn +50% rank experience, +50% ribbon experience as well as warfunds for participating in war battles.
However, it is highly recommended to play staged battles to get used to the game, the maps, weapons, vehicles, etc. before playing war battles. This way, you avoid wasting precious resources others paid for while you are acquainting yourself to the game, maps and/or weaponry.
War battles are set up by players.
Though not everyone can set up war battles, all players with a player level of 10 or higher can join war battles.
To set up a war battle, players have to send their own resources (assault teams) which is done on the war map as part of the Generals portion of Heroes & Generals.
Only players with at least one soldier above level 12 can equip and deploy assault teams.
Apart from letting the match-maker find you a battle, you are able to choose your own battles on the war map.
In order to do so you first have to choose a faction for which you want to fight for the duration of the current war.
There are several conditions that have to be fulfilled to be able to queue for a specific battle:
1. The available resources have to match you squad type and there have to be enough resources for the battle to be "fun" (Otherwise the battle won't start, more informations: Battle Director).
2. If you're not by yourself, you have to be the squad leader to be able to queue up.
3. If all conditions are met, you'll be able to join the battle. Otherwise a "Missing Condition"-warning will show above this button explaining you what is wrong.
You can significantly increase your chances of getting into your desired battle if you or at least one of your squad members have at least 1 Assault Team in that battle. The bigger the total number of assault teams your squad has in that battle (which fit your squad type), the higher your chances of joining.
4. Check additional informations like time, weather and ping here. If ongoing battles have a high ping for you, it may impair your game experience negatively.
How to fight
You shoot the enemy. You capture the objective. You coordinate with your teammates. Also, don't forget to whistle.
Controls
Here are some of the more useful controls. You might want to use these in your first battle.
M = Map (right mouse click to zoom in/out). Use this to see where you are in relation to the objectives.
F = Whistle (this can be used to signal teammates when on foot). You can use this to ask a teammate in a vehicle to wait for you to board.
Mouse Wheel = Camera Angle / Position (used when in a vehicle)
B = Binoculars (requires you to have binoculars equipped) Binoculars are used by soldiers to better survey the battlefield and help spotting enemy units.
Squad
After joining a battle, you will be put into a squad. Depending on your level and other factors, you will either be a Squad Leader or become a squad member. As a squad leader, you will be able to give orders out by pressing 'Q'. While holding 'Q', move your cursor to the desired location and press left mouse button to confirm your order. Available orders: 'Attack','Defend','Rally' or 'Clear Area'(only avilable to tankers and pilots)
If you would like to dismiss a squad member or leave the squad, you just need to go to the scoreboard (default 'Tab'), then either find yourself on the scoreboard then press left mouse button and select 'Leave Squad', or select the member of squad you like to dismiss, press left mouse button to dismiss the member from your squad.
You can only give out orders with a soldier that is at least level 6.
Additional experience are given to both squad leader and squad member(s) when orders have been executed.
During the battle, you won't be able to get back into a squad after leaving a squad. For squad leader, the squad spot would be locked for the rest of the match after one of the member being dismissed. So think twice before you leave/dismiss someone from the squad.
You can also report players for any suspicious behaviour in game. 'Report' option also can be found through scoreboard.
Spawning
You can spawn near any point your team has captured.
If you like to spawn previously selected auxiliary seats and the desired ressource is available, you can select the auxillary seat soldier through your soldier list.
Paratroopers must choose a capture point as destination where their transport planes will fly to, then will spawn in the plane, and be able to jump out when it reaches the point, (or before, if needs be) unless the para planes have ran out. If the team resources have ran out of transport planes, then paratroopers will spawn the same way as regular infantry.
Tank Crewman can spawn in a tank near the main objective or access point, or as a passenger in a tank driven by a friendly tanker.
Infantryman can spawn in an APC at any time. If you are assaulting, you can only spawn in an APC if you are on the same attacking line.
Switching from infantry to tank Auxillary seat
An infantry under spawn protection
After spawning as an infantry, you will remain invulnerable inside the protecting zone until the moment you fire your weapon or leave the protecting zone.
Also Tanks cannot spawn from every point, only the main objectives (e.g. O1, O2, O3) and access points (e.g. A1, B1, C1,)
Planes can only spawn at main objective points and access points (e.g. A1, B1, C1) where they will spawn in the air behind the access point.
Capturing
In order to capture a point, you must be within the radius of the capture zone (normally within the fences,walls etc). When you get inside the capture zone, a circle with the capture point's letter and number appears on the UI, along with (a) red/blue number(s). The blue number represents the amount of friendly soldiers inside the capture point, and the red represents the amount of enemies. The higher the amount of allies you have inside the capture point (the blue number) the quicker you will capture the point. However, if there are an equal amount of allies and enemies inside the capture point, the counter will stop - it will remain at its current status. E.g. if you are attacking A3, an enemy point, and there is one enemy inside as well, the capture point status would get contested but it will remain the enemies' point. In order to capture the point, you must remain inside the point, kill any enemies inside the capture zone and defend until the circle at the top of the screen is fully surrounded by blue.
Capture Counter
Note there's 'Attack' order above the counter, indicating the squad leader's order.
Points are needed to be captured in certain order.
Team needs to follow the number order, step by step connecting all objectives towards main objectives. (O1 or O2)
Defending
The primary way to defend a capture point is to prevent enemies from getting into the capture zone. However, if enemies got inside the capture zone, they will start capturing the point. You need to either eliminate all enemies inside, or, get inside the capture zone to slow down enemies' capture timer and wait for reinforcements. To reward players for defending capture zones, you will receive extra 10 Exp bonus point for each opponent you eliminate inside a CONTESTED capture zone. Use cover to your advantage, setting up Anti-Personel mines or cover the entrances. Use whatever way to help you defend the capture point.
It is adviced to use machine guns or sub-machine guns if you are planning to defend the objectives from inside. These weapons are ideal for close quarter combat. Anti-personnel mines can be placed inside or near the entrances, but can also be placed in the direction where you expect your opponents to come from. However anti-personel mines are rather expensive to maintain. Plus you teamates can triger it as well, so use them wisely.
Also be advised that anti-tank mines will NOT be triggered by players on foot, so do not place them in buildings unless you are planning to trigger them manually by shooting at them as enemies walk by.
A capture point that is being contested
Note the progression circle stays where it is due to the same amount of enemy and friendly soldiers inside the capture zone.
Attacking
It is important to get to know the layout of the map when attacking. There are many medical/ammo/anti-tank supply crates scattered on the battlefield (they are usually close to capture points). You're also able to equip vehicles with crates. Use them as you can. You can find out if you have any of these items nearby by pressing 'M' button to display your battlefield map. Then press zoom in (default is right mouse button) to see if there's any crates around you.
Rushing straight towards the next objective is the quickest way to capture. However if you encounter heavy enemy fire on the way, it might be good idea to think about a flanking maneuver. Many of the maps in game allow you to flank the enemies: swimming, use other bridges or access points. Because players tend to put more attentions on direct access roads/bridges towards the objective, you may achieve unexpected result from flanking.
When you reach the objective, you will be rewarded for each enemy you eliminate inside the contested capture zone by 10 additional exp. You will receive great amount of bonuses when you neutralize/capture objectives. You should also be advised about enemy counter attacks on your current objective. You can not capture the next objective without your current one, so always keep eyes on it and always have 2-3 players defend it.
Close quarter weapons and grenades are very helpful for clearing an objective. Due to the enemies defending capture zones, they will have better cover advantages over you, so grenades are good ways to flush the enemy out from covers. However, grenades can damage/kill friendly troopers too. So it is not wise to throw them into an objective while it is being contested by friendly soldiers.
In short, having map awareness and a capture-oriented load-out allows you to advance along capture lines much more efficiently, hopefully leading to a victory.
Little symbols on map indicate medic crates, ammo crates and anti-tank crates.
The symbols are also explained in the top part of the map.
General strategy for infantryman
There are different ways to play this game as infantry. As we know, infantry is the main core of an army and without it it's impossible to win whether you attack or defend.
Condition - Capture: You can help your team by pushing with them or defending the last conquered point. Both actions are equally important because you can't capture the next point if you lose the previous one!
If your teammates are moving forward and you stay behind camping, trying to find someone to kill, "You are not helping your team", "You are not going to get much experience, credits or points to unlock ribbons". Sometimes killing enemy soldiers is a little useful towards victory as it drains the enemy spawn tickets/lives (lives from the assault team). You do not get a lot of experience for killing soldiers (outside of a capture zone) but it does help you leveling up your gun and unlocking new guns.
Situation and Instruction: You spawn at C1 with your teammates and you have C2, C3 and C4 ahead. One guy to capture C2, the others move straight to C3. Half will guard it and the other half will fight their way to C4. This can be changed by planes and tanks, maybe easy or maybe harder.
It's hard to see good team play. If you spot good players or squads, try to work with them.
You spawned at random spawn point and you see the road to the next capture point is blocked by heavy defense. Use any mean of transport to go around that defense to either get to the next capture point from behind or weaken their defense by taking out soldiers and vehicles (tanks, etc.).
Tanks, Mines and Planes
How to deal with Tanks
What do tanks do?
Tanks provides very safe protection to crews from gun fires. They often have very powerful cannons, which can be loaded with high-explosive shells, along with machine guns too. They can suppress infantry from distance, defend bridges, access points and eliminate vehicles but also combat enemy armors. However, a tanker's view is extremely limited due to the crew only being able to observe the surrounding environment through its scope and view port. So it is extremely easy to get flanked up close by infantry. That is why it is often advised to cover your teammate's tanks, to avoid enemies from using anti-tank equipment to destroy them.
How do I destroy a tank?
You need anti-tank weaponry to destroy weapons. There are hand held anti-tank rocket launchers (Panzerfaust 60) scattered across all maps. There are also rocket launchers, anti-tank mines and anti-tank grenades which you can unlock and purchase to use on your soldiers. The hand greanades do NOT deal any damage to tanks and armored vehicles, including Armored Personel Carriers (APC). So if there's an enemy tank in sight and you don't have any anti-tank weaponry at the time, do not waste your time and credits throwing hand grenades at them. Just simply mark its location by aiming at it for few seconds and let your other teamates know and deal with him or try to find anti-tank crates on the map (note: it takes around 3 shots from picked up anti-tank rocket launcher (Panzerfaust 60) to destroy a tank).
Anti-tank mines are best being used for defensive purpose. It only takes one single mine to kill any type of vehicle (from Cars to Heavy Tanks), as long as they drive right over it.
Note: if an Anti-tank mine explodes next to a vehicle instead of below, it only deals about a third of its damage.
Tanks rear and side armor tend to be weaker than the front armor. Weapons like Anti-Tank rocket launchers and certain Anti-Tank grenades can only penetrate certain milimeters thick armor. So it is always a good idea to approach a tank from the side or rear.
Each tank has its own weakspots, try to get to know them and shot at their weakspots. It will guarantee a higher chance of penetration and let you destroy enemy armor more efficently.
Tank View Port
Tank Sight
Note how limited the vision is from inside a tank.
How to place Anti-tank Mines
It is always a good idea to place some AT mines to prevent enemies from using vehicles to transport troops to the capture points. Especially between Number 3 and Number 4 points, where distances tend to be long. AT mines can be set up at flanking points to prevent enemies from showing up at your side or rear. For example, it is always a good idea to lay down some mines at the water crossing of B line when the enemies are attacking on C line (on the Town map).
Place your mines in the water, under shades or on terrian that has the similar texture as your AT mines texture will prevent enemies from discovering your AT mines.
AT mines have around 4-5 metres of explosive radius, so it is a wise idea to have at least a 4 meter gap between two mines to avoide a chain reaction which also leads to a higher cost.
To cover maximum area while giving your allies chances to drove by them, lay down mines in triangle shape or 'S' shape is always a good idea.
Anti-Tank Mines Being Placed on Bridge
Note AT mines are being layed in the shape of 'S' and under the shade but also having some gaps between one and another.
How to deal with Anti-tank Mines
If you're within a 25 m radius to a friendly mine, you will see it marked as such with a red skull (see image). So do not destroy them unless they leave you no other possible way to advance (You can destroy them by shooting them). When you see friendly mines, be careful not to walk/drive over them because they will detonate and kill you. Usually, most people will lay mines in a pattern so that you can navigate around them safely.
If you happen to spot enemy mines, disable them by shooting at them. If they are placed in shallow water, bullets may not be able to scratch them. In that case, use any kind of grenade to detonate them.
How to deal with anti-personel mines
Noob
Anti-personel (AP) mines have much smaller explosive radius and only deal damage to soldiers. The trigger distance of AP mines are 2 metres, so if you like to squeeze by an AP mine, bare in mind to keep at least 3 metres distance between your soldier and the mine. TRY NOT TO DESTROY FRIENDLY MINES!! AP mines are very expensive to use, so do not shoot them unless you have been trapped and have no choices at all.
AP mines are small and can be difficult to discover, but it is still possible to look out for them. Placing down AP mines next to the door, down at corner of stairs or other more hidden spaces will minimise the chance of them being spotted by the enemies.
AP Mines are extremly expensive at around 1k credits for each mine you place!
Setting up AP mines inside the Capture point
Note the AP mine is being set up by the door step instead of right at the entrance.
How to deal with Planes
Why am I blown to smithereens by planes all the time?
Planes often have the altitude advantage, so they tend to have a great overview of the battlefield. They can easily pick out the targets to destroy. However, they do have their own limitation too - weather, trees, houses and also very loud engine noises. So, it is not difficult guess a plane's action.
Use Anti-Air Guns on map to counter planes. You may not be able to take down planes all the time but by using AA guns (which can be found near most of the main objectives and some capture points) you can put more pressures on enemy pilots, force them to change there tactics and also make them be more cautious about their strikes. Forcing them to repair can be better than destroying an aircraft as it takes more time before they can get back up in the air.
Use trees to cover your advances. Roads are easier for vehicles but good pilots will always spot you on a road
Get into cover when you hear the plane's engine sound getting closer
Use flanking manuvour to avoid being seen
A successful career
Different Soldiers
The game has a variety of classes, which you can see in the picture below. This section covers the main roles of each class and some player-made variations that are common.
In Heroes and Generals it is better to have many different soldiers with diverse equipment sets rather than one soldier with everything, as you progress through the game you build your characters for suitable roles or your particular play-style.
Infantry is a flexible class and it is possible to have many different loadouts focused around close quarters combat, long range and anti-tank roles.
You probably won't need more than one tanker per faction.
Recon is a fairly basic class focused around bolt-action rifles, you won't need to make multiple of them for now.
Paratroopers can be given diverse loadouts (including anti-tank), though they are limited by fewer equipment points.
As a pilot you could have one plane fitted with high explosive shells and another crew with armour piercing.
Different classes have different rank insignia as seen next to the character icon.
There are a lot of ways to earn credits in the game but the best class is usually infantry due to their flexible approach to capturing objectives and destroying vehicles.
Credits
If you are trying to earn credits make sure to use as few modifications as possible on your guns to make the most credits.
Anti-tank roles are a good way to make credits, but be careful as using anti-tank weapons ineffectively can cost you!
The higher rank you are the more credits you will earn, so using more experienced soldiers can help you buy equipment for your newer characters.
As a beginner, you primary income most likely will be from your rank salary. Rank salary is measured by the hour and earned by total time spent alive in each game.
Capturing objectives and getting kills will earn you more money as well.
Getting more credits is also based on your Score ingame ex. you can get alot of score by capturing.
If you decide to equip scopes on any of your guns keep in mind they are fairly expensive to maintain, so make each shot count
Warfunds
Warfunds can be earned by commanding your troops in combat on the war map (General's tab in the menu).
You can earn them by playing war battles and destroying high value targets such as tanks, planes and other vehicles.
Gold
Gold is the premium currency in Heroes and Generals and can be bought through the store.
Once per day, you can earn 4 gold for simply participating in a battle.
Sometimes gold is given during giveaways or during special events, so check you inbox!
Infantry is the backbone of any army and is always used in larger quantities than any other class in the game.
Infantry has access to a very big variety of weapons and vehicles, so you always have different choices in terms of how you want to make that particular infantry character as you should make many of them for different roles (anti-tank, infantry sniper). You have a lot of possibilities with loadouts as well. Essentially, infantry does pretty much everything from defending objectives to attacking them, though always infantry will win the matches not any other class.
Buy and use the different infantry soldiers for different purposes because when you are in the game you can switch between those characters for what situation you need.
Always make sure to have at least one infantry soldier available to you. (If you branch out to other classes).
Even though infantry only starts with a simple Semi-Auto rifle, do not be discouraged by this as it is a powerful weapon when modified with proper ammo or the scout 2 barrel - increasing the damage enough for the gun to be able to 2 hit kill anyone!
As you can see from the picture, infantry and any class in the game can be bought as Lieutenant (Level 12) or as Major (Level 15).
Tank crewman
Tank crewman's task is to support the infantry's advance, but a tanker's main objective always is to destroy other tanks in the battlefield and then support his team's infantry. As a tank crewman, you should always consider having a wrench with you to repair your tank and a pistol, later, on, to defend yourself from those people who want to destroy your tanks. Try to learn different tanks exports while you are in battles.
Tank crewman should always carry a wrench if possible to repair the tank.
Tank crewman's primary objective is to destroy other tank's
Binocular's can be helpful to a tanker to locate very long range target's
Carrying a pistol might be helpful if someone tries to destroy your tank or if you need to defend yourself.
You can press the space bar once while aiming at target's to auto adjust your range.
Also note that different type's of tanks are good in different thing's, such as a tank destroyer is good at destroying tanks but it has a harder time helping infantry.
Fighter Pilot
Fighter pilots essentially have the same job as a tank crewman would have. Their main objective is to destroy enemy planes first, then provide air support for the advancing infantry. It is recommended as well to carry a wrench on your pilot. Do not be discouraged by how hard it is to learn to fly at first you really have to give it time.
Your plane has a choice of using High Explosive rounds or the Armour-piercing, composite rigid ammunition. Now, the high explosive rounds are best used for ground targets and supporting infantry, but the armour piercing are more effective against the planes and the tanks on the ground. But, don't worry, you will always have your normal Machine gun on your plane with 1000 rounds to shoot down other planes.
It is useful to carry a wrench as pilot to land and repair your plane after taking damage make sure to find a nice open spot for getting back into the air.
By pressing (Shift) in-game you can use the debug controls to fly more smoothly!
Having a sidearm sometimes can prove very useful to you if you happen to jump out of your plane to the ground.
You have a choice between Armour-piercing, composite rigid or the High explosive ammunition on your plane.
Controls and Throttle More in depth
As a fighter pilot you have three options for controls.
First control mode is controlling the plane by the camera itself
Second is controlling the plane by the crosshair (Note that both of these modes use the mouse to control the planes direction)
The third is the classic mode which is used by pressing shift to use debug controls to move smoothly when turning, allowing very much precisely to do what you want.
Fighter pilots also have three different options for throttle.
First option for throttle is automatic which automaticly always goes back to the optimal speed for the plane.
Second option is the step mode which simply allows you to press W and S to go lower or faster in speed but in certain steps.
Third option is the smooth option which allows you to just press W and S to smoothly go up and down in the throttle allowing you to completely choose your speed how you want it.
Paratrooper
Paratroopers are light infantry that jumps from the transport planes to objectives to capture them and then essentially defend and move to the next objectives. Paratroopers have some special equipment depending on what faction you're playing in the game.
You can make multiple paratroopers to give them different loadouts depending if you need something like anti-tank.
Paratroopers can use a badge called free fall to choose freely when they want to deploy their chute.
Paratroopers can be either grounded paratroopers or in the air using their transport planes.
Recon
Recon's job in the game is to try and spot enemies for his team and hold down areas if possible with his sniper rifle and the 8x Unertl scope. As recon, remember to relocate often after killing enemies because they will try to hunt you down.
Keep in mind if you buy an academy trained recon, it only comes with the lower zoom scope to start. Ranking up the Bolt action rifle specialist ribbons will get you to the one hit kill modding capabilities and the better scopes.
Carrying sidearm is useful as recon too.
Switch positions often if you kill a lot of enemies they will try to hunt you down
The 8x scopes are expensive to repair. Keep that in mind when shooting!
Don't forget to spot enemies for your team if you can!
Use your camoflage to your advantage when hiding from people it is effective.
Simply Enter Battle and let the fun begin! From the get-go, your Infantryman will be equipped with your chosen faction's unique semi-automatic rifle. It can be a very powerful weapon and here are 5 Tips on how to get the most out of your Semi-Auto Weapon from Reto.Circinus.
Each Hero can be a different adventure. On your way, you will unlock exciting new modifications, weapons, and vehicles - each with their own unique advantages and disadvantages. You can even develop special abilities with badges to enhance your Heroes. The choice is yours!
The in-game Economy in Heroes and Generals is an important and valuable aspect of the game. Everything (except Warbonds) has been made purchasable with in-game credits so nothing is locked behind a pay-wall beyond your reach. Keep in mind that higher ranked soldiers earn a greater base salary and that your actions in-game influence the credits you will earn as well as the credits you will use to repair your equipment. For example, capturing objectives will earn you more credits while over-usage of explosives and modified equipment can cost you in repairs.
The base salary only applies when you are active in a battle. So, being AFK or unhelpful in a game is not only hurting your team, you'll be missing out on credits you could have been earning by being active and helpful to your team.
Pricier items are not necessarily upgrades over more affordable items. Each different item you acquire on your journey adds diversity and adaptability to your game play.
For more information on how to make credits, take a look at these 5 helpful tips from Reto.Circinus!
Just because Specialist Classes are unlocked at a higher Player Level, it does not necessarily mean they are more powerful than Infantry in every way. You will need to learn what classes are best used in what situations, how to use each class, and adjust accordingly.
Once you enter battle, you will only have access to the weapons currently equipped on each of the characters you entered the battle with. Therefore, it can also be beneficial in the long run to create multiple characters of the same class with different loadouts so that you are able to adjust on the fly depending on the situation.
When moving from one objective to the other, it could be beneficial to avoid high-traffic areas that may have anti-vehicle mines, or may be in the sights of a tank or Recon.
Do not wait too long for people to get onto a single jeep. Airplanes will target Vehicles with large amounts of people!
The best way to get onto vehicles (even while moving at high speeds) is to Jump and spam E(or your 'Use' key) as they're passing by. With some practice, you can get into fast moving vehicles very effectively.
Make friends and use them. A team of six uncoordinated people with every resource can easily be beaten by a team of six coordinated people with nothing.
After capturing a point, avoid simply moving on to the next one. Enemies may contest your point, which can ruin your progress.
Become familiarized with the weapons that work well in certain situations.
Use combat badges that compliment your play style - don't equip a Nimble badge if you aren't sneaking up on anyone!
Do not throw anti-personnel grenades at tanks - it doesn't damage them, but they will be alerted to your position.
Swimming is a time-heavy endeavor, and can put you in risky situations. Only swim if you have to, or find another way to cross water. You can also use an amphibious vehicle to get several teammates across for a coordinated flanking effort.
Don't stand on top of or next to enemy tanks being targeted by friendly Airplanes or friendly Tanks, or you may be teamkilled!
Use transport vehicles to speed up movement of the team.
Utilize the Bicycle, a free and common transport method. If you are deep in enemy territory, you can't spawn in a vehicle. So, take one and ride away!
When in any vehicle, press CTRL (or whatever key is bound for Crouching) to duck from enemy fire. Keep in mind, however, if you are in a turret you cannot fire, nor can you enter third person.
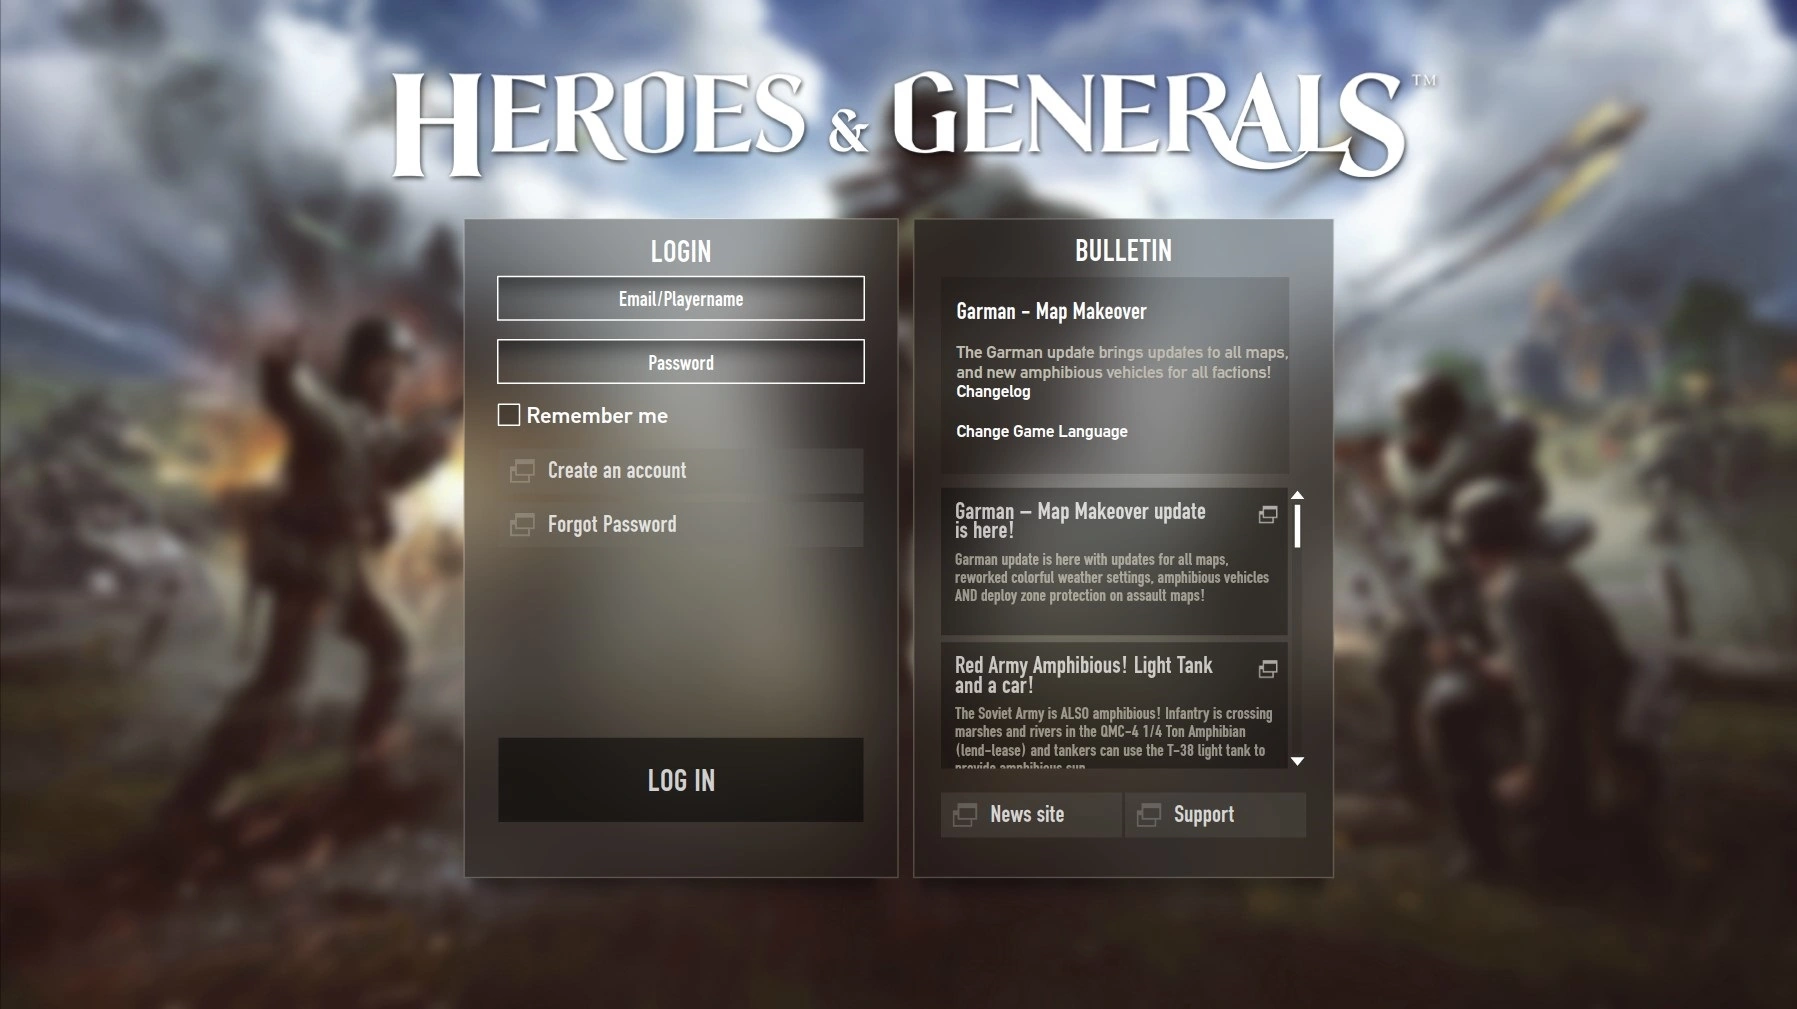
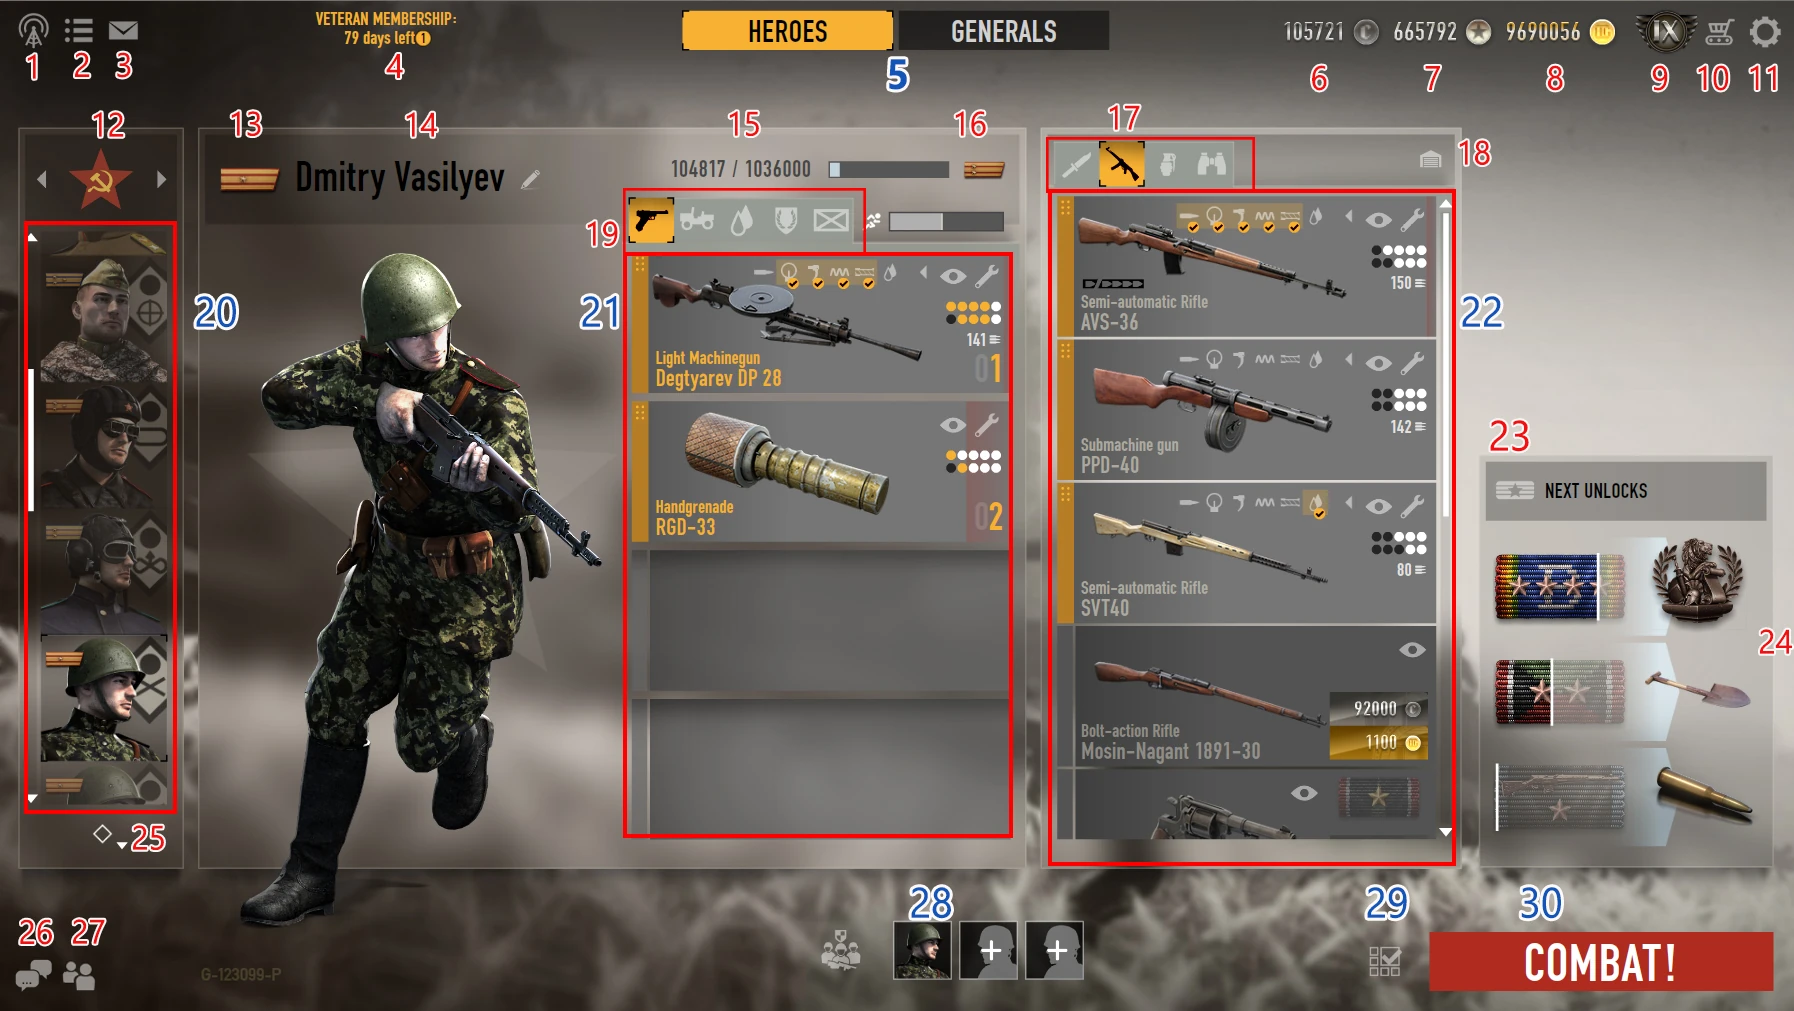
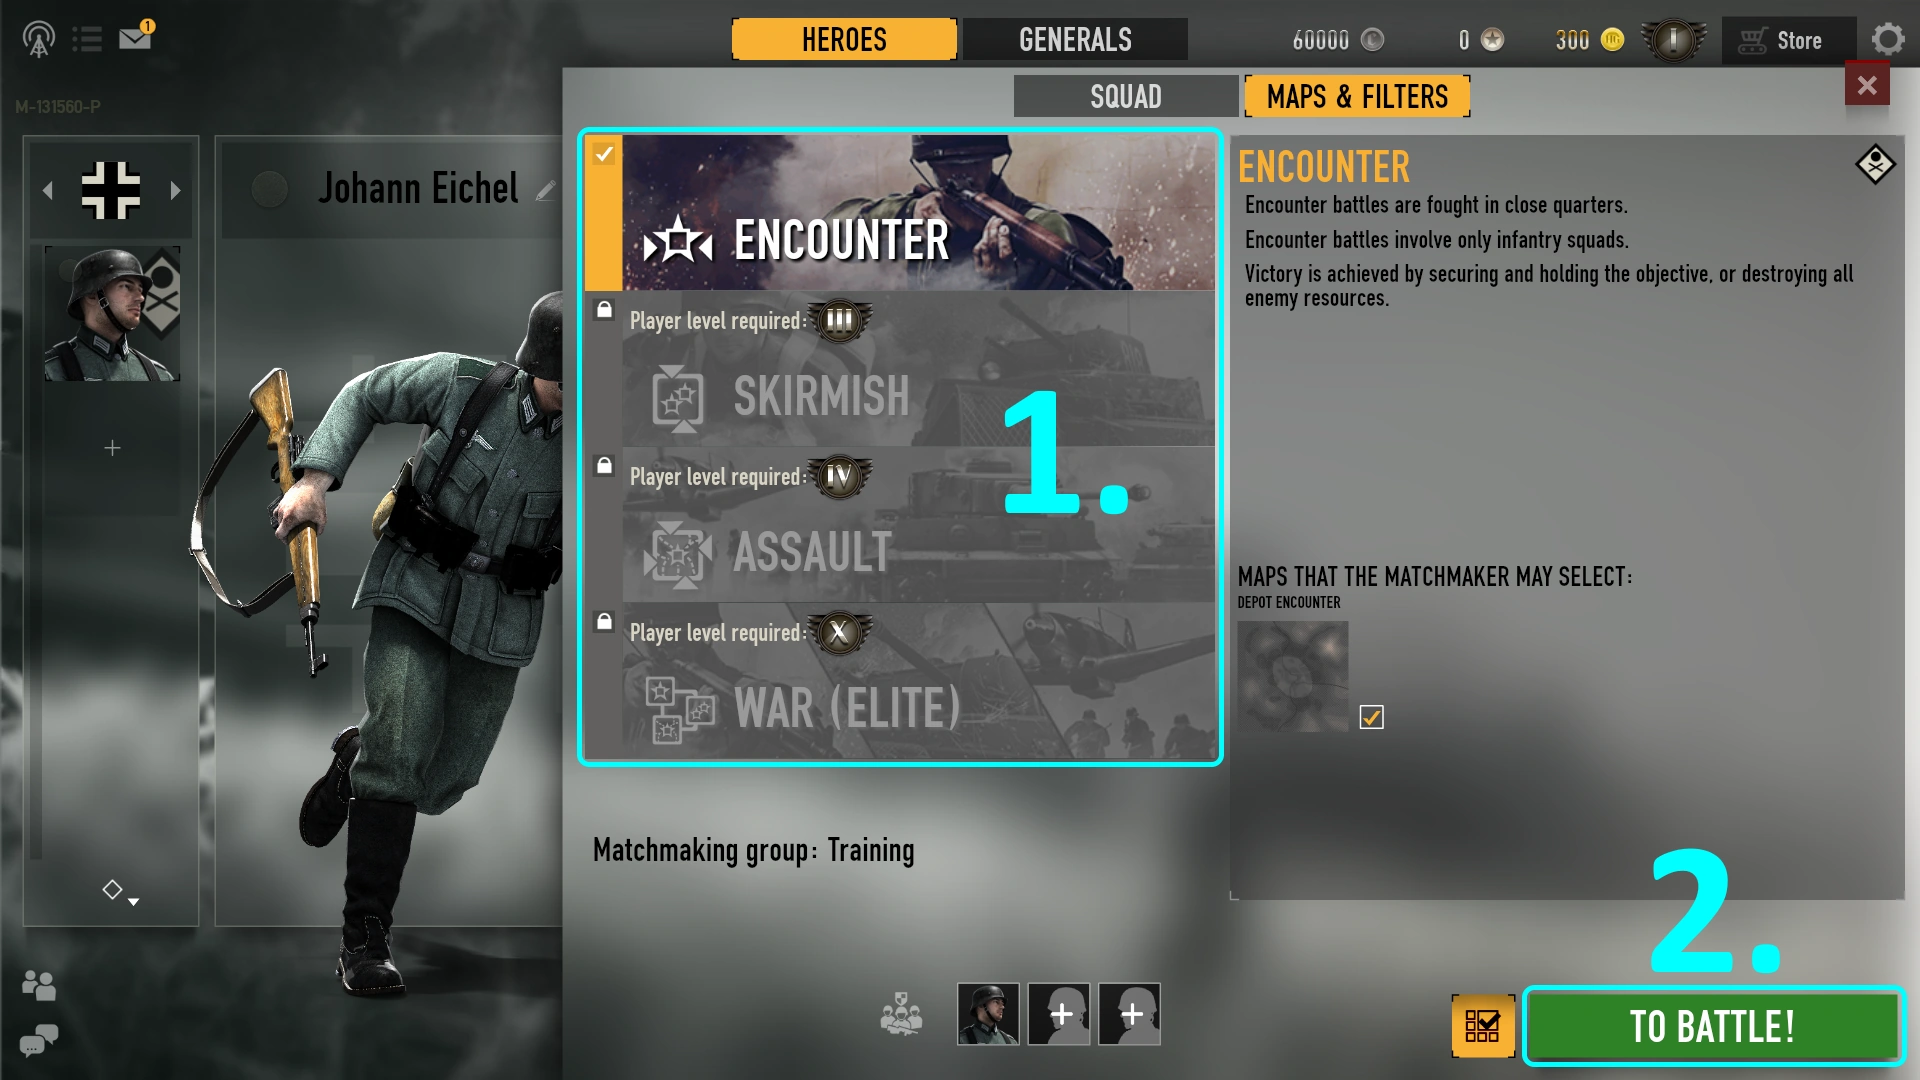
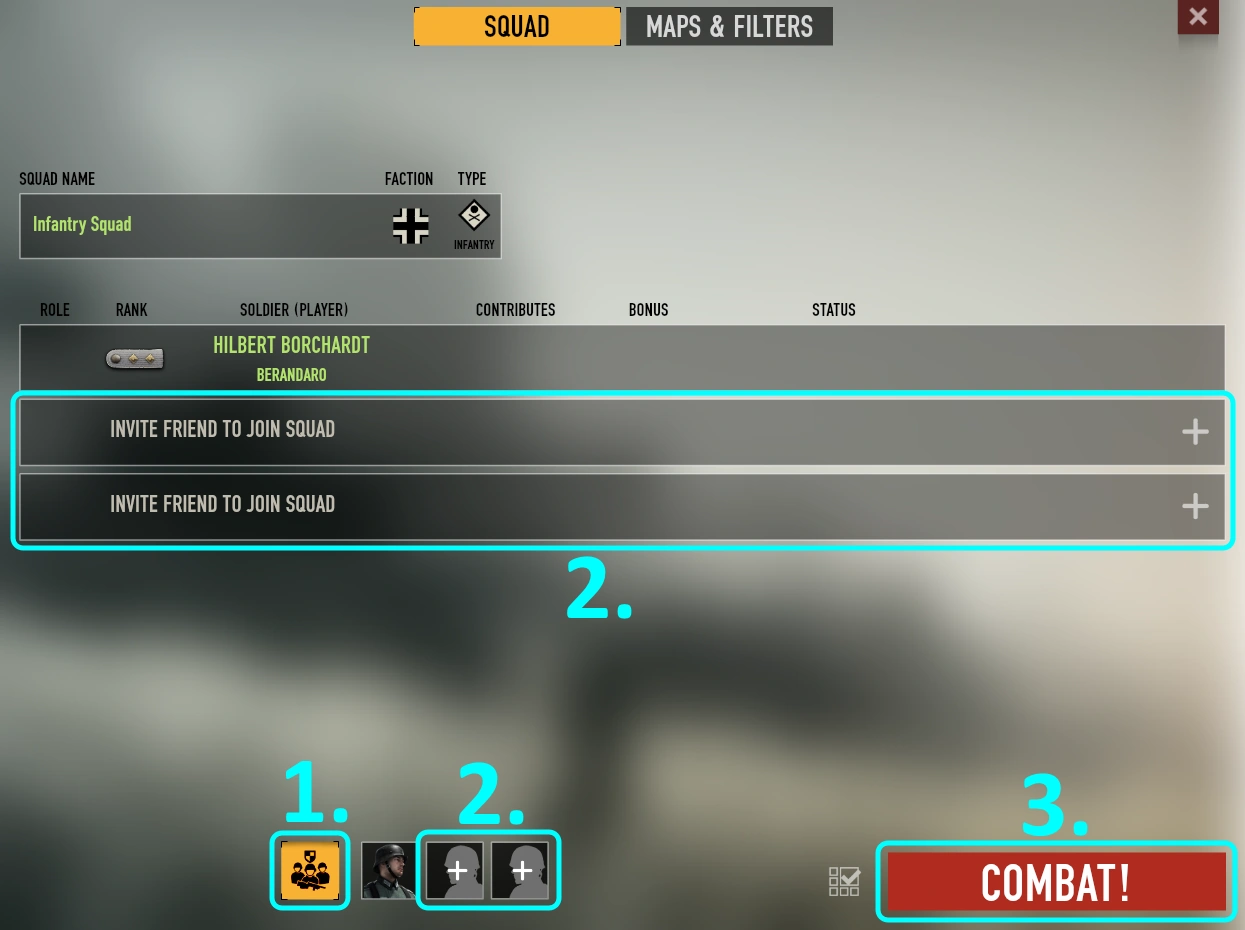
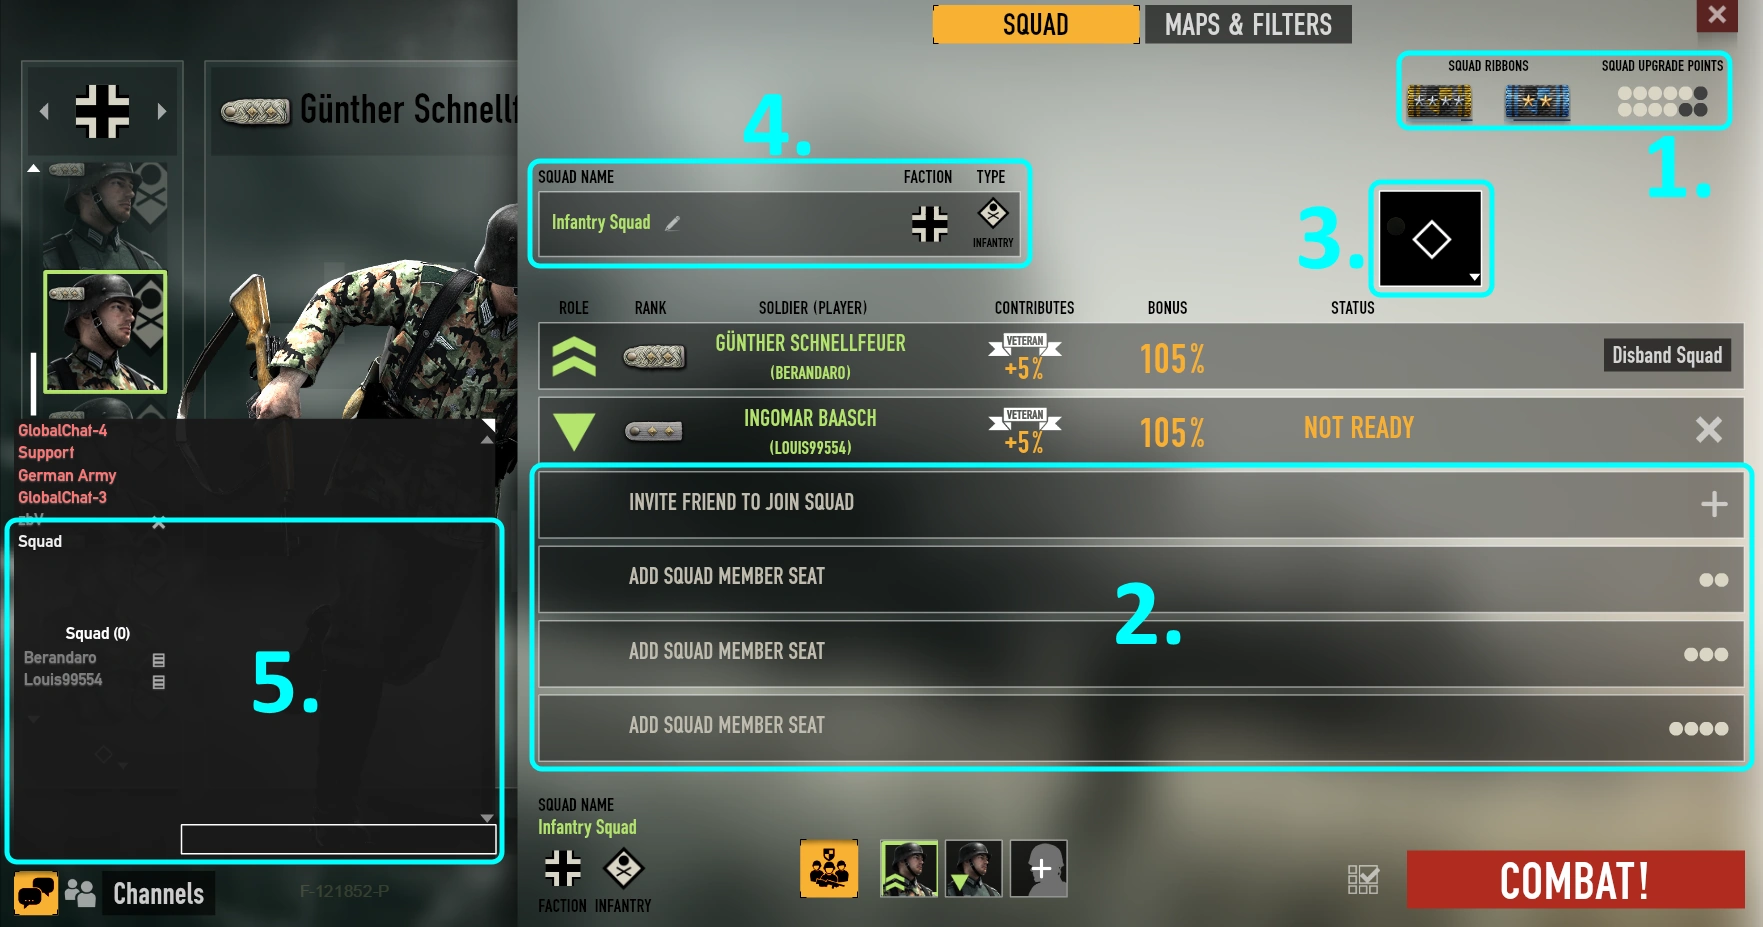
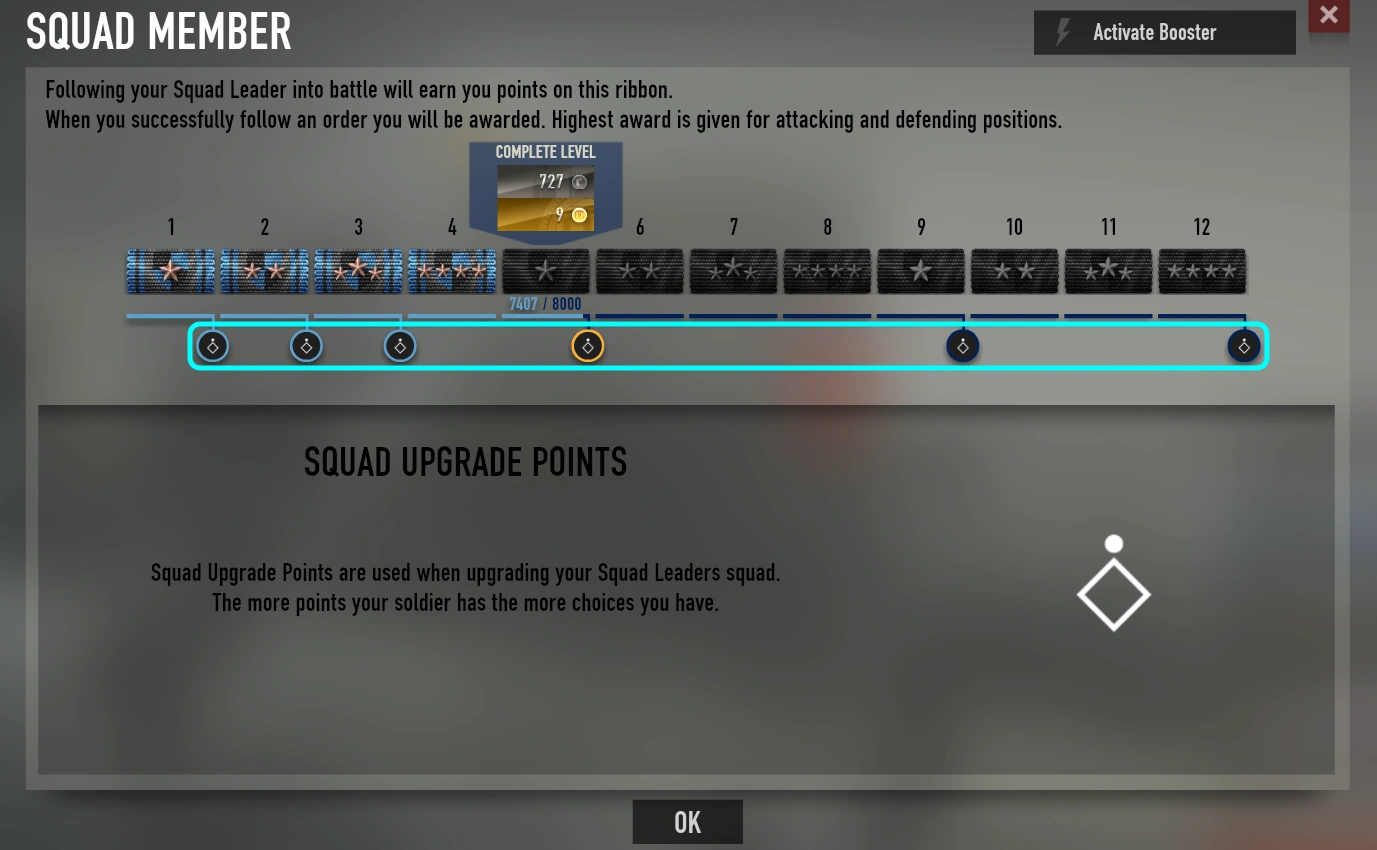
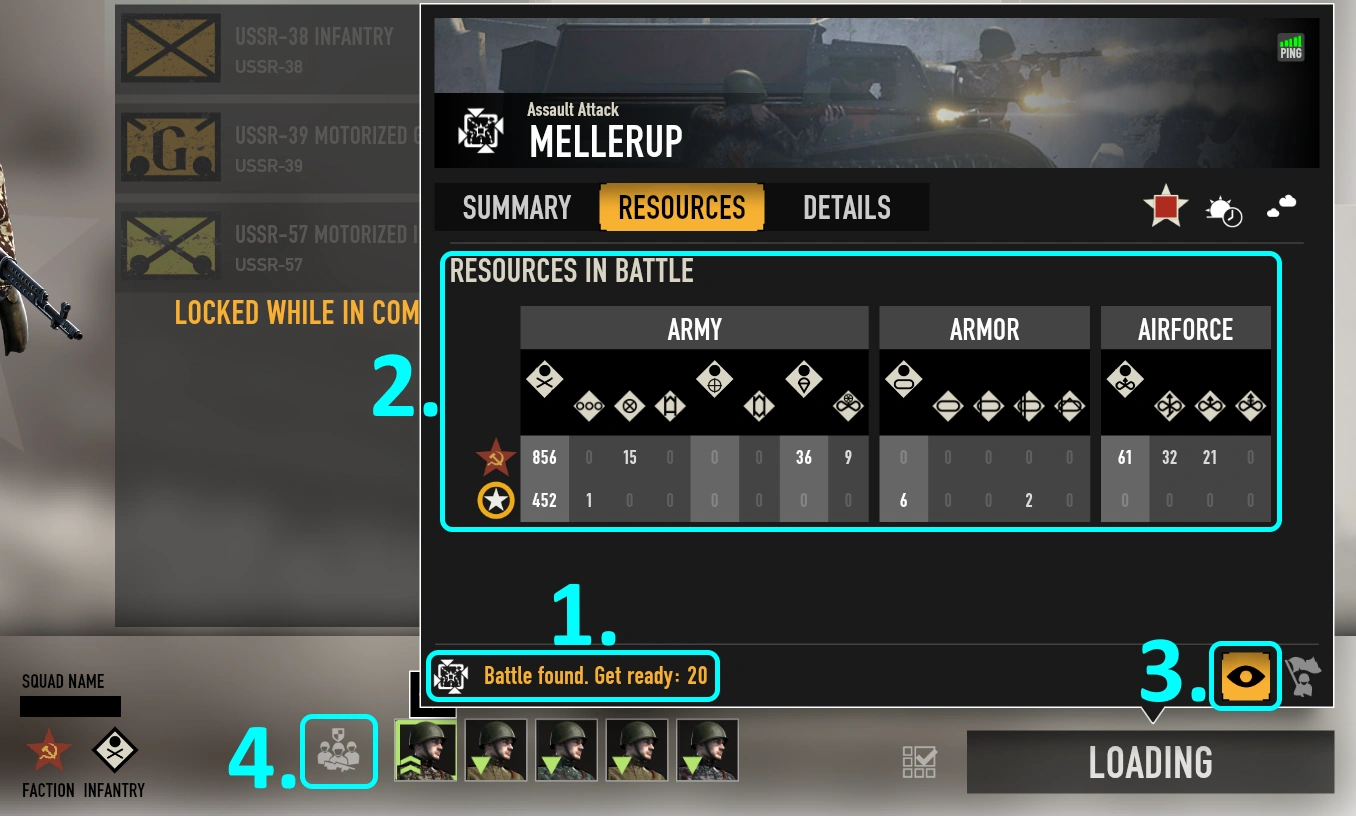
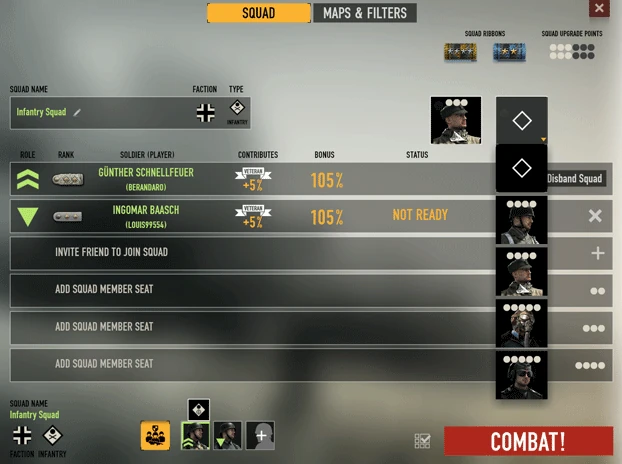
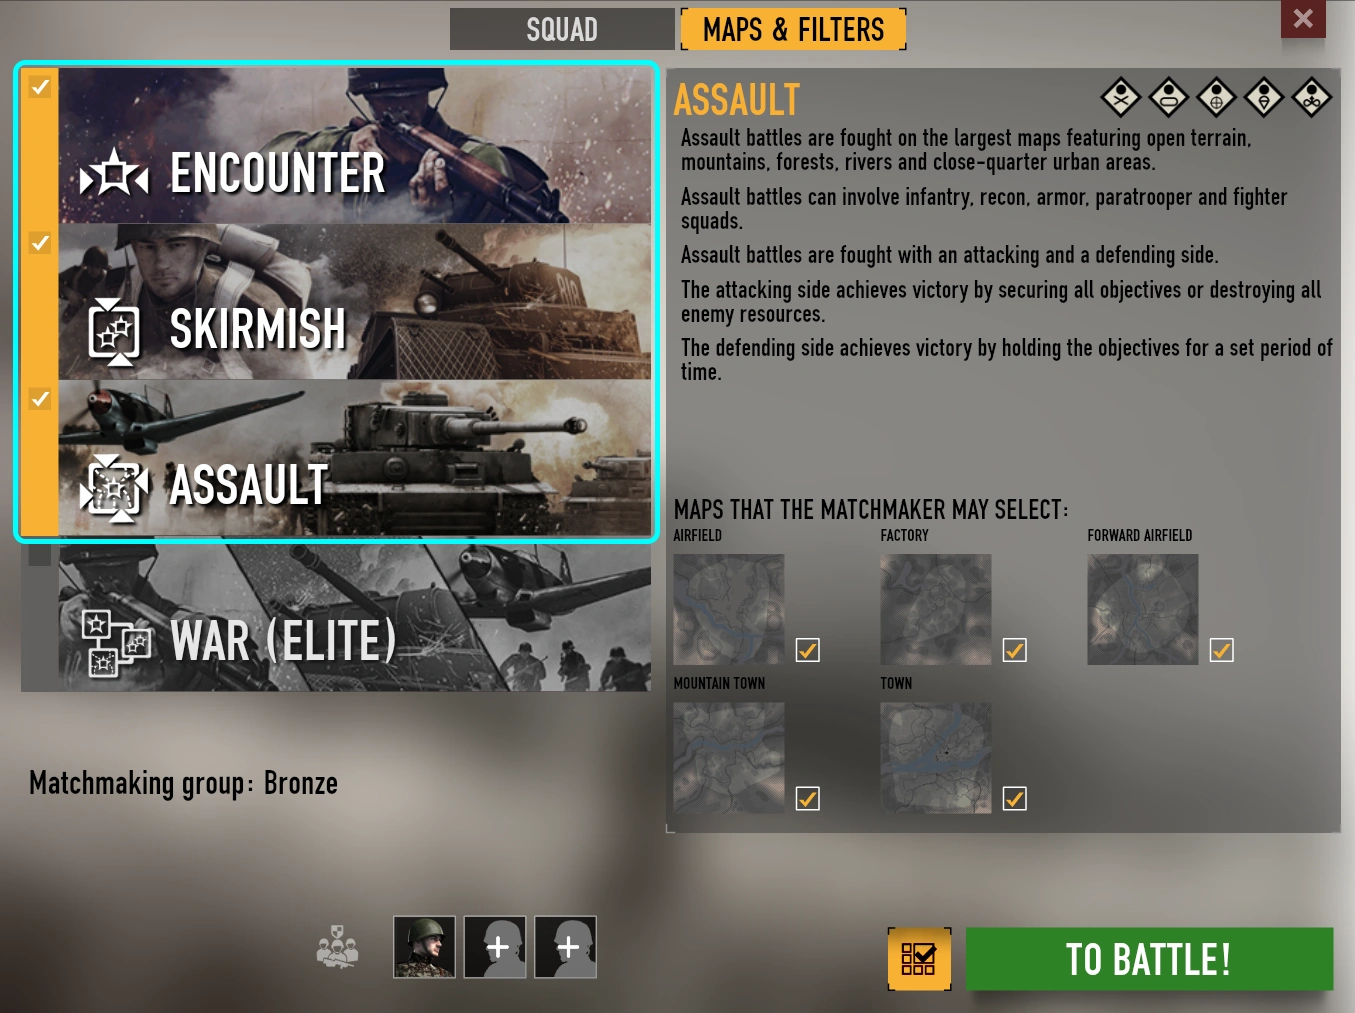
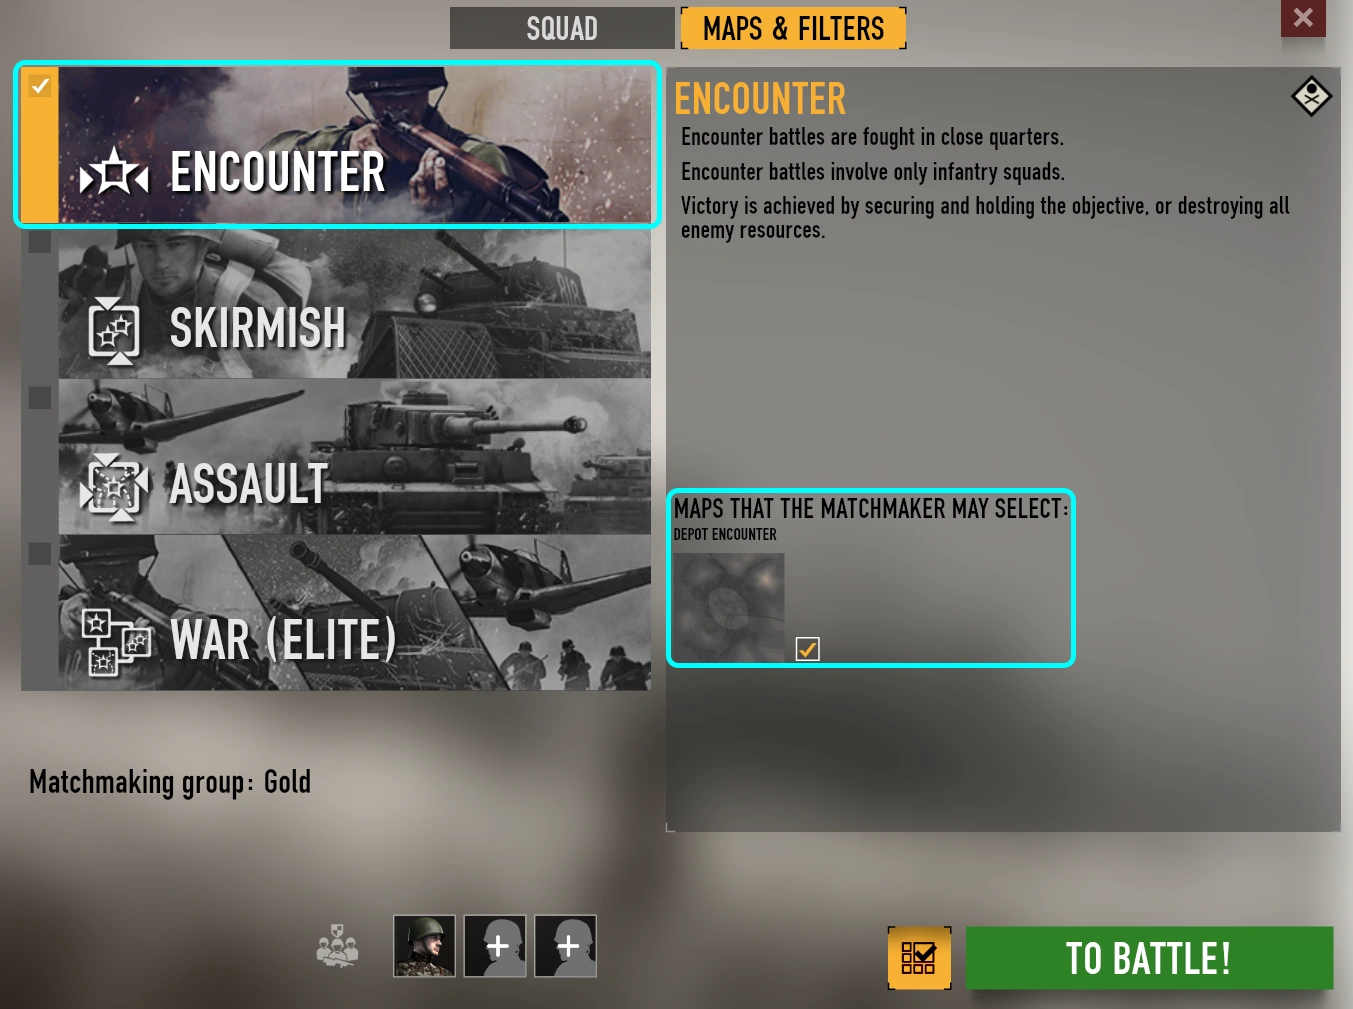
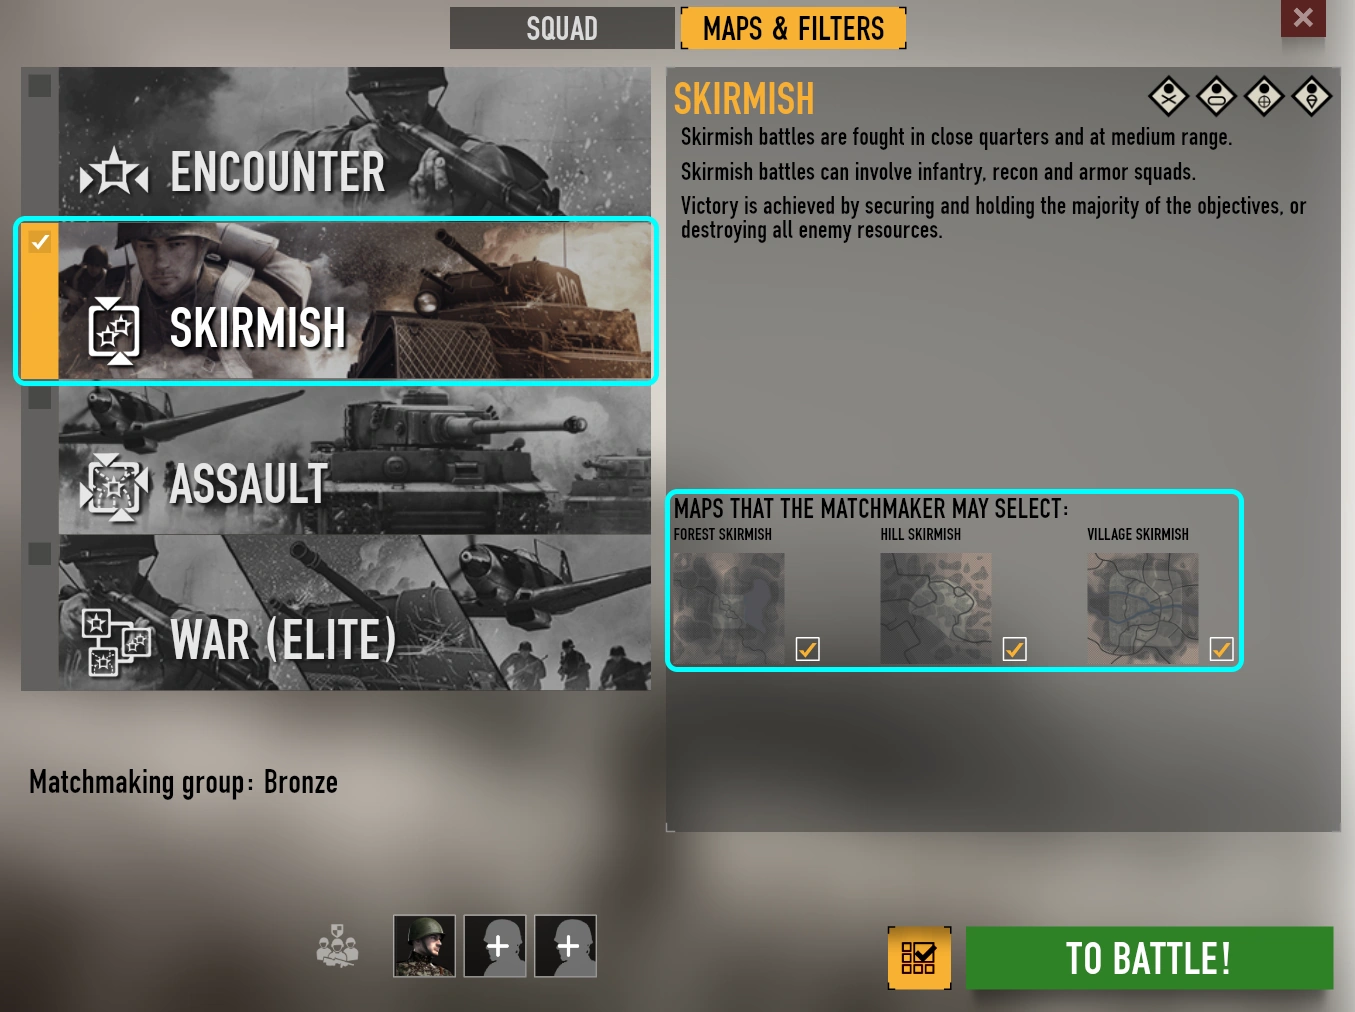
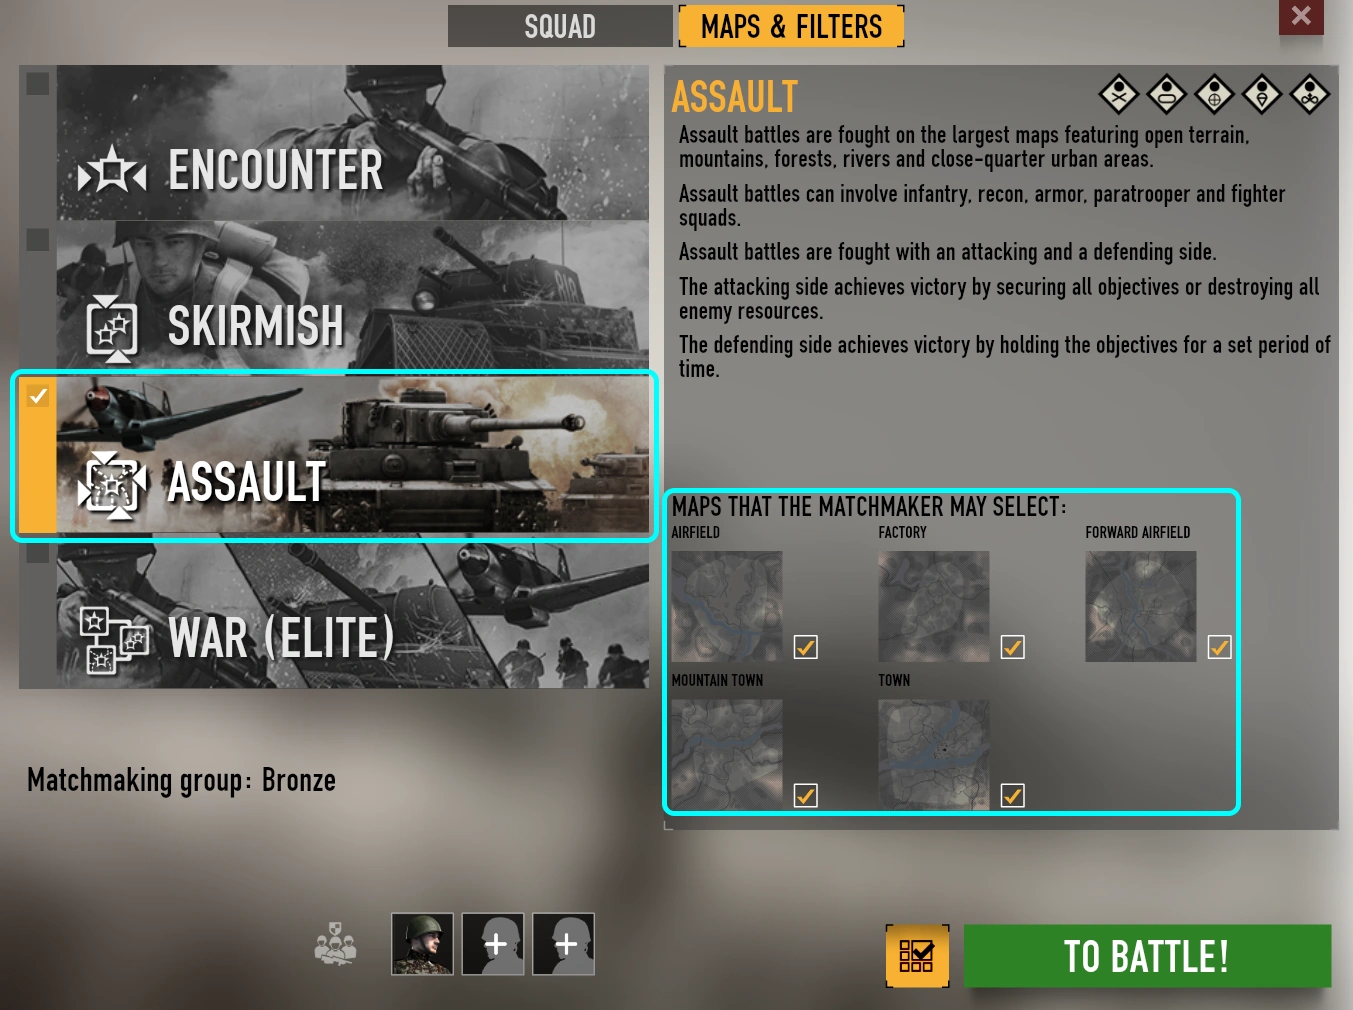
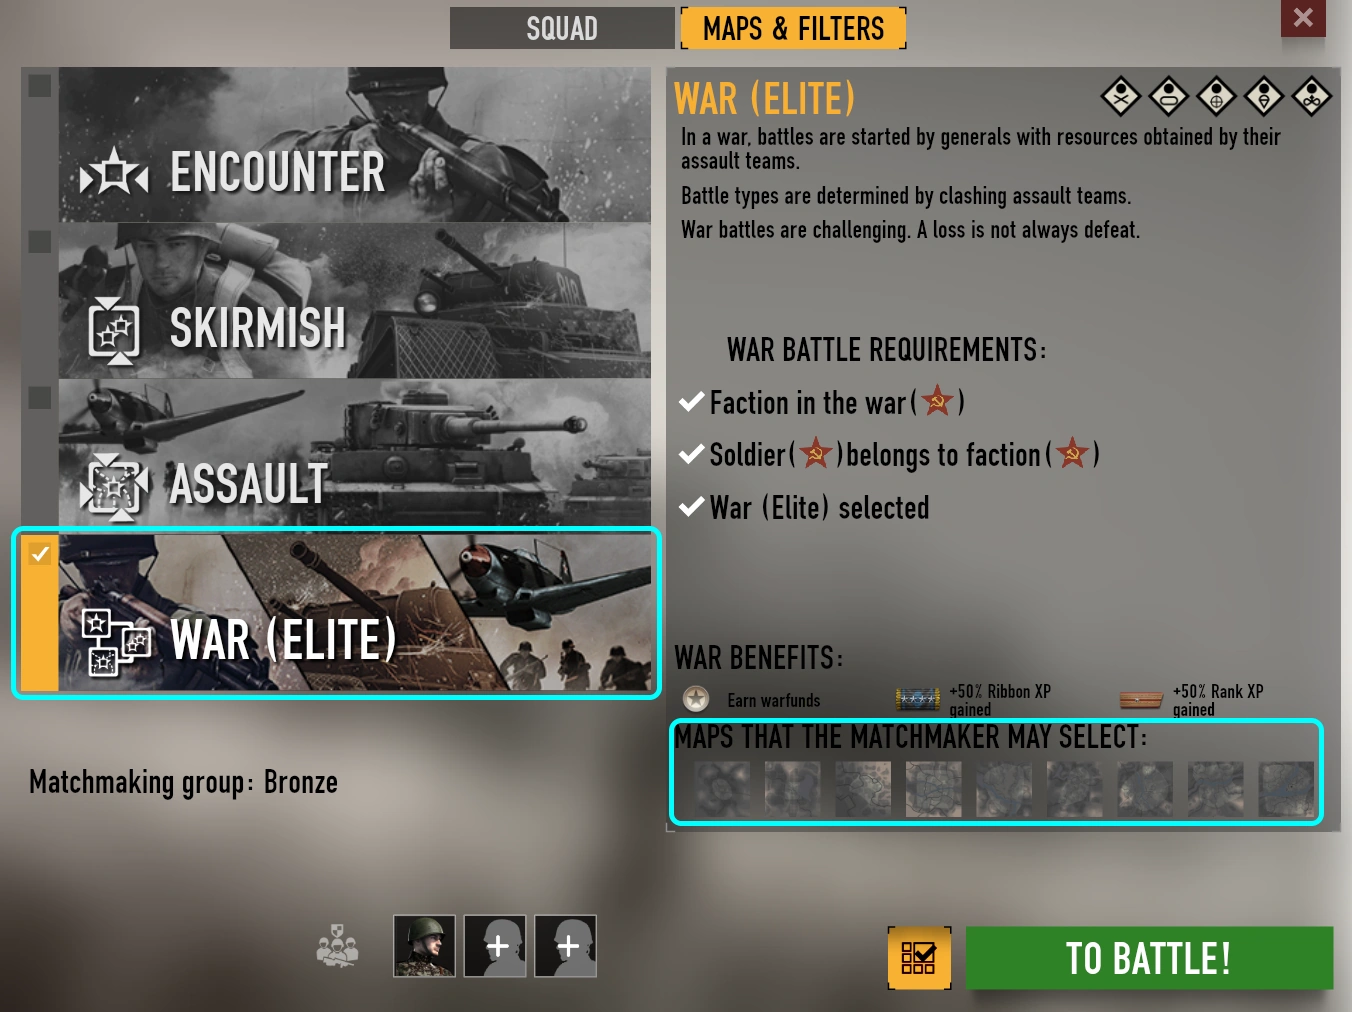
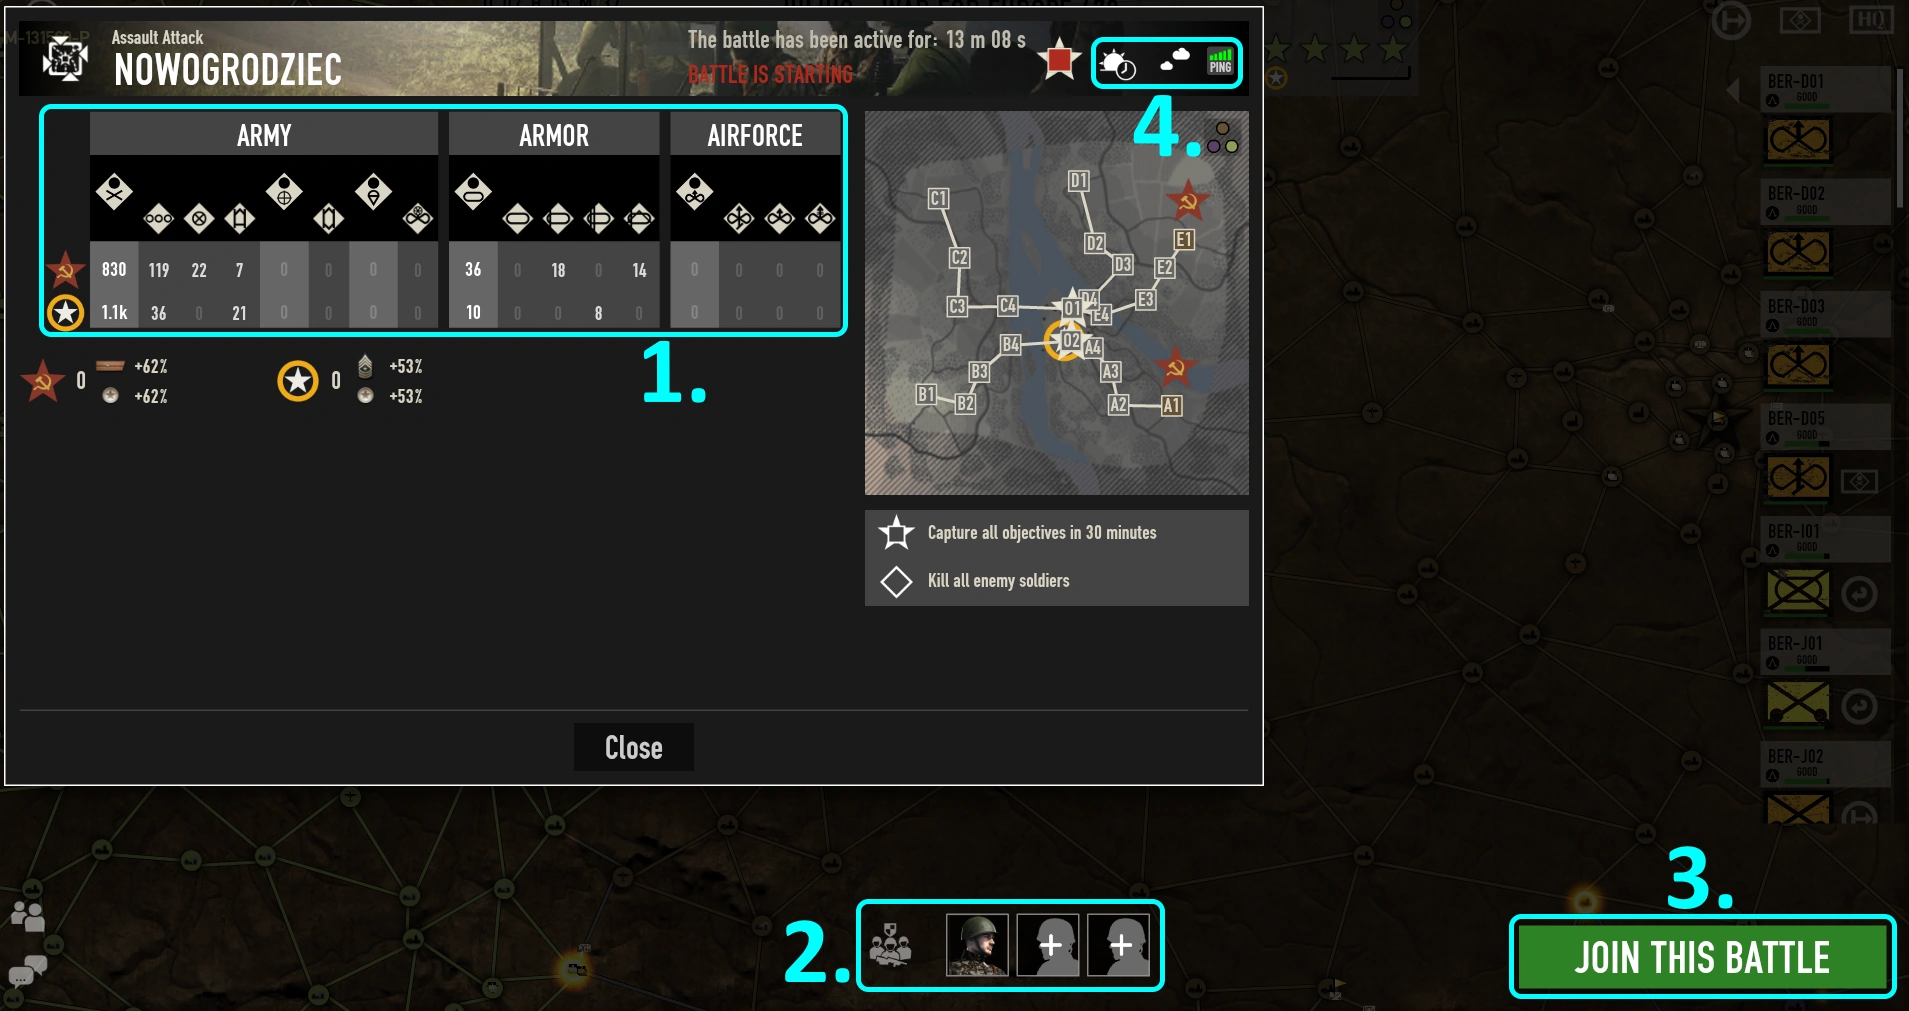

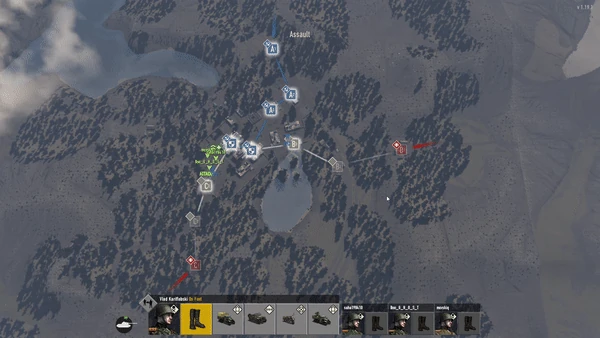
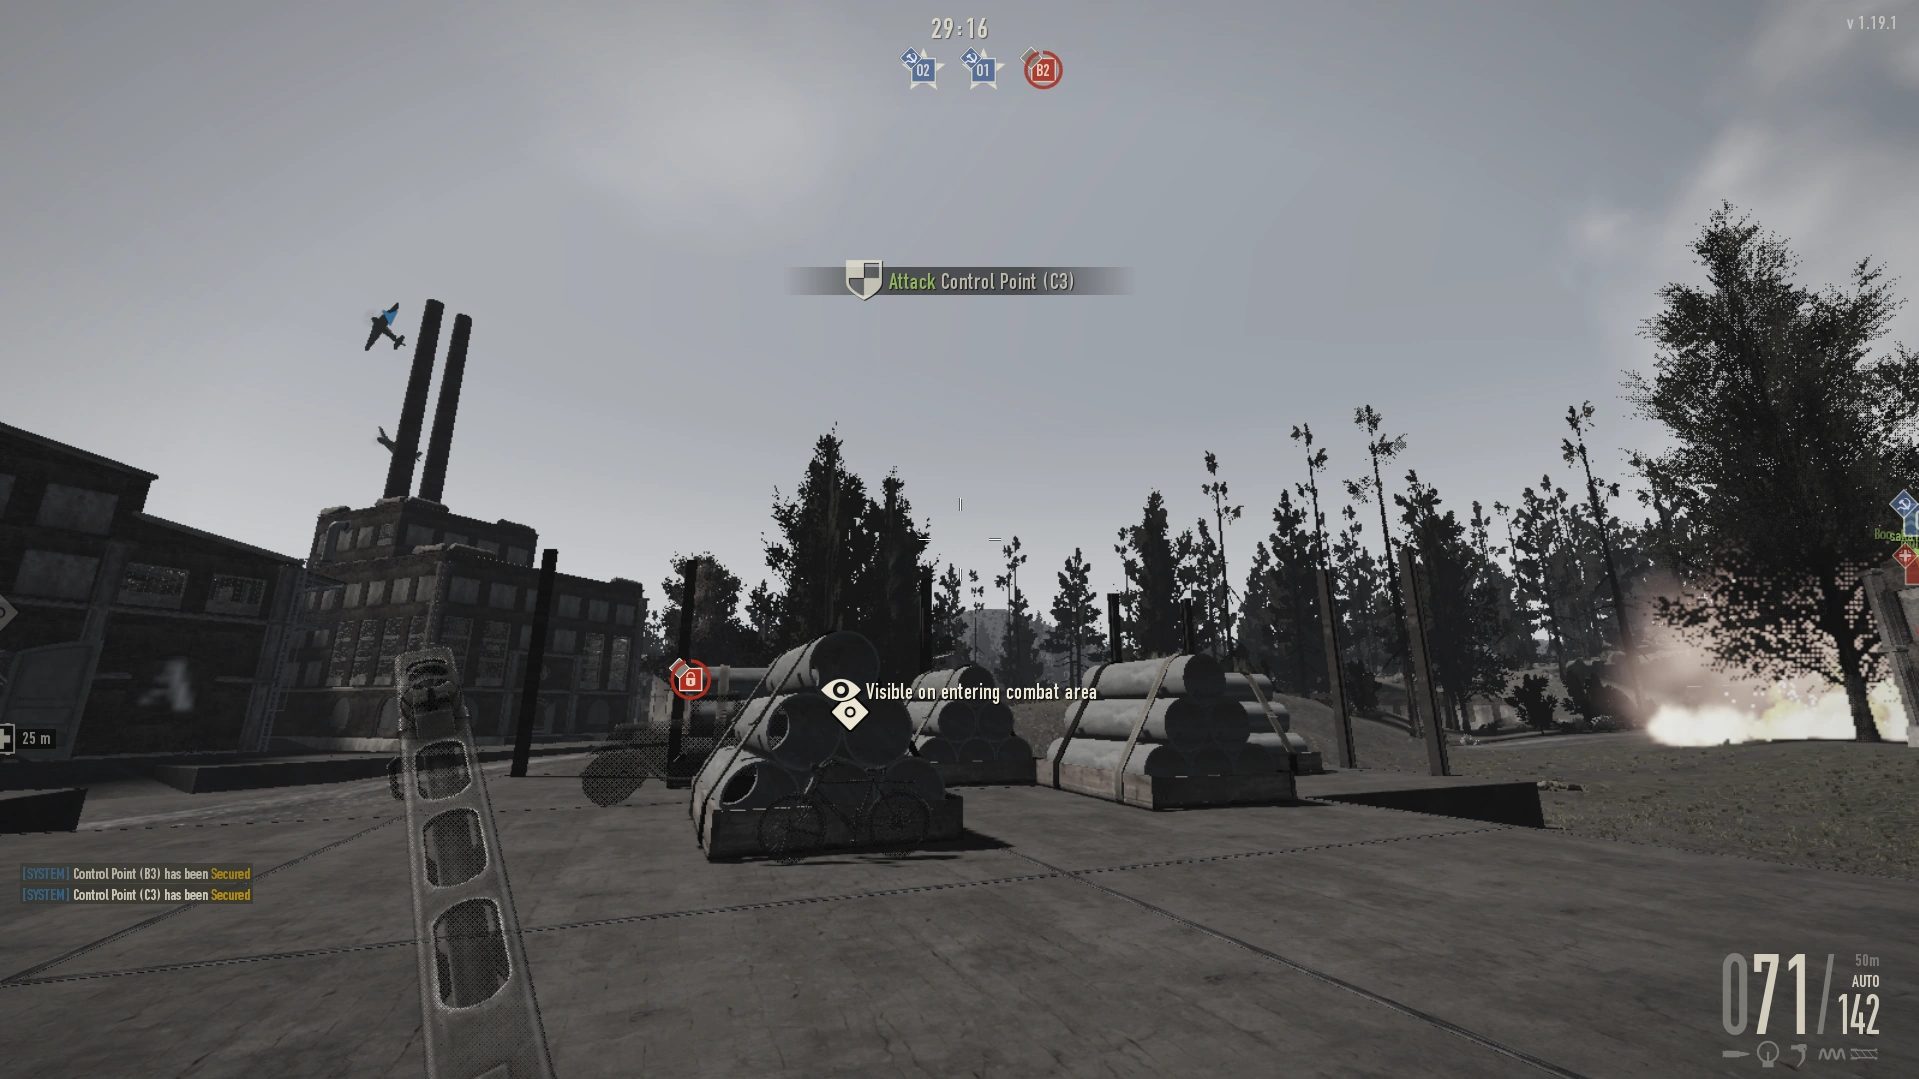
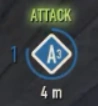
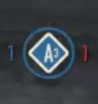
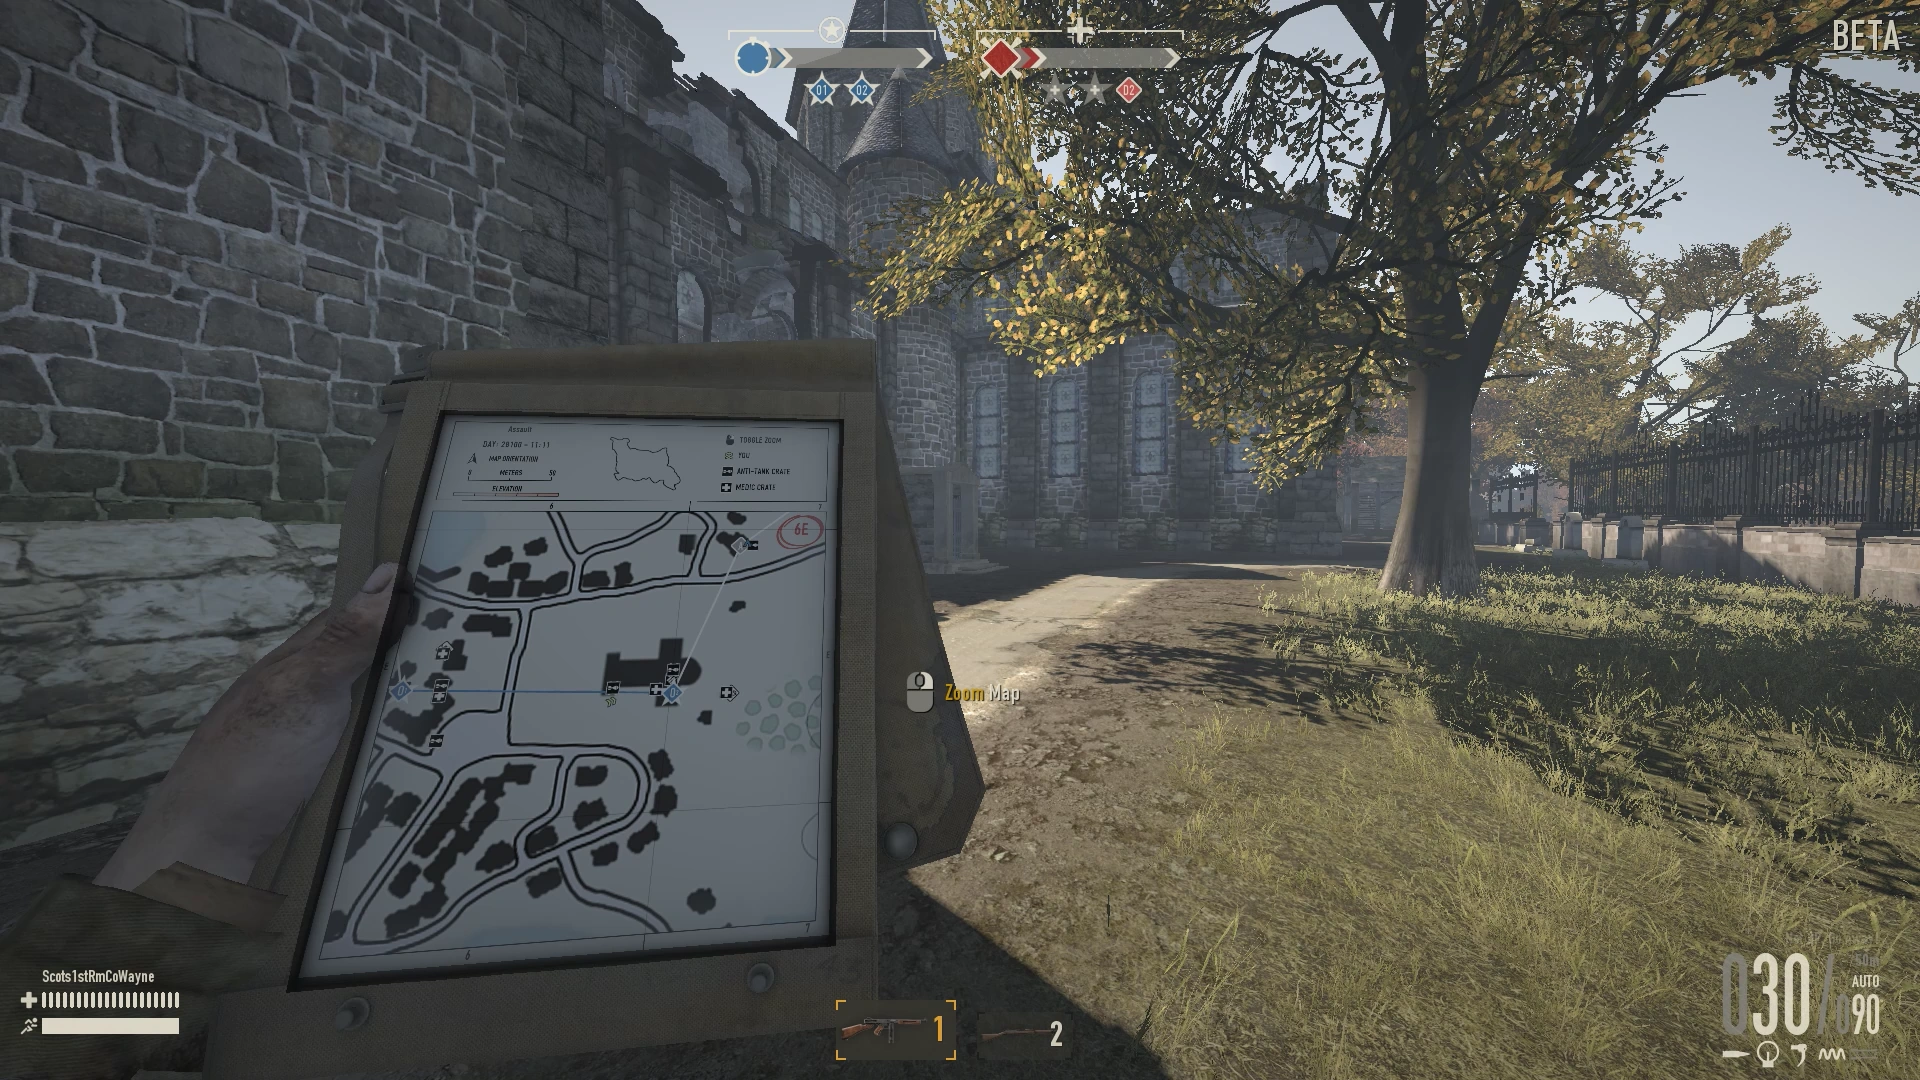


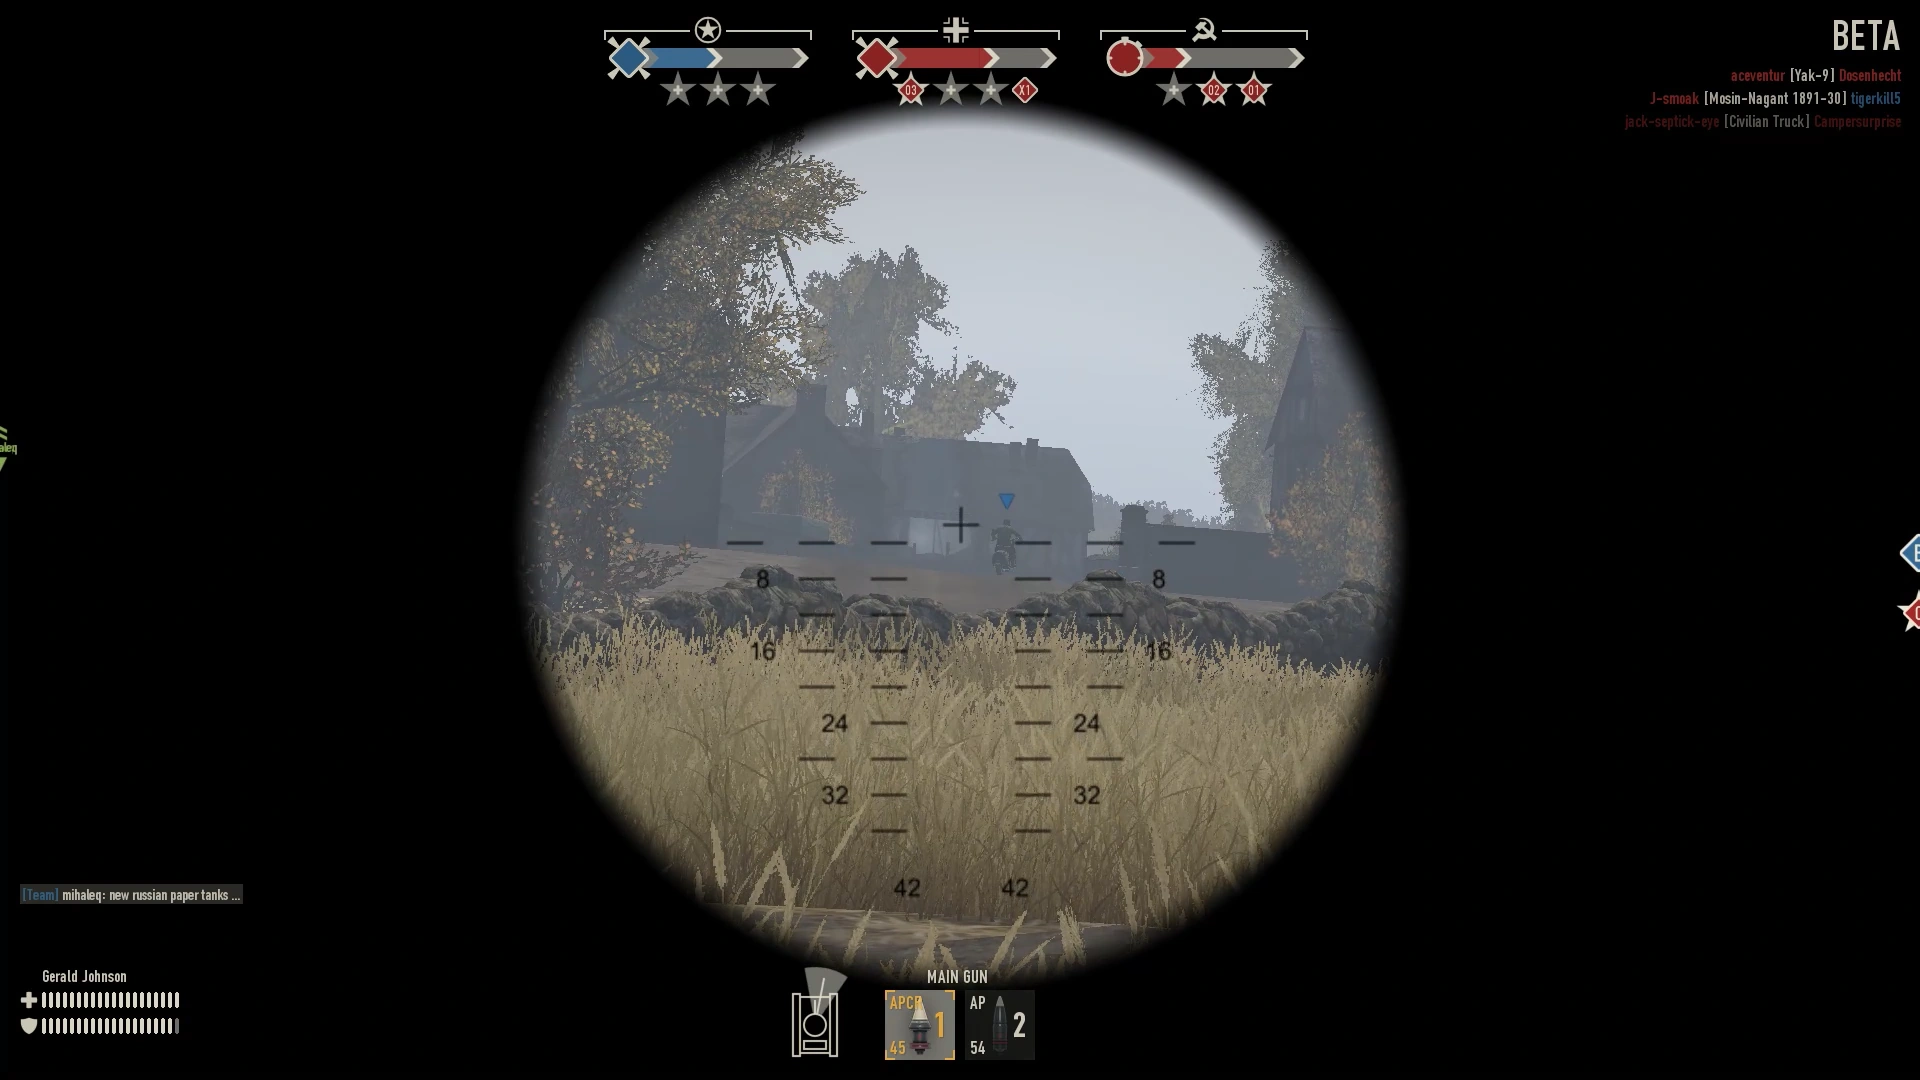
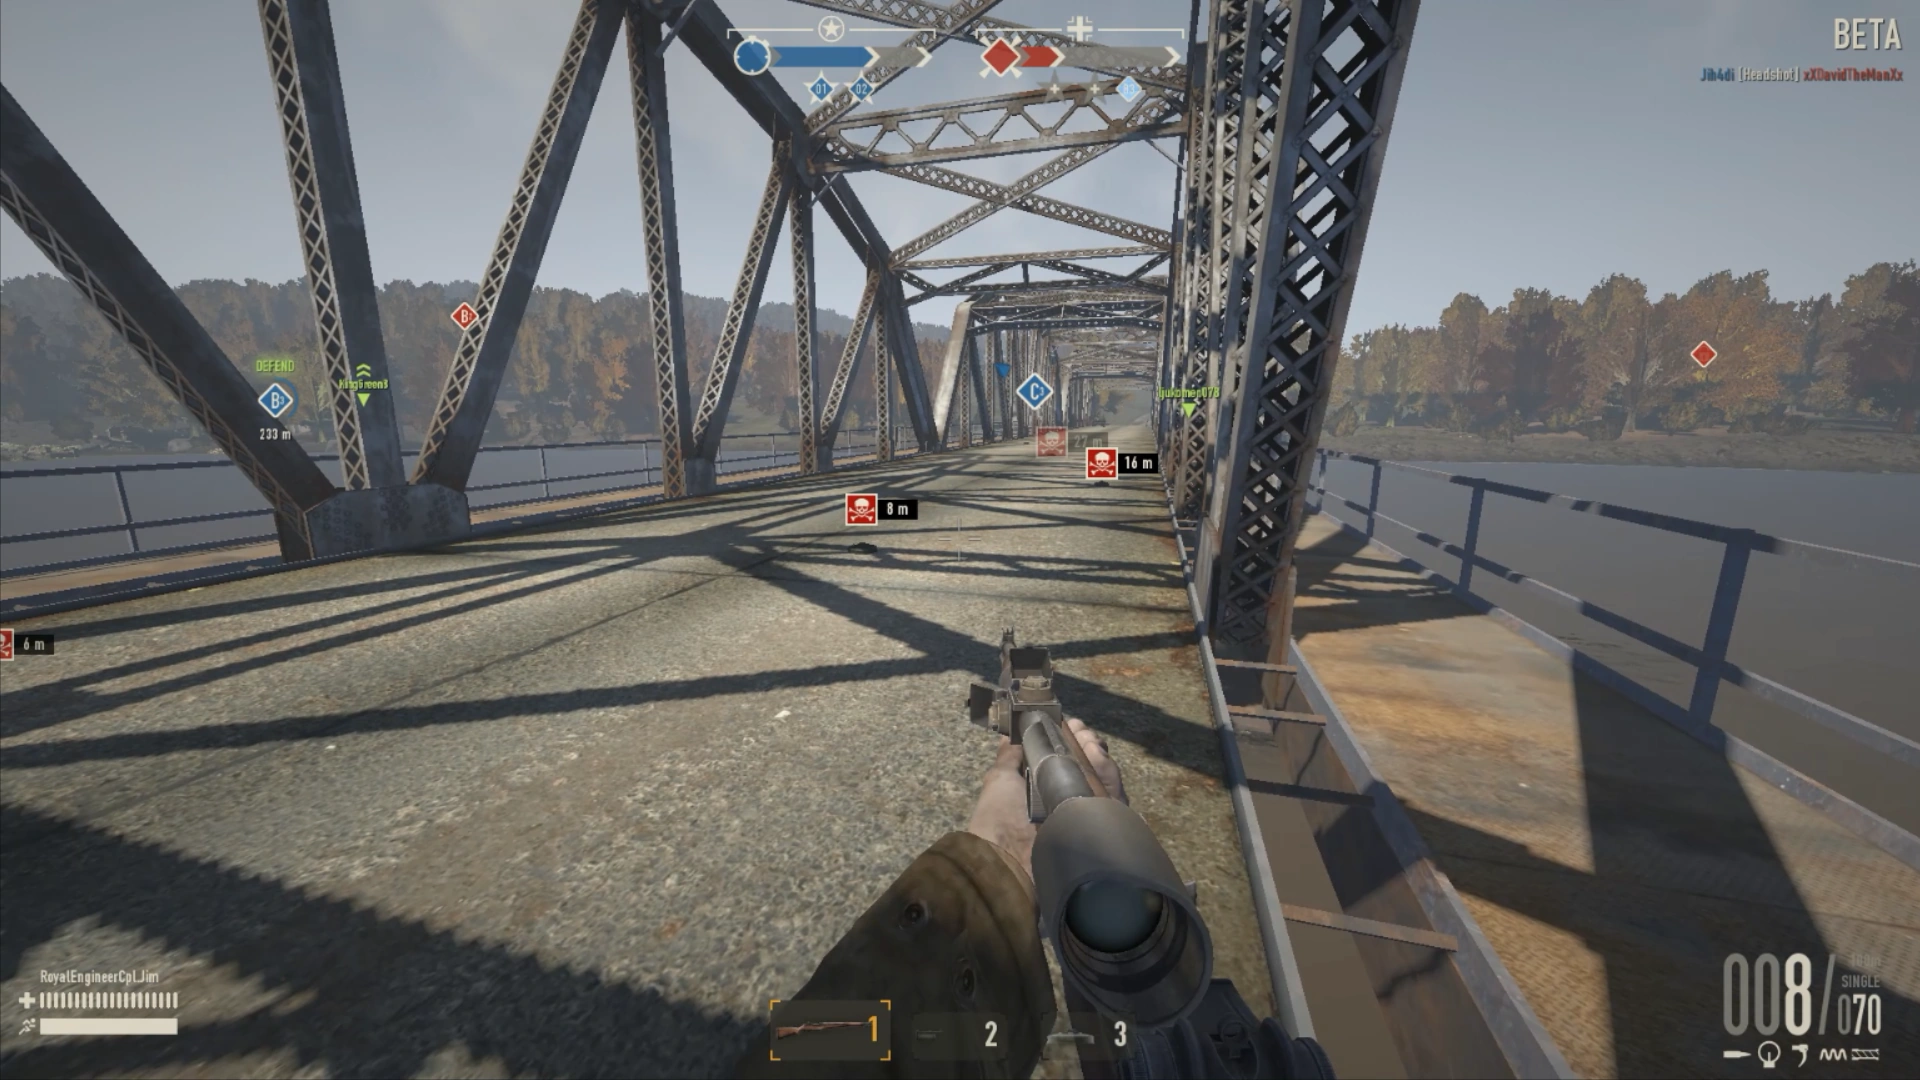
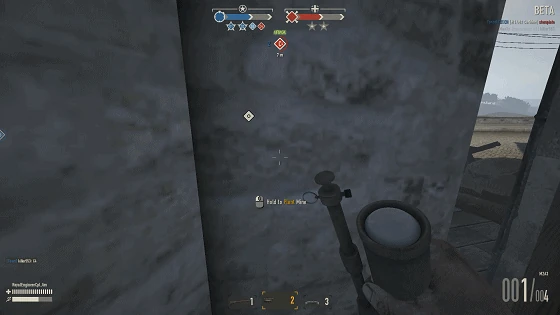
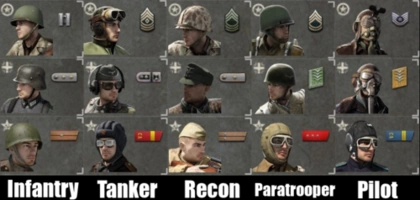
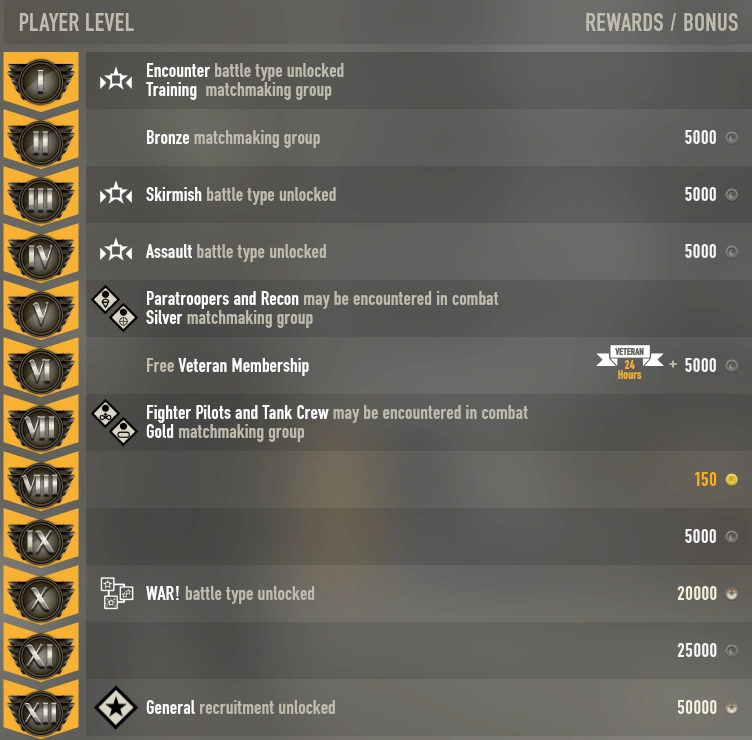
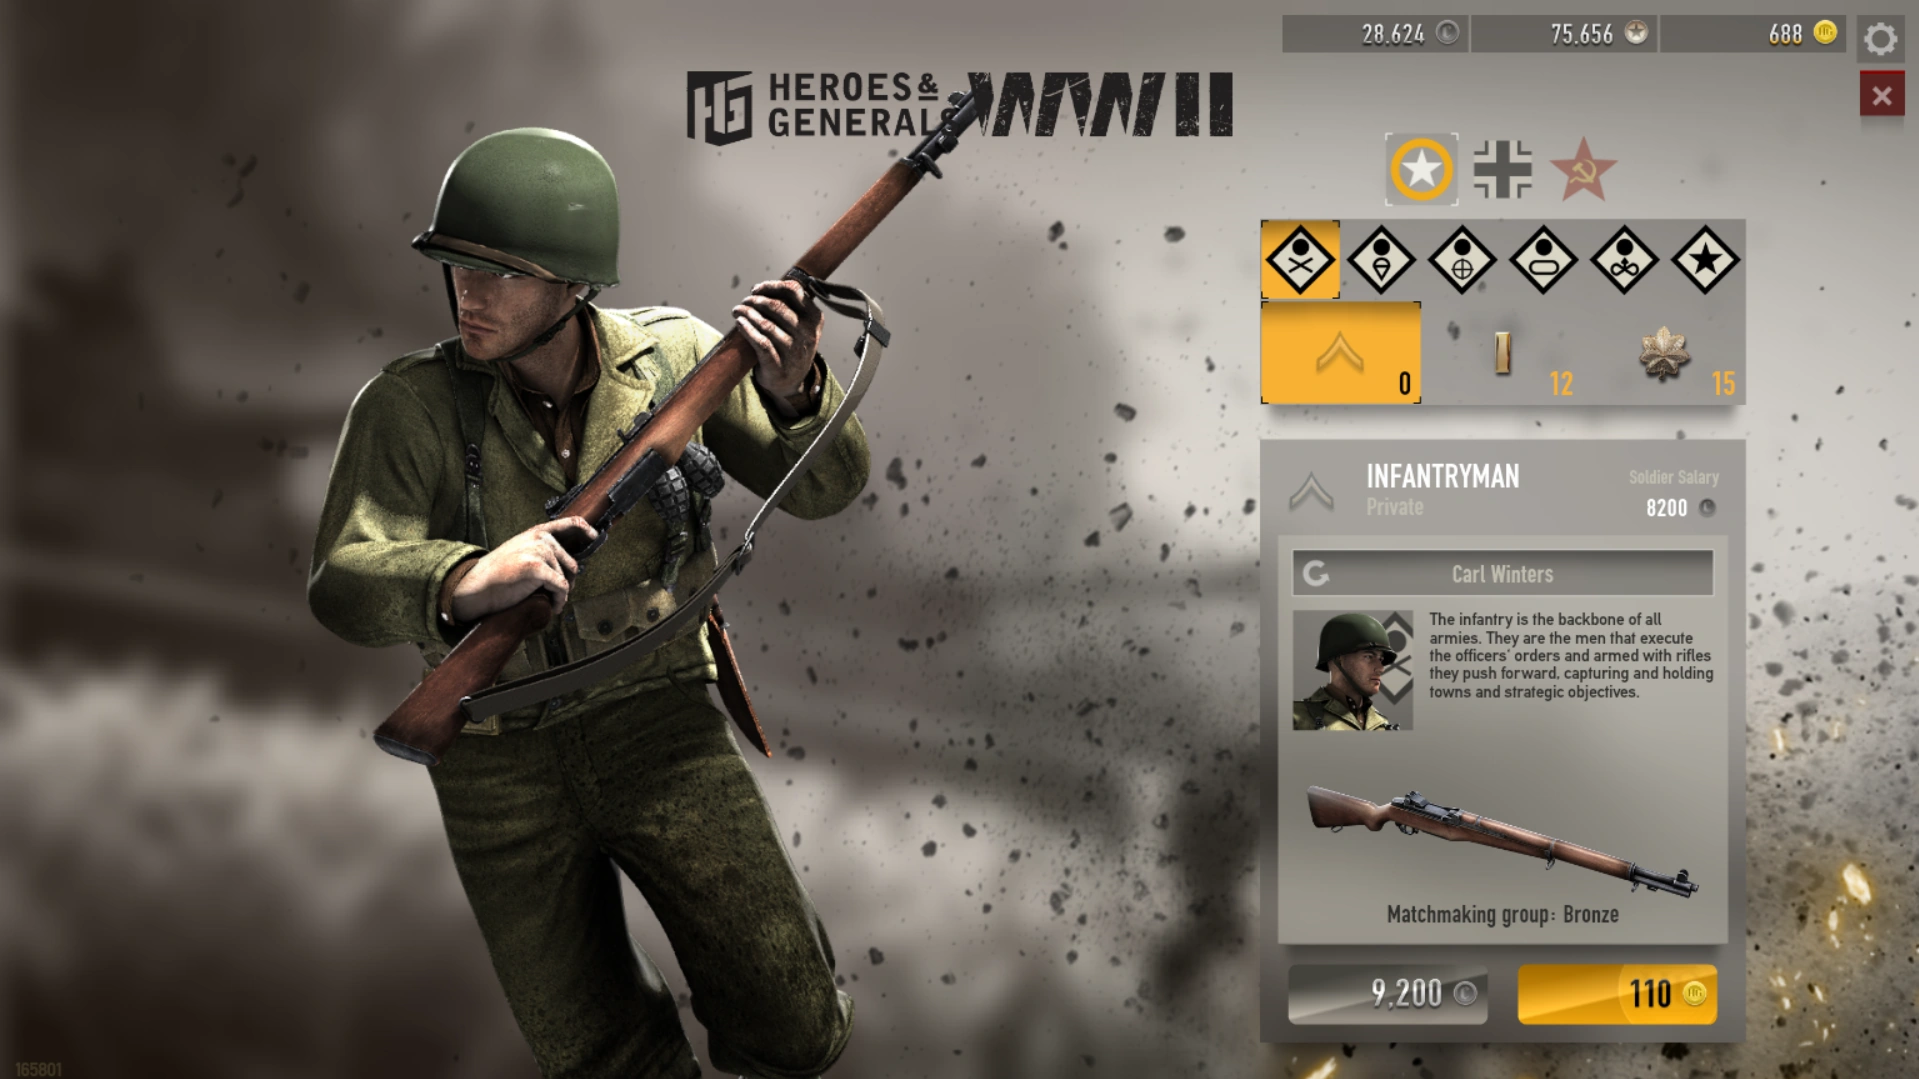
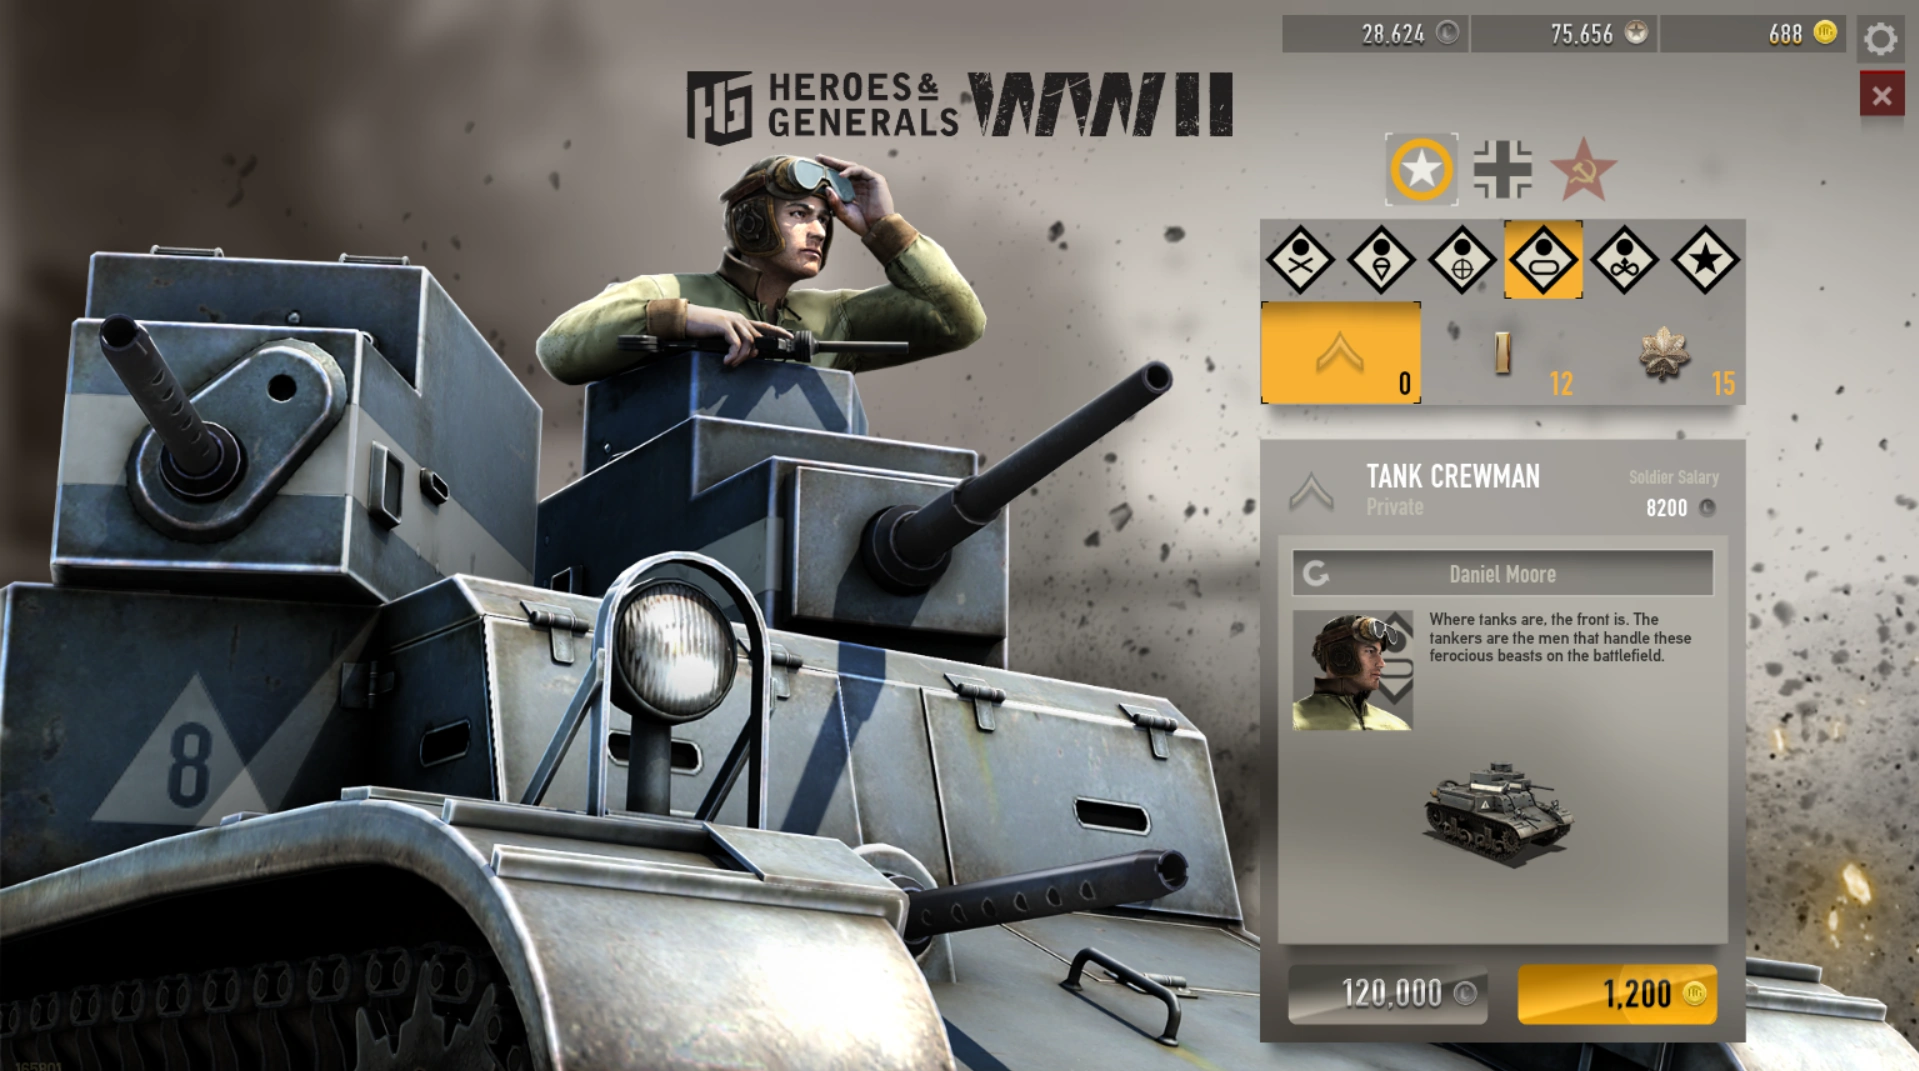
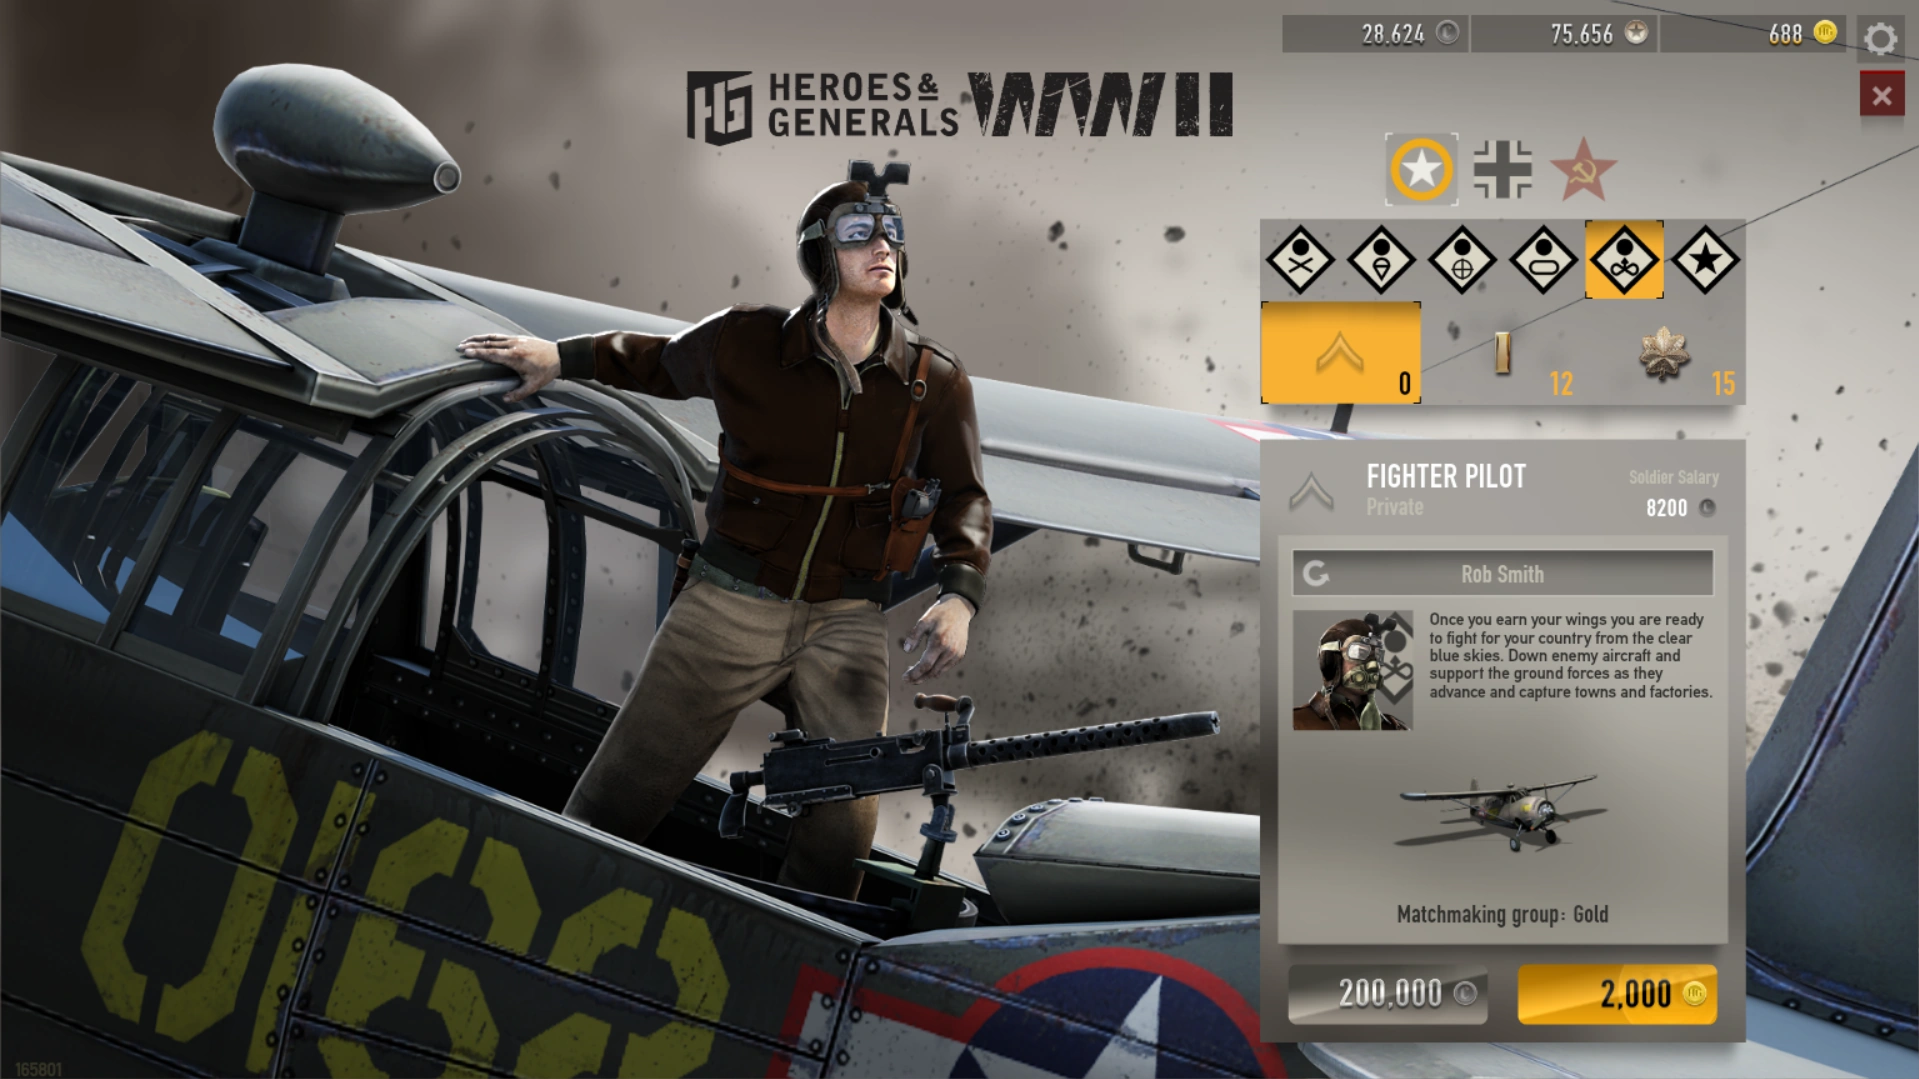
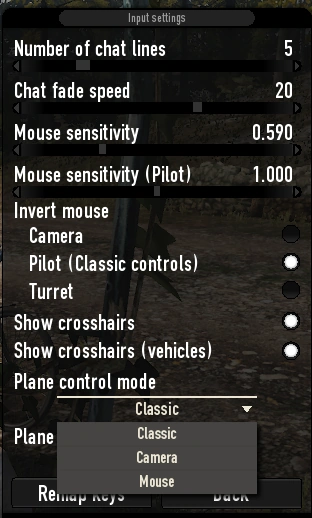
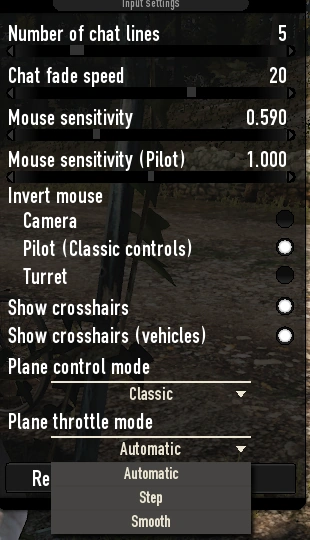
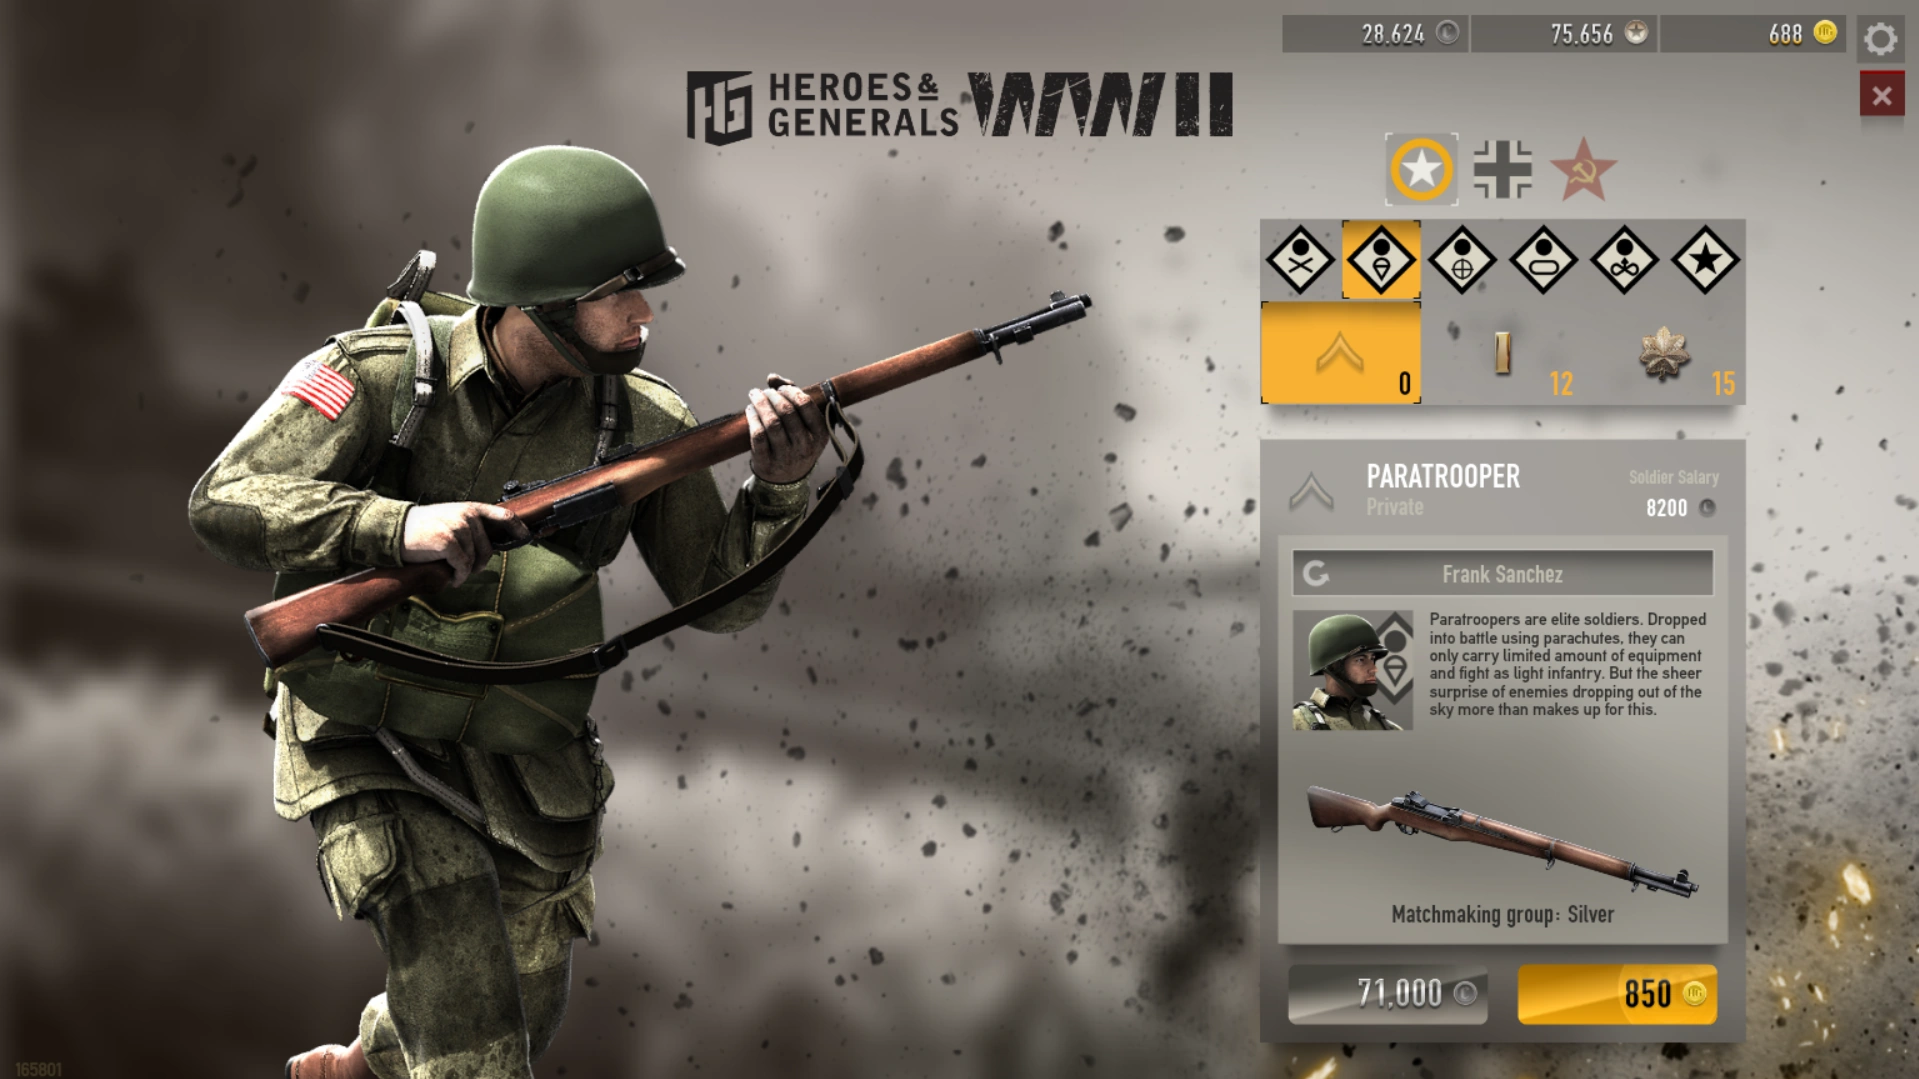
